

Introduction: Basketball Robot With Intel Edison


He shoots! He scores! The crowd goes wild! Let’s build a robot that plays basketball with you. This tutorial is a step-by-step guide for a simple and small differential-drive robot that uses the Intel® Edison. You’ll get to know a few more tricks on how to use Mini Breakout Kit and set up a node.js server for the communication.
Before you begin, make sure you’ve followed through Intel® Edison Getting Started guide, and our tutorial.
This means that your Intel® Edison:
- has updated firmware (check this)
- is connected to the local wireless network
- can connect to ssh/scp through microUSB or WiFi
Here is a video of the completed project.
This tutorial was originally published on Intel Communities here.
Step 1: Needed Components


- 1 Intel® Edison with Mini Breakout Kit
- 2 continuous micro servo motors
- 1 CD40109B level shifter
- 1 10k ohm resistor
- Male Pin headers
- Female headers
- 1 50 mm x 70 mm protoboard
- 4 AAA batteries
- 1 AAA battery holder
- 9V battery contact
- 1 battery holder power connector
- Jumper wires
- 1 lithium battery
- Rubberbands
- Stiff wire
- Copper tape
- Screw
- Nuts and bolts
- Scrap sheet of plastic
- Ping pong ball
- Glue
Step 2: Needed Tools
- Soldering iron and solder
- Scissors
- Screwdriver
- Pliers
Step 3: Sort the Lasercut Pieces

Place nuts into Part B5 first for easier assembly
Attachments

Step 4: Solder the Electronics


Use the schematic to solder the electronic components together
- Solder female headers onto the Intel® Edison and male pin headers onto the protoboard. This will make it easier to reuse the mini-breakout for later
- Attach battery and protoboard
- Secure the battery pack to Part B5 with the contacts towards the back edge
- Using Part A1 as spacers, secure the protoboard to Part B5 with the pin headers towards the back edge
- Attach the sides
- Secure Parts B4 and B6 to Part B5 with the motor opening towards the front edge
- Insert and secure the motors
- Attach connections to protoboard
- Connect the Intel® Edison and Mini Breakout onto the protoboard
- Connect the battery pack and servos
- Connect a fully-charged lithium battery to Intel® Edison
- Identify the connector J2 on left top side of the mini-breakout board
- Connect the red wire to the left pin (J2-1) and the black wire to the right pin (J2-2)
NOTE: The battery is charged when the bottom microUSB port (J16) is connected. Make sure to plug it in for charging.
Step 5: Attach Front Wheels

- Make tread on the tires by weaving a rubber band back and forth through the slots
- Push the servo arm into the recess
- Secure to the servo
Step 6: Attach Back Wheel

- Cut a 100 mm length of stiff wire and slide Part A2 to the middle
- Bend the sides of the wire up on both sides, then bend the ends slightly. Insert the ends into Part B2
- Attach Part B2 to the assembly
Step 7: Make the Basketball Sensor Switch


- Solder one end of basketball sensor wires to a small strip of copper tape
- Tape over the center hole on the bottom of Part B8
- Cut a 40 mm x 10 mm piece from some scrap plastic to make a switch
- Fold it in half and cover one half entirely with copper tape
- Trim the plastic so that it bends easily under the weight of a ping pong ball
- Punch a small hole in the middle of the other half
- Screw through the middle of Part B8 and secure the plastic switch
- Insert the other basketball sensor wire into the side hole of Part B8 and solder to a small strip of copper tape
- Tape onto the top of the copper half
NOTE: The screw acts as a contact with the copper tape. Adjust the screw height and shape of plastic switch so that the connection is activated easily.
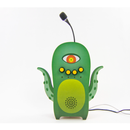
Step 8: Make Basket

- Attach Part B8 to top of assembly
- Glue and insert Parts B9 into Part B8
Step 9: Close the Robot

Attach part B7 to assembly
Step 10: Programming the Robot
The first step will be to update the mraa library which is used for driving the GPIO pins with various languages in Linux.
SSH into your Intel® Edison board with either the serial port or the IP address.
Type the following commands into the terminal:
echo "src maa-upm http://iotdk.intel.com/repos/1.1/intelgalactic" > /etc/opkg/intel-iotdk.conf
opkg update
opkg upgrade
It will take a few minutes for the update process to finish.
Download the file from the attachment, copy it into Intel® Edison with scp. It includes the files needed for running the server.
Attachments
Step 11: Start the Server
Go to the directory “cd ~/robotServer” and run “node index.js”. If you see “listening on *:3000”, congratulations! It is running
Step 12: Using the Robot
After the server is established in the Intel® Edison, access the web interface to control the basketball robot
If you don’t have the IP address to your Intel® Edison board, type “ifconfig” in the terminal and it’s under the section “wlan0”
Open a browser in your computer or mobile phone, browse to “edison-ip-address:3000” to find the web interface
Control the robot by click the arrow keys or start a basketball game
by clicking the “Basketball!” text. Throw the ping-pong ball into the basket, and the robot will do a little celebration dance
Step 13: Calibrating the Servos
If the servos are moving unexpectedly without commands, you will need to calibrate the motors. To do this, insert a screwdriver into the slot behind the servo and turn until the motor no longer moves.
Step 14: Level Shifting
A continuous servo motor usually needs at least 3 V for logic HIGH so we will need to a level shifter since the mini-breakout board using 1.8 V as logic HIGH
If you just want to turn an LED on/off or have different levels of fading, a transistor amplifying circuit would be enough to do the work. Servo motors require high-frequency data input, but the transistor circuit inverts HIGH and LOW.
To remedy this, we will use a CD40109B. It is a 4-channel low-to-high level shifter which means it can convert 4 pins from a low-voltage signal to a high-voltage signal in a single direction. Follow the schematic or you can read the datasheet to find out more.
There is quite a range of different level-shifters like this one from SparkFun which is bidirectional or this one
from Adafruit that supports I2C. They may have a lot features in common, but can be unique in different ways. Do plenty of research to find out which one is best for your project.
Step 15: Powering the Robot
If you have worked with multiple servos before, you probably know that it’s better to power the servos separately from the Arduino board since it alone cannot provide enough power to drive them. The same applies to the Intel® Edison.
In this particular case, we are using a 4-pack of AAA batteries to power the servos. They provide 5 to 6 volts which is good for servo motors. An added benefit is smaller footprint for the battery pack.
To power the Intel® Edison with mini-breakout board, you can either provide 7-15 V or use a lithium battery. Since the AAA pack meets neither criteria, we’ll need a dedicated lithium battery.
Step 16: Node.js
Node.js is a programming platform that runs on javascript. It is efficient and powerful and a good choice for building a web-based application. It is supported by the Intel® Edison standard system image so you can run node.js scripts directly on it.
In this tutorial we used a few libraries to achieve our goal.
Socket.io is used for socket communication so that the remote control signals can be transferred in real time. Express is for serving the web interface easily and Cylon.js is a mraa-based library for interfacing with pins and hardware.
Similar to how you run python scripts in Intel® Edison, you will type “node scriptname.js” to execute a node.js application. Our code is running as a web server, so you’ll be able to visit the webpage through a browser and send data.
If you want to know more about Node.js, you can read more from the official site Node.js or find various tutorials around the internet.


