

Introduction: Better Closeups


I shall tell you my methods of taking good close up and macro photos using my fixed lens point and shoot camera.
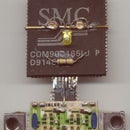
The picture shows a test shot taken using the "macro" setting on the camera. Objects close to the camera are blurred, those at the right distance can be seen clearly and then, further out, they are blurry again.
The trick is to get your camera - to object distance at this sweet spot every time.
Step 1: Carry Around a Distance Mark


If you look closely at the previous photograph, you will note that the markings on the scale are sharpest at one particular point. That is the point at which the camera focuses when put into "macro" mode. The photos below show my solution to this: I have put a white piece of tape on the wrist strap of the camera, at the point where the macro focus point lies.
Then, while taking a closeup photo, I hold the camera with one hand, stretch the strap with the other and place the object at the mark on the strap. This way, macro photographs turn out to be sharp every time.
The camera does have an LCD screen. This is not very helpful for focusing, since the image is very small, and apt to get washed out in bright light outdoors.
Step 2: Manual Focusing


In case of this type of camera with a macro / normal lever, it is possible to take sharp photographs at varying distances too.
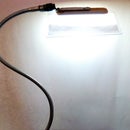
The photo below was taken with the same camera - to - object distance as the introductory photograph. I just set the "macro" lever to an intermediate position.
To find this position, the camera was zoomed in to its maximum (it has digital zoom 4x) and then the lever was adjusted to the point where the 'AC230V' text was most legible. Then the zoom was cancelled and I took the photo.
It is important to keep in mind that the digital zoom actually makes your picture worse when blowing it up. Always take photos with no zoom, doing all your cropping and blowing up (if needed) using the computer. Event the simplest of image editing tools on the computer will do a better job than the camera.
Step 3: Use a Supplementary Lens

Even if your camera does not have a "macro" position or an LCD viewfinder, do not despair. It is possible to take closeups using an additional lens held up in front of the camera's lens.
In the picture, I show the setup of taking closeups with a 'Cool-i-Cam G3' camera. This camera does not have an LCD screen and the lens does not have a macro setting.
I just hold a watchmaker's eyeglass against the lens. Its wrist strap has a mark where the focus lies when this lens is used.
There will always be situations where a good picture needs specialised cameras. But, however, with intelligent manipulation, even the most basic cameras can be used to take reasonably good pictures.
The first camera in my pictures is a "DigiArt 410" four mega pixel camera. The second, "G3", has a resolution of 1.2 megapixels.
Using a bit of tape and a wrist strap (if it does not have it already) you, too, can improve your close up photographs.
Participated in the
Photojojo Photo Month


