

Introduction: Big Stainless Steel Sculpture: Part 2


Part deux.
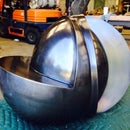
Step 1: Tack Welded Sculpture


The sculpture has been tacked together and now needs to be completely welded, finished and mounted. Here's how we got this far:
Step 2: Cutting


I was considering making cardboard patterns and cutting all the shapes with a hand held plasma cutter but decided that would be really dumb. So, I went down the street to Nor-Cal Metal Fabricators in Oakland and had them laser cut, form and fit the individual elements. Yes, that's a reflection of a Cornelius as Che Guevara T-shirt.
Step 3: Forming


Each individual plate needed to be rolled to a radius of about 23 feet. The roller is sort of a crude tool so we made a "sweep" to check the radius of each plate. For added structure and to help maintain a uniform thickness, stiffening ribs were cut on the laser and sandwiched between the plates. Each rib had a series of small keys to help register the faces of the form before tacking.
Step 4: Fitting


With all four elements cut, rolled and tacked we began to assemble the sculpture. Since the middle ellipse was bisected, we decided to fit the top and bottom pieces first. The last photo shows the middle section split into two segments that will fit on either side of the top and bottom elements. The top ellipse slipped over the bottom form and aligned well to scribe lines that were engraved by the laser cutter. Then the two sides were tacked in place making sure that they stayed in plane to give the appearance of slicing through the other forms.
Step 5: Tack Welding


After verifying that the pieces fit, the sculpture was tacked together. Stainless steel has a high coefficient of expansion which means that it moves a lot when it's being welded. As a result, great care was taken to make very small welds on the entire piece to distribute the stress loads and minimize distortion. After the whole sculpture is tacked together, all of the seems will be beveled and welded using a technique referred to as "stitch welding". The last photo in this section best illustrates this technique. Small welds ("stitches" about and inch long) will made on the entire sculpture leaving spaces between the welds to be filled later. We'll turn the piece often to work all surfaces.
And that's where it is now. I'll be coming up for air in a couple weeks with part three.


