

Introduction: Black Walnut Harvesting & Processing


As Autumn approaches in our area of Northeastern Oklahoma, many of our nut trees are beginning to shed their crops, dropping nuts beneath trees, in the garden, yard, bushes, and even on an occasional unsuspecting human below the tree. Our house was unfortunately planted after the tree, and a tad too close, as we now endure the season with many a sudden "Bang!" when nuts land on the roof. This is the sign – it is time to collect the harvest.
Every year, I intend to create an Instructable for such a harvest, yet every year, I put it off. This year, feeling rather industrious, I felt it was time to create one. However, while searching to see if anyone else had already created such a tutorial, there it was. 'Triplezee' had already created an Instructable Forage and process your own black walnuts.
I’ve always felt funny about creating a duplicate, not wanting to detract from someone else’s hard work, so I gave up on the idea. But wait! As luck would have it, Triplezee’s Instructable was entered in the Hunter-Gatherer Contest, which ended October 6th. There was also another contest that did not end until October 13th, called Remix Contest, which encourages members to re-create existing Instructibles. Voila! I could participate after all!
Step 1: About the Black Walnut:


A rose is a rose is a rose. But the same does not apply to walnut trees. English walnuts, also referred to as Persian walnuts - Juglans regia, are the most common walnut available in the United States market, which is also the world's largest exporter of walnuts. This Instructable features Juglans nigra, also a walnut tree that is native to eastern North America, though not as easy to shell. Crack open an English nut, and you will find the nut is easily removed in whole, or even half. Not the case with black walnuts, as the shells are extremely hard, and the nuts are tightly wedged into the shells with deeply-hidden crevices.
Black walnuts are one of the healthiest of tree nuts. They are low in saturated fats, high in unsaturated fats, a good source of protein, iron, fiber, minerals and Vitamin A.
Once a black walnut tree is established, typically requiring eight to ten years, it will not only provide a bounty of nuts, but provide memories for generations of families. Many people recite stories of gathering black walnuts at their grandparents’ home, reminiscing about the dark stain left on any hands unwise enough to try processing them without gloves. Special memories include baked goodies made with the hard-earned nuts.There are difficult years, though, when a black walnut tree simply does not produce well.
The wood is incredibly hard, and notably beautiful, highly sought after by wood turners and for archery use, such as making long bows. The nuts are valued, and often at expensive cost, due to the amount of processing and tedious work involved in extraction of the nut meats, which differ from an English Walnut in that the black walnut tends to lodge itself inside the shell quite well. If you have ever shelled English walnuts, you may have noticed how very little care is necessary to obtain a whole, or even half nut, intact. Quite the opposite with a black walnut, but if done correctly, the rewards you reap will be well worth the effort.
Follow along as I show you what black walnut processing is all about.
Step 2: Equipment and Materials Needed


Once you’ve located a prospective Black Walnut tree, you’ll need to determine how much work you are willing to invest. You can make the process easy, or even turn the job into a creative endeavor, which I hope to have accomplished with this Instructable.
For a handful of nuts, processing them can be as easy as smashing the freshly-dropped nuts with your shoe, kicking off the husk, letting the nut dry, and then whack it with a hammer. I’ve gone a little further, mainly because we have a number of trees, and a large bounty to process. It is time to pull out the heavy-duty hardware. Enter the tractor and the concrete mixer!
Things to make the job easier:
Tractor or other heavy vehicle - You certainly don't need a tractor, but if you have one, they are handy for removing the husks. You could also drive over the nuts with an automobile. Just drive back and forth until the husks are cracked and falling off. Please note, the husks are the soft, but tough covering on the nut, not to be confused with the nut shell, which will remain attached until you smack it with a hammer, or use a specialty nutcracker designed to withstand the durability of the black walnut shell.
Concrete mixer – handy, but not absolutely necessary. It does clean the husked nuts much better, though. You could also poke holes in a large bucket or plastic tub, then rinse well, or haul the nuts to a car wash, using the powerful jet stream to knock muck off the nuts after they have been husked. Remember to use the clean water setting only, no suds!
A screen, rake, or other item to cover the opening of the concrete mixer, to keep the nuts from falling out during rinse cycles.
Rubber gloves – essential. Black walnuts will stain your skin, clothing, tools and anything else they touch.
A source of clean water
A garden hose, buckets, or other means to transport water
Buckets, tubs, or large glass jars, especially if you wish to save the sludge (Sludge? What sludge? See step #6)
A screen, screened table top, or other large section of material that will allow the nuts to be spread out in a single layer to air dry with ventilation. An outdoor location is fine, provided you do not expect rain.
Keep a tarp or other waterproof material handy to cover the nuts in case it rains.
A vise, heavy duty nutcracker, hammer, sledgehammer, or other device to crack, smack and otherwise attempt to get through the very hard shell to reach the treasured meat! When shopping for a cracker, be sure to verify it is truly intended for BLACK WALNUTS. A quick look on internet auctions reveals some are not quite educated on what they are selling. A common nutcracker will not work.
Knee pads, if you intend to crawl around on the ground to pick up the nuts, or a device used to pick up bounties of nuts, such as this nifty gadget, the Large Nut Wizard
Step 3: Picking Up the Nuts


There are tools are on the market which enable a user to roll over a black walnut, containing it in a cage of sorts. This will enable a lot of picking up without a lot of bending over, which is what I did to collect our harvest. Once the season begins, try to gather nuts as often as you can, as they will multiply quickly, and you may find yourself overwhelmed with a chore. Invite friends over, and barter or beg them to help if you have to. Picking up black walnuts is a fun job for kids – hint, hint!
Be sure to wear waterproof gloves, as the walnut husks will leave your hands looking as though you haven’t bathed in some time. I made this mistake years ago, only realizing later what my son’s teacher must have thought during a parent-teacher conference. I could see her notes now. “Mother’s hands were extremely dirty.”
If you don't have a handy rolling tool, you'll do a lot of bending over. To save a bit of pain your back will experience, try to kick or nudge nuts that are near one another so you score more nuts per bend. It's not lazy, it's using your head.
Step 4: Husking the Nuts


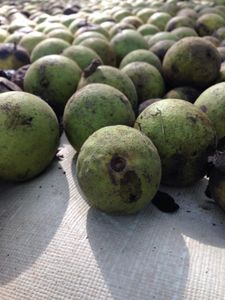
The nuts will fall from the trees with a thick, leathery coating similar to a tough orange peel, but is not easily removed. If the husks are not removed in a timely manner, they will begin to rot and turn to black mush over a short period. This husk will affect the flavor of the nuts, so try to remove it soon after the harvest.
At this point, you may also find tiny white worms in the husks. These are the larvae (think maggot) of Rhagoletis suavis, which is commonly known as a husk fly. Those who are unfamiliar with the little wiggler may be repulsed to the point of walking away, but the worms won’t penetrate the nut shells, and thus cannot access the nut meat. Grin, or in this case, grimace, and bear it.
So, we’ll need to clean them up. There are several options for husking the nuts, such as filling a burlap or other heavy-duty bag with green walnuts, secure the bag shut, then drive over the bag with a vehicle. Once the husks are smashed, the hard nut remains, and can easily be separated from the husks.
If you happen to have a large piece of machinery, such as a tractor, husking the nuts is a breeze. Lay a large tarp or other piece of material you don’t mind staining behind the vehicle on a flat surface, in a single layer, not to exceed the width of the vehicle’s tire span. Slowly drive back and forth over the nuts. The husks will crack open to reveal a black-stained nut, or if husked quickly after they have fallen, a nut with a much lighter coat. Remember, the more you drive back and forth, the more husk will fall off, making collection easier.
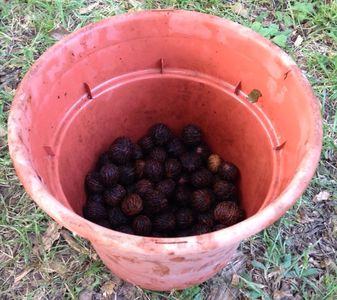
Try a few different methods for the husking process. I found it easiest to sit on a short bucket near the pile of nuts on the ground. Each time I picked up a handful of nuts, I would drop the husks into a plastic tub, and the nut into a plant pot.
See the images which compare a full bucket of nuts with husks to images featuring husked, and also washed nuts. Quite a difference! Our dried walnuts, with the shells still on, numbered 42 per pound, but we'll get far less meat.
Once you have removed all of the husks, be mindful of where you put the husks, as Black Walnut tree roots contain a naturally-occuring chemical called juglone, which is often detrimental to other plants growing in the immediate area of a black walnut tree. Read more about Black Walnut Toxicity in this PDF.
Step 5: Cleaning the Nuts


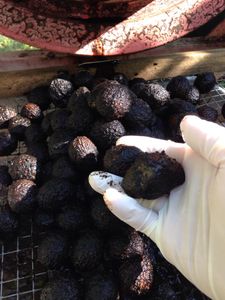

Now that the husks are removed, you will likely notice there is still a good deal of gunk stuck to the nuts. You can clean them a little more, or a lot, which is what I prefer to do. Excess husk and gunk left to dry on the nuts can permeate the shells, giving the nut meat a strong, bitter taste that is not tasty. The fresher and cleaner the harvest, the better the meat will be.
If using a concrete mixer, place a chain, rocks, or other abrasive material into the tank. Add enough nuts to fill the tank or tub about half way full, then add water to cover the nuts. Adjust the concrete mixer tank to tumble at an angle, but not so much that the nuts roll out. Don’t worry about adding too much water, as excess will just spill out. Turn on the mixer and allow it to run.
You will probably have to add more water after the first 15 minutes of tumbling, as it doesn’t take long for sludge to form. Turn off the mixer, then add enough water to create liquid. Turn the mixer back on, tumble a few rotations, then turn it back off again, and tip the tank enough to allow water to drain out. If you have a processing station set up as I did, the nuts that do happen to fall out of the tank will land on the screen. You could also use a garden rake to prevent the nuts from falling out. Any that do sneak out, simply put them back into the tank. Add more clean water, turn the mixer back on, and tumble again.
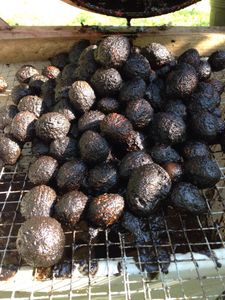
Repeat the cycles of draining and adding clean water, about every thirty minutes. You will notice the consistency of the sludge has become much more liquid, and the nuts should look much cleaner. You may repeat this process as many times as you wish, though four or five cycles should be sufficient. You will know when it is time to change the water, as it will become very dark, and / or thick. A garden hose would be ideal for this step, instead of having to haul water back and forth. Compare the images of the nuts after only having their husks removed, to the next two images, which were taken after each rinse and tumble cycle.
Old timers have long said that any husked nuts that float are goners, and not worth the effort to dry. We have found this to be true.See the image above featuring floaters. Sure enough, the meat is black and not good.
Step 6: From Disgusting Sludge to Liquid Gold


Though a very messy endeavor, cleaning and processing black walnuts with water will produce a very thick, dark sludge created from the decomposing husks. This soupy goop is invaluable to many, while others deem it simply a nasty mess. You should definitely consider wearing clothes you don't mind possibly ruining.
Hunters and trappers use this so-called sludge in which to soak their traps. The deep, black gunk will not only clean, but will also remove human and animal scent, but also rust. Notice the difference in a rusty chain before tumbling in the concrete mixer, and after tumbling. Though the chain stayed in the mixer even through rinsing cycles, it cleaned up beautifully. After each dump and drain session, consider saving the first and / or second batch of drained liquid, as it will be the most potent, and full of the darkest, thickest stain. Store in glass jars with properly sealing lids.
The sludge can also be used to make a stain for furniture, and other wood-working projects. It provides a deep, dark color to the natural grain of wood. To use, simply filter to remove particles and any remaining husk residue, then dab a soft cloth into the stain, and wipe onto your project. Please note, you should always test an inconspicuous area of your project before you begin such a process.
After crawling around on my hands and knees during harvest time, I discovered my knees were badly stained, and even looked like bruises. Hey, maybe special effects artists might be interested in the sludge. After all, if used for makeup, even soap wouldn't remove it. Only time.
How to dye yarn, fabric and even basket reed with black walnuts - Thank you, Instructables member 'Cookery'.
To add to the fun, you can even use black walnut sludge to make an ink for writing, drawing and crafts.
Make your own Black Walnut ink - You Grow Girl Blog
Black Walnut Ink - By Fiberdrunk of The Fountain Pen Network- EXCELLENT LINK full of great information!
Step 7: Drying the Nuts

After the last rinse and tumble cycle is complete, turn off the mixer and adjust the tank to drain onto the screen. Once they have drip-dried, move the nuts to a location where they can be exposed to good air flow, are covered from rain, and have plenty of room to breathe in a single layer. This is where a screen will come in very handy. You might also have a large picnic table made with metal mesh or grates, which would be perfect for drying the nuts.
Over the next few weeks, run your hands over the nuts to shuffle them about from time to time.
Step 8: Shelling the Nuts - Chore Time!


Just when you thought the hard work was over. Just kidding. Sort of. Black Walnuts have an extremely hard shell, which is one of the reasons why it is actually used in sandblasting! There are commercial crackers available, though they are usually expensive, and I cannot vouch for their effectiveness. Many people over the years have tried to reinvent the wheel, so to speak, by creating what they believe to be the ultimate nut cracker designed mainly for the shelling of black walnuts, which are impervious to just about any basic nutcracker one would use on a standard English walnut.
Note the structure of the internal shell of the nuts. In the first two photos, I've used a band saw to cut walnuts both with and against the natural seam so the position of the nut meats can be seen. The nuts were then cut into quarters to further show more detail. Now you may understand what makes shelling these wonderful nuts so difficult.
Refer to the last image in this step. The bowl on the right was filled with cracked nuts, then the nuts were removed. You can see the pile on the left still has a bit of picking to do, but we will not find much more meat. We cracked sixteen cups of nuts. Our bounty? A mere two cups of nut meat. No matter what type of cracker you use, no matter the method, you are still not going to end up with much of a score. An 8 to 1 ratio.
In our research, trials and tribulations along the way, we've found quite a few options to share with you. Please note, the links further below were checked at the time of this Instructable, though prices may have since changed. Mention of the following sites does not constitute endorsement unless specified.
One such cracker that we can heartily endorse is 'Grandpa's Goody Getter' created in the Ozark Mountains! We are very pleased with this cracker, achieving a good portion of nice-sized walnuts worth the process! We don't know Mr. Bacon personally, nor are we paid for mention of his cracker, but it works, and is well worth a mention. His site even provides videos of the cracker in operation. He includes with each shipment, a little pair of shears, to cut shells that are resistant to the cracker. These shears actually come in pretty handy. They are the little red shears shown in the image on this step.
Another cracker we would advise, the Black Walnut Cracker by Hunts. This cracker looks to be very sturdy and long-lasting, and is also available in an electric model.
Save yourself a lot of hard work and money - go for a leverage-type cracker. A hammer and a block of concrete does work, if you don't mind flying shrapnel and itty-bitty pieces of walnut that you must dig out of crevices the hammer did not reveal. Long handles are usually a good sign of a good cracker.
The following nutcracker does not have a website, doesn't sell on internet auctions, and does not accept digital forms of payment. The C.E. Potter Black Walnut cracker is a heavy-duty, cast iron cracker that may be picked up at the store in Oklahoma, or shipped with additional funds. It looks like a durable, heavy-duty cracker that I would also recommend.
Potter Walnut Cracker Co.
Box 930
Sapulpa, OK 74066 / 918-224-0567
Drill Cracker - using an electric drill (Where to buy? Click HERE)
Choosing a Black Walnut Cracker - From Mother Earth News
Master Nut Cracker (Additional mention from Mother Earth News - Click HERE)
Make your own cracker from scrap
As you can see, there are so many different crackers to choose from. Do your homework, watch YouTube videos.
You're sure to make a wise choice, just keep physics in mind and you should pick a winner of a cracker.
What to do with the dried shells? Oh, there are so many uses for the by-product of these wonderful nuts. Shells are often crushed and sold as pincushion filler, used as mulch, used as a sandblasting, and so much more!
Though I personally have no experience in using them as such, the green husks, also called hulls, are often sold for use in homeopathic medicine in a tincture or powder. After pricing the tincture, I think I'm in the wrong business. Ha!
Step 9: Storing the Nut Meat

If you’re still with me, and have participated up to this point, you should have a decent bounty of cracked nuts ready for use or storage. Though they do freeze quite well, you will want to ensure that most of the air is removed from the freezer bag. This is where a food sealing system would come in handy. Lucky me, I nabbed one at a yard sale for five bucks! That is what happens when you buy fancy kitchen gadgets for people who don’t use them. They don’t want them.
Step 10: Recipes Using Black Walnuts


Black Walnuts can be used in many culinary creations. Well-known Black Walnut ice cream, of course, and who could forget the taste of a chocolate chip cookie with genuine black walnut chunks?
There are so many recipes available, using walnuts, though worth repeating, not all walnuts are the same. There is a big difference in the taste, not to mention cost, of black walnuts versus English walnuts. Even in my vast cookbook collection, there are few recipes that specifically call for black walnuts.
Here are a few sites which mention the latter:
Bosc Pear and Walnut Tart - My own Instructable
Do yourself a favor, save a lot of searching. You want recipes? Bookmark this link.
Iowa Black Walnut Distributor - Quiche, catfish, cookies and more!
Great for things outdoor and edible. Super selection of black walnut posts at the Hunger and Thirst Blog
Step 11: In Closing...
I certainly appreciate that you have viewed and / or read my Instructable, and hope you have garnered some interesting information from it.
There are so many ways to process black walnuts, and so many different opinions about how it should be done. Nothing is carved in stone, so please feel free to try different things, different tools, methods and such. It is a wonderful learning experience from first picking up that hard, green ball of a nut to eating a homemade food item created with the black walnuts. Once you experience the amount of work it takes for the nuts, you'll have a whole new appreciation for the tiny package of nuts for which you would otherwise pay almost $16.00 per pound.
You may decide all this effort is not worth the reward, but for us, it is fun, and rather reminiscent of the times that people didn't simply run to the grocery store and slap down a debit card for their groceries.
Thank you for visiting my Instructable!

Third Prize in the
Remix Contest


