

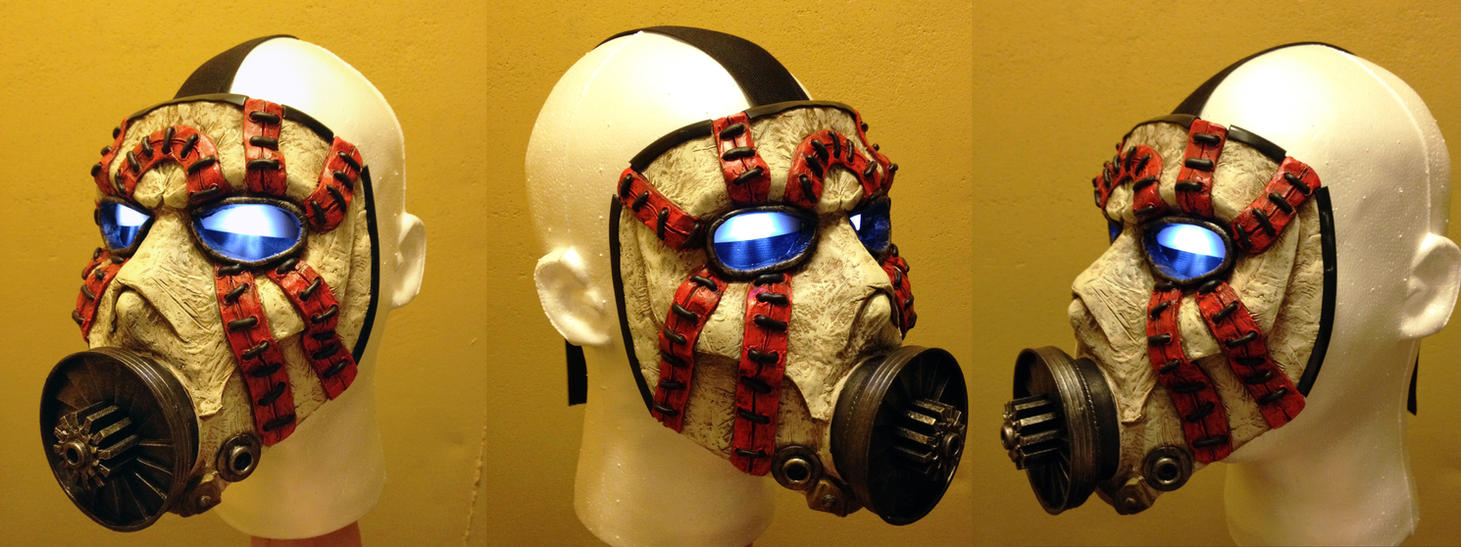
Introduction: Borderlands Psycho Mask


This years halloween costume. The mask is made from air dry clay and a cpu fan. There is a layer of plasti-dip on the top to strengthen and give a "distressed look". There is a hidden toggle switch under the chin that to control the interior lights. I'd like to apologies for the lack of photos, I hadn't intended to do a step by step but a few people asked.
Materials
- Plain white plastic face mask
- Crayola Model Magic Clay 8oz pack
- Swimming goggles
- 40mm computer fan
- 2 Leather Belts
- Plasti-dip Spray can
- Plastic lid
- 5V Blue Leds, battery clip and wires
Tools
- Soldering Iron
- Super Glue
- Scalpel
Nothing difficult here guys. I'm not artistic and I haven't soldered since school. Just takes some patience.
Step 1: Working With the Clay

The make or break part of this build is how well you build up the clay on the mask, so this is just a few tips and pointers of how to work with the clay. All of which were learned from this tutorial.
I first rolled small sections of the clay out using a rolling pin (read: wine bottle) until it was roughly 5mm thick. Then any piece I wanted for the mask was cut out from this "sheet" using the scalpel and a ruler. The rule was only used very roughly, as any excess or lack on the mask could easily be fixed by removing or with a bit more clay. I used my fingers for 90% of the shaping, but the few flat edges I wanted I just used the handle of the scalpel.
Each piece was laid on the mask and the edges pressed down to stick it in place. I then used the "wet finger" technique from the linked tutorial to remove any joints between pieces. I didn't bother with sandpaper, I tried it and couldn't make it work. I found I could smooth out the clay sufficiently by wetting my thumbs and sliding them across the clay, pressing softly as I went.
Be sure to work with small pieces of clay at a time. If you have a large rolled sheet it will dry out on you, this is air-dry clay after all.
Step 2: The Mouth


The midway photo is of the completed base, roughly how the mask will look before the artsy clay is done.
It's personal preference how large you want your psycho "mouth" to be. There are some awesome oversized versions out there, but I tried to stay accurate to the game and opted for a small mouth (a 40mm fan). The shape of the fan (shown) is a circle on a square. Measure the diameter of the circular bit (not 40mm funnily enough) and cut out a square of sides length a bit smaller. Undershoot, you can always make a hole bigger but you can't make it smaller. When you get it right you will be able to force the fan through from the back (circle sticking out, square behind) and it will stay put without any glue. Try on the mask to make the positioning is right. When you're confident,glue it in place from the back.
Highlighted in the photos above, the fan won't stick out enough to match the psycho mask in game. To make it stick out, you need a ring of plastic, slightly bigger than the fan, to glue on top. This takes some hunting at the supermarket but I found "Colemans Mustard" lid was the right size. I heated up a sharp kitchen knife and cut out the top of the lid, leave the sides behind. The cut was far from smooth (damn ugly), but stick it ugly side down and nobody is the wiser.
I painted the cpu fan before sticking down the ring, just for ease of access. The painting was done using model paints and how much detail you want to go into is completely up to you. I used a black primer coat, followed by a dark metallic grey across the whole fan. Then I took a much lighter metallic grey and painted the edges of the fan blades, thick line getting thinner the closer to the end of the blade. This creates a really nice "light / shadow" effect and I personally think it adds alot. The screw holes for the cpu fan where also visible so I glued 4 screws of various ends and colours into each hole. The mismatch added to the "cobbled" look that I was going for.
The added ring was painted before glueing. I used the same black primer layer, and then just the darker metallic grey but painted with purposely broad and messy strokes. This looks like a cool "grained" effect. The mustard lid specifically had alternating pattern on the rim so I painted it alternating shades of grey to add detail.
There will be very little contact between the ring and the fan so the glue wont be very sturdy, this is reinforced by applying some of the clay. This also fills in the large gaps between ring and mask. I'll explain in a later step the best way to apply the clay, but fill in the gaps and smoothen it out to make a nice transition from ring to mask. Be sure to leave enough ring sticking out. As you can see in the photo I also put some clay inside the fan to cover some ugly bits, it depends on your fan.
Step 3: The Eyes

Cut the straps off the goggles, and trim away the connecting nose piece so you are left with just the eye pieces. Try on the mask to work the eye positions and use a pencil to mark roughly how you want them to sit. The mask will have a natural brow so keep the lenses below this. Measure the size of the eyepieces and cut a smaller hole, same as with the fan. The black rim should be sticking out, as shown in previous images, and they should stay put without glue. Try on the mask again to make sure it is comfortable on your eyes, then glue the lenses. If you bought black goggles they won't need painted.
Step 4: The Nose


By far the most frustrating and time consuming part of the entire build. As shown, the Psycho's nose doesn't stick out like a normal nose, it ends in an inward sloping face. So first step was to cut off the tip of the masks nose. If you try the mask on now your nose will probably stick out of the hole, to fix this I cut a triangle of plastic (from the super glue packaging) and glued it to the inside. Now when you try it on, the plastic will flex a bit to accommodate your nose but over all your nose will be squished back . This is the one uncomfortable factor of the mask; I didn't find it too bad but I may have a small nose.
Now for the trying bit, building the nose. The nose is 100% clay just built up and I must have tried 5 or 6 different nose before I found a balance of "Looks right" and "won't cave in". First step is to cut a triangle out of the clay, lay if over the nose, wrapping the edges onto the side of the hole and smoothing this edges out so you are left with a flat upward sloping face. You want this to be as steep as possible (to match the game) while still leaving room for your nose. As with all the clay you add, take your time and be sure to smooth out each edge so that the pieces join seamlessly with any adjacent clay.
The nose "arch" shown was a long wide rectangular strip of clay, bent and set on its edge around the nose. Go around the base of the arch, smoothing out the join and strengthening the bond, be gentle with the clay covering the hole. once attached you adjust the sharpness of the arch by pinching the top and pressing in on the side, until it looks right. I then took the edge of the scalpel and pressed against the top edge of the arch to widen it and make it look thicker. This arch will be quite fragile until the clay is allowed to fully dry so be careful.
Step 5: The Detail

First the "skin" was built up across the entire mask. Squares were cut out of the clay and slowly the entire face was covered. At this time I also reinforced the mouth and smoothed out the nose. I added extra clay under the eyes and by pressing with my thumbs I shaped out some cheeks. The cheeks in my plastic mask weren't exaggerated enough. In the previous images you will notice the band above the forehead has no clay in it. In the game the mask doesn't curve up onto the head, but ends in a flat edge below the hairline. The unclayed part will eventually be cut off, but not until all the clay modelling is finished as it helps stabilise the mask on the table.
The eyebrows were two 'sausages' rolled out of the clay and placed along the top of the goggles. I then used the handle of the scalpel to shape the crease where the eyebrows meet and define the bottom edge. The top edge was smoothed out into the forehead as shown. The mask was left to dry overnight at this stage and the "leather strip" and "chin bolts" detailing was done the next day.
After 12-15 hours the clay should be dry and spongy to the touch, now you can get started on the detail. The leather strip effect was made from long thick strips cut from the clay, laid across the mask. The hard part here is bonding the strips to the surface of the mask without smoothing out the harsh edges of the strips, just takes some extra time and going slowly with a wet scalpel handle. I over shot on the lengths needed, as it was easier to cut off excess than add new seamless pieces. A large rectangular peice was cut for the base of the chin, and shaped using the scalpel to form the "curve" shown. This was only left for an hour before the screws were added (mainly from impatience). The screws were made by rolling up balls of the clay and flattening them against the table with a book. Then the scalpel handle was used to made the + cut in the top. Leave the mask for a few days before painting.
Step 6: The Leather Straps


In the game the mask is held on by brown straps, presumable meant to be leather. My leather straps was made from two women's belts, cheapest I could find. For strap lengths and strap positioning, hold the mask up to your face and determine for yourself were the belts should be attached and roughly how long they should be.
For the horizontal band, which forms the fastener, the middle section of one belt was cut out and discarded: leaving two lengths, on with the holes and the other with the buckle. The cut ends were glued to the inside of the mask, about an inch in to ensure strength; It is the belts that will hold the mask on so they will take a lot of abuse. I found once it was all glued that my mask was too loose so I pierced a new belt hole. The mask should now stay on hands free! At this point I ran round the house playing "psycho" before moving on.
The vertical band isn't needed to keep the mask attached but it's in the game and every little helps. The second belt was cut as before but this time the middle section was used. Try on the mask to get the length right but the leather strap glues to the inside of the top and to the back of the horizontal strap without the buckle. Is pictured above to make more sense.
Step 7: Plasti-dip

This stuff is brilliant. I found it when I was looking for a way to protect the clay. It's basically spray on rubber and it's used mainly in car body work repairs. You can buy it in a host of colours but white is obviously preferable for the mask. I used masking tape to cover the eyes, the fan and the leather straps and I hung the mask up on the washing line, by the straps, and started spraying. The instructions are on the can, lots of thin layers instead of a few heavy ones. The end effect is a rough texture to the mask that looks pretty awesome. When you leave it to dry some cracks will form but in my opinion this only adds. As well as protecting from wear and tear the plastidip has the neat effect of covering up a lot of blemishes and also making the mask shower proof, tested by myself in the mizzle.
Step 8: Painting

Model paint again, used the light metallic paint from before to paint the chin bolts and found a brown which matches close enough to the belts for the the strips. Simple block painting this time, but use a small brush and take care not to get any brown paint on the white of the mask. You can't use masking tape as it will lift the plastidip layer.
Step 9: The Circuit


Above was the original circuit diagram, you'll notice the inclusion of the fan. The original plan was to have a three way toggle switch with three states, just LEDs, LEDS and fan spinning, and off. However I broke one of the terminals on the fan during the build, so that failed. I ended up using a simple LED, toggle switch and battery set up. The led's were glued in just below the eyes in the bottom corners (shown above). These were hooked up in parallel to a 5V battery clip and a toggle switch. The switch was hidden from view on the chin at the right and the battery can go anywhere that you have room, in my case there was ample space under the chin.
Solder the entire circuit together first, reinforce all the joints with super glue and then glue it into your mask. Don't put the soldering iron anywhere near the mask. I covered all the circuitry with climbing tape to tidy it up a bit.
Step 10: Enjoy!


You're finished! Have fun running around like topless nutjob, waving an axe and screaming at passersby. I have gone on a couple of fancy dress club nights with it and there is no sign of wear yet. You can drink with the mask on with strategic straw use but it is quite easy to take on and off yourself so that shouldn't be an issue. But be aware many places don't take kindly to topless patrons.

Finalist in the
Game.Life 4 Contest

Participated in the
Halloween Costume Contest

Participated in the
Makerlympics Contest

Participated in the
Full Spectrum Laser Contest


