

Introduction: Build Your Own Arduino


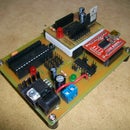

Setting up an Arduino on a breadboard has become a process I have grown to love.
Within a few minutes you can have a fully working Arduino platform to work with as you will see in this tutorial. There have been several occasions when I was at school and quickly put together one of these for testing some ideas for a project. Plus it is just looks so neat with all the components laid out over the breadboard.
Some of my Arduino Projects
Whats is an Arduino?
Arduino is an open-source electronics prototyping platform based on flexible, easy-to-use hardware and software. It's intended for artists, designers, hobbyists, and anyone interested in creating interactive objects or environments.
Arduino can sense the environment by receiving input from a variety of sensors and can affect its surroundings by controlling lights, motors, and other actuators. The microcontroller on the board is programmed using the Arduino programming language (based on Wiring) and the Arduino development environment (based on Processing). Arduino projects can be stand-alone or they can communicate with software on running on a computer (e.g. Flash, Processing, MaxMSP).[1] www.arduino.cc�
Step 1: Components


* See note about the TTL-232R cable in programming options before purchasing.
You can buy components at www.ArduinoFun.com or www.SparkFun.com or www.CuriousInventor.com or www.FunGizmos.com or www.Adafruit.com just to name a few places off hand.
Origninal tutorial by: http://itp.nyu.edu/physcomp/Tutorials/ArduinoBreadboard
Step 2: Setting Up Power


Step 3: Arduino Pin Mapping

Step 4: Component Hook Up


Figure 1-7: Supporting circuitry pins 1-14
Referring to Figure 1-7, locate a spot where you have 6 columns on the breadboard that are not in contact with anything else. Place a row of six male header pins here.
Step 5: Programming Options

- FT232RL USB to Serial Breakout Board, SKU: BOB-00718 (This option takes up more space on your breadboard)
- FTDI Basic Breakout - 3.3V SKU: DEV-08772 (This option, and using right angle male headers works the best out of all three because it is secured better on the breadboard)
- Arduino Duemilanove w/ATmega328
- Arduino Decimila, Duemilanove or Nano w/ATmega128
- No Power – Make sure your source power is above 5V.
- Power but nothing works – recheck all your connection points.
- Uploading error – Refer to www.arduino.cc and do a search on the particular error message you receive. Also check the forums as there is a lot of great help there.
Step 6: PCB Files

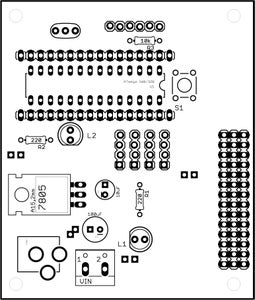
If anyone is interested in etching their own PCB (printed circuit board) I have included the component and solder side pcb files.
I have added a zip file which contains 300dpi JPG files of the component side and solder side.
If you have questions, feel free to email me and I will help you out the best I can. Just note I have classes throughout the day, so sometimes my replies can take a day to respond.


