

Introduction: Build a Discreet USB Air Conditioner With a Brita Pitcher


Last summer, the office AC stopped working. This is Los Angeles and outside temperatures were over 100 degrees. I had to do something to cope with the heat. Then I had an Eureka moment. I can make my own AC unit. But the problem was how can I use a homemade ice powered AC unit without looking like a total idiot at the office? I thought to myself, if I was to make a home made ice powered AC unit, it needs to be: portable, discreet and easy to maintain. Thus, I came up with the idea of using a Brita Pitcher as the housing for my home made AC unit. It's portable. I can just pick it up by the handle and take it where ever i need it. It's discreet. The Brita Pitcher on my desk just looks like a Brita Pitcher. Not some sort of wacky contraption on my desk. And finally, its easy to maintain. When I'm done using the Brita Pitcher AC unit, I can just pour out the icy water at the sink. I can also wrap up the power cable inside the top compartment of the pitcher.
Best of all, once I no longer need the AC unit, i can just stick in a new Brita Filter and use the pitcher like any old Brita Pitcher to filter water.
Step 1: Supply List


To do this project, you will need:
Old Brita Pitcher (not Pur)
Computer fan that can fit into the top compartment of the Brita Pitcher
Power source (battery pack, 12v computer source, USB)
2 Paper Clips
4-5 Index Cards
Philips Screwdriver
Small Pliers
Wire Stripper
Spare molex connector (optional)
Scotch tape
Step 2: Wiring the Fan

For this project, I will be powering the fan with USB power. You could tap into your computer's 12v power and also power the fan. Using the wire stripper, cut off the end of the USB cable (USB B) that doesn't plug into your computer. Strip about 1in off the red and black wires on the usb cable. Separate the red and black wires. Wire the red and black wires to a male molex connector. Cover each expose wire with electrical tape. You could solder the wires too. Make sure the wires correspond to the polarity of the wires coming out of the fan. Also make sure the male molex connector plugs in correctly to the female connector coming out of the fan.
Alternative: instead of wiring the usb cable to the molex connector, you could wire the usb cable directly into the fan. However, I am using a molex connector so i can preserve the fan and use it for future projects.
Step 3: Building the Index Card Structure for the Fan Part 1


Test your fan. Note which direction the air is blowing towards. For this project, the air will need to blow down into the pitcher from the top of the pitcher. Have your fan pointing downwards. Lay down the fan onto your desk or working surface. The topside is the air intake side and the bottom side will be where the air exits into the pitcher. Now unplug the molex connectors.
Lay down 4 sheets of index cards length wise along the edge of the topside of the fan. Do not block the fan's air flow. The cards will overlap each other. Look at the pictures for reference. Tape the index cards together. Poke holes on the index cards where the fan screw holes are located. Insert and tighten the screws. The screws should be holding the index cards in place now.
Step 4: Building the Index Card Structure for the Fan Part 2


With the fan facing upside down (bottom side facing up). Fold up the index cards to form the stand for the fan. It should look like a box with an open view of the fan. If you know how to gift wrap a box, this should be fairly easy. If not, look at my pictures. Straighten out two paper clips. Then bend a 90 degree angle at the middle of each clip. Tape the paper clips along the edge of the index card fan stand. The paper clips will reinforce the stand's structure.
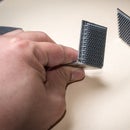
Step 5: Install the Fan Structure Into the Brita Pitcher


Make sure you do not have a filter in the Pitcher. Drain and dry the pitcher. Attach the USB cable to the fan. Wrap the USB cable around the fan structure. Insert the the fan structure into the top compartment of the Brita Pitcher. Back to why you should not use the Pur pitchers. The Brita pitcher provides a tube that extends down towards the middle of the pitcher. This will allow the fan to channel air towards the ice. Pur pitchers do not have this tube, thus i find the air is cooled less effectively.
Next, we need to build a hood or air duct to direct the air. Remove the little flap where the water is poured out of the pitcher. Using an index card, fold up 1 cm for 3 of the sides (1 lengthwise, 2 width-wise) . Please look at the pictures for reference. Cut a slit in the middle of the 2 shorter sides. This will form the slot for the pitcher lip. Now the air will blow towards what ever direction you point the pitcher.
Step 6: Toss in the Ice and Plug in the Fan
Now, all you have to do is toss in some ice and plug in the fan. Now you're ready for a cool breeze. The fan is not too strong if you are using a 5v power supply, thats why i said breeze. Check out the last step for ways to pump up the fan speed.
Step 7: Clean Up and Final Thoughts.


Once you are done using the Brita AC Unit, just unplug the fan and pour out the icy water into the sink... or a friend =). No mess. No clumsiness. Easy to handle. Easy to store. Almost fully nondestructive. Now all you have to do is dry the pitcher and wrap the usb cable back into the top compartment. When you actually want to use the Brita Pitcher as a water filter, just flush out the top compartment and install a fresh water filter.
Tips and Alternatives:
You could install a power switch.
Instead of 5v USB power, you could use a battery pack or another higher power source. I have some pics of my 12v battery pack with and without a switch.
If you have a big enough pitcher, you could use 2 fans.
Participated in the
Office Supplies Contest


