

Introduction: Build a Stage Marker Light


When spike marks and glow tape aren't enough, you can mark your quarter marks and wings with LEDs. There are commercial versions at decent prices. Or, if you have a soldering iron and a hot glue gun, you can make your own for just a couple bucks worth of parts.
This Instructable is designed for someone with no electronics experience beyond knowing which end of the soldering iron to hold.
Step 1: Parts List

In keeping with the newcomer-friendly nature of this Instructable, the following parts list can be found at any local Radio Shack.
270-0398 open-style 2xAAA battery holder, with leads
271-005 100 ohm resistor (5-pack)
Total parts cost? About $2.78 each.
It is fashionable in some circles to make fun of the "Rat Shack," but where else are you going to go at 7:30 on a weeknight to pick up that last essential part for a show opening that weekend? So give them some love.
Step 2: Tools


You need a soldering iron and solder. Well, okay. This thing is so simple, you can match-solder it. But if you have a roll of solder already, why are you short an iron?
The other essential tool is the hot glue gun. If, by some bizarre twist of circumstances you have found yourself at the only theater in the universe that doesn't own a hot glue gun, then you can substitute 5-minute epoxy. Which is messy and takes longer, but otherwise will get the job done.
That said, it really is easier messing with wires if you can come up with;
Needle-nose pliers
Side-cutting dikes
Wire stripper (actually, I tend to use an X-acto knife to strip small wires anyhow)
Masking tape: the ghetto third-hand jig.
Step 3: This Is Not a Circuit Diagram

Seriously, we don't need it. There's three parts (the orientation of two of them matters, though).
The LED needs to be connected in the right direction. Here's what that direction is:Long lead connects to plus or red. Flat side connects to minus or black. The resistor goes between battery and LED, on either side....
Sorry, to avoid confusion, we're going to say the resistor goes between plus/red and the LED. Think of it as a dam that limits the energy trickling down into the LED into something it can handle (as an analogy, it isn't bad).
On the table, the parts look like the above.
Step 4: Okay, Have One Anyways

Sometimes you just want to see the drawing.
Step 5: Bend and Trim

Take the LED, and gently bend the legs all the way out to each side, as if it is doing the splits. The leads are square, and only want to bend along the flat sides. Also, don't bend it once, then bend it back; they can't take being bent back and forth and will snap off.
Once you've bent, take the longest leg (the one AWAY from the flat side) and trim it to about a quarter inch. This is where you will make your first solder joint.
Step 6: Solder

There's a hundred different ways to hold pieces together so you can solder them up. This is one; use little scraps of tape to attach the parts to your workbench.
The LED can take a decent amount of heat, but try not to linger forever on the joint. If you notice the case starting to melt or change color, you are definitely leaving the iron in contact too long.
There is no space in this Instructable for a full tutorial on soldering, but I'll give the basics anyhow; apply a little fresh solder to the tip of the iron and wipe off the excess if necessary. This is called "tinning" and gives you a little flux to help the heat flow better. Now touch the iron to both wires you mean to solder, and apply the solder to the wires close to but not touching the iron. Hold until it starts to flow, remove the solder, keep the iron on a little longer to properly wet the connection. Keep the pieces steady and don't let them move until the joint has cooled.
I should mention; trim one lead from the resistor to that same quarter-inch or so before you make this first joint.
Step 7: Trim the Battery Case Leads


You don't actually have to do this. You can just mash the wires together and cover it all with hot glue. But a little neatness here helps in the end. I'm not measuring anything here; I'm just snipping at some pretty arbitrary places.
If you do cut the leads, you need to use the wire strippers (or an X-acto knife) to get back to bare metal. And because the leads are stranded, the bare metal will be a little messy to solder to unless you take your fingertips and twist the end back together a little, just like you were twisting a bag tie at the supermarket.
Step 8: Solder the Rest

Solder the RED wire to the resistor, and solder the BLACK wire to the other leg of the LED, then snip the excess wire off with your cutters.
Soldering can be easier if you "tin" everything first; that is, apply a little solder to the wire you are going to solder before you try to put them in position. If you do it right, you can often just push the wires near each other with one hand, touch them with the iron with the other, and achieve a decent joint.
Step 9: Test

Before going any further, pop the batteries in and see if it works.
Step 10: Glue

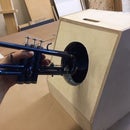
Hold the LED roughly center on one side of the battery holder, and close to level. Apply two big spots of hot glue to keep it in place.
Then go along the length of the wires, sticking them to the battery case and protecting the connections. Try not to get any of it inside the battery compartment, or on the bottom (because this is the side that will go against scenery)
I assembled the example in this Instructable with the longest-setting hot glue sticks it has ever been my misfortunate to meet. I had to use everything...blowing on it, tipping it, wetting my fingers and gingerly pressing it back into place...in order to get the glue to set properly.
Step 11: But Why Didn't You...?

You may be saying, "I saw one of these LED things at another theater and it used a 9-volt battery." Well, yes, you can do it that way. The part is also at Radio Shack:
270-0324 9v battery clips (heavy duty, 6-pack)
And on first blush, this seems a better model. The parts are about a buck cheaper, and the axial 9-volt design does look kinda cool. Plus there's only one battery to change instead of two you have to pry out of a holder.
Well, no, it isn't.
When you add in the cost of the batteries, the 9-volt version costs over a buck more to build (each; some of these items are only available in five-packs or more).
And the batteries don't last as long, either. Typical capacity of a 9v "transistor" battery is 500mAh. A single AAA cell delivers 1200mAh. You'll be changing once a week in any case, but the 9V is also roughly twice the cost. And harder to find in bulk. And harder to find in rechargeable types, too.
Lastly, the forward voltage of the LED is a fraction of 9v. The rest of that voltage is being wasted in the resistor.
Step 12: 9v Version


If you have to build the 9v, here it is:
You want to spread the legs of the LED as before. In this case, though, we solder the resistor so it is heading back towards the LED. In fact, adjust it until it sits right beside the LED.
Once those leads are soldered together, glue the LED on top of the battery clip, with the soldered joint and the other lead of the LED both facing back away from where the battery leads come out.
Trim the battery leads until they are just long enough to reach the other side of the battery clip.
Now solder the battery leads to the LED-and-resistor assembly. The circuit is otherwise identical; long LED lead to resistor, resistor to red wire, black wire to the flat side of the LED.
When everything is soldered, trim the excess wire off, then slap on a bunch more hot glue to hold everything nice and stable. Make sure to keep the two leads spread apart as you do this; distance and glue is all that keeps them from shorting together.
Step 13: Use It


There's no switch. I'd rather not force Stage Management to go around to every light just before a performance, so these are designed to run all weekend off a pair of batteries. Before the first show of the next weekend, pop in a fresh pair.
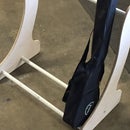
Attach them to the front lip of the stage with double-stick tape. Or put a strip of gaff over them, which will also black out the exposed batteries. For wing or escape stair use, attach to whatever is convenient.
With the 40-degree beam spread of the LED in the parts list, it will be easily visible from the back of the stage. It is also directional enough to be less visible from the audience.
Step 14: BOM

If you are making ten or more of these things, the savings from ordering in bulk come in. Here's the parts list for Digikey:
5mm red LED; 20ma, 60 degree view angle. $0.53 ea, or $0.38 ea for ten
2xAAA battery holder; open, with 6" leads. $1.42 ea, or $0.9 ea for ten
82 ohm resistor at 1/4W. $0.1 ea, or $.055 ea for ten
The ohmage here is chosen to run at 16ma; slightly brighter, but anything over 70% capacity shortens LED life and waste battery life for little appreciable increase in brightness. The thermal load means 1/8W is fine, but 1/4W is a little easier to handle when wiring up the thing.
Digikey also has a good variety of the same LEDs in amber and green, as well as in flashing options;
5mm red flasher, 20ma approx, 2.5Hz flash rate. $1 ea, $0.78 ea for ten
With this parts list, the unit cost is $1.735 for ten and above, and shrinks to barely over a buck each at 100 units.

Participated in the
Make it Glow!


