

Introduction: Build a Video Stream Using LinkIt Smart 7688 and Watch It Everywhere on Cloud


Hello Everyone!
Today I'd like to share with you how to build a vidoe steeam using LinkIt Smart 7688 development board and a free cloud service to use and watch the video everywhere on both web and mobile.
Please go to MediaTek Cloud Sandbox to register a free account if you do not have it yet.
Let's start!
Step 1: Items Needed

a. A LinkIt Smart 7688 or LinIt Smart 7688 Duo development board
b. an USB OTC cable
c. an USB charging cable
d. a web camera (here I use the Logitech C310)
Connect the micro-USB end of the charging cable to PWR port on the 7688 development board and the USB end to your computer. Then use USB OTG cable to connect your web camera to the USB HOST port on the 7688 development board.
Step 2: Create a Prototype for Video Stream Service on MCS

Log in to your MCS account.
Click Development on the top menu bar, and click Prototype. Enter the prototype information as you wished and Save.
Step 3: Add a Video Stream Data Channel

After the prototype is created, add a video stream data channel.
Click Add, and select Display.
Enter the information for the video stream data channel. Please make sure the data channel ID is Video which we will need it later when compiling the Node.js code. (You can change the data channel ID as you wish, but you will need to replace the ID in the sample Node.js code I will provide later in Step 5 and Step 6.)
Select the data type as Video Stream. And Save.
Step 4: Create a Test Device

After adding the data channel, now create a test device. This test device is just like your development board. When your development board is connected to MCS, you can received data from your development board and also give command to your device as well.
Here you need to keep the deviceId and deviceKey which is unique for each device. You will need them when calling MCS RESTful APIs in the code on your development board.
Step 5: Prepare the LinkIt Smart 7688 Development Board
a. Make sure the 7688 development board has been switched to station mode and connect to the same network as your computer successfully.
b. Connect to the console of 7688 development board through ssh command on your computer.
ssh root@mylinkit.local
c. Install FFmpeg package on the 7688 development board.
opkg update<br>opkg install ffmpeg
d. Install necessary Node.js package on the 7688 development board.
mkdir app && cd app && npm init<br>npm install mcsjs --save
e. Test if FFmpeg can send streaming content to MCS successfully.
ffmpeg -s 176x144 -f video4linux2 -r 30 -i /dev/video0 -f mpeg1video -r 30 -b 800k http://stream-mcs.mediatek.com/:deviceId/:deviceKey/:dataChnId/176/144
The :deviceId, :deviceKey and :dataChnId need to be replaced with the real value you just obtained. You also need to specify the video resolution in the URL. In this example, the resolution is 176x144. You can view on either MCS web console or App to make sure the video stream works.
Step 6: Developing a Node.js Program to Connect With MCS
You are now ready to write the Node.js program on the 7688 development board.
a. Create a file called app.js using an editor, vi is used in this example:
vim app.js
b. Type i and copy/paste the following code in the editor. Please remember to replace the deviceId, deviceKey and dataChnId to the real values.
var mcs = require('mcsjs');<br>var exec = require('child_process').exec;
var deviceId = 'Input your deviceId';
var deviceKey = 'Input your deviceKey';
var dataChnId = 'Input your `video stream` data channel Id';
var width = 176;
var height = 144;
var myApp = mcs.register({
deviceId: deviceId,
deviceKey: deviceKey,
});
exec('ffmpeg -s ' + width + 'x' + height + ' -f video4linux2 -r 30 -i /dev/video0 -f mpeg1video -r 30 -b 800k http://stream-mcs.mediatek.com/' + deviceId + '/' +deviceKey + '/' + dataChnId + '/' + width + '/' + height, function(error, stdout, stderr) {
console.log('stdout: ' + stdout);
console.log('stderr: ' + stderr);
if (error !== null) {
 console.log('exec error: ' + error);
}
});
c. Type :wq to save and exit.
Step 7: Run Your Application and Watching the Video Stream on MCS
You are now ready to execute the Node.js program. In the system console, type the following command:
node app.js
Go back to MCS console, click Development on top menu bar, and click test device.
Go to the test device you just created.
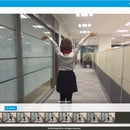
You will see the video image data channel is sending the images captured from the web camera.
It is very convinient if you wish to build your own baby monitor or you would live to broadcast a live show; and by downloading the MCS mobile app, you can watch the video stream everywhere.
.


