

Introduction: Build an Alexa Interface for OurWeather (ESP8266 Based Weather Station)


In this Instructable we will show you how to connect up the Alexa systems in your house to your OurWeather (ESP8266 based) station kit. We will be rolling this really cool feature set into our other major kit offerings including:
- - GroveWeatherPi - Raspberry Pi Based Weather Station Kit
- - SmartPlantPi - Raspberry Pi Based Plant Watering and Environmental Kit
- - The ThunderBoard Raspberry Pi IOT Lightning Detection Kit
This is a four major step instructional tutorial to get your OurWeather to Amazon Alexa Interface working. All source code is provided!
While we are focusing on OurWeather in this Instructable, the techniques we developed are good for many projects.
What is OurWeather?
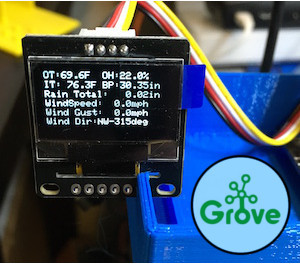
OurWeather is an ESP8266 based connected weather station containing 7 different sensors that will teach about electronics, software and the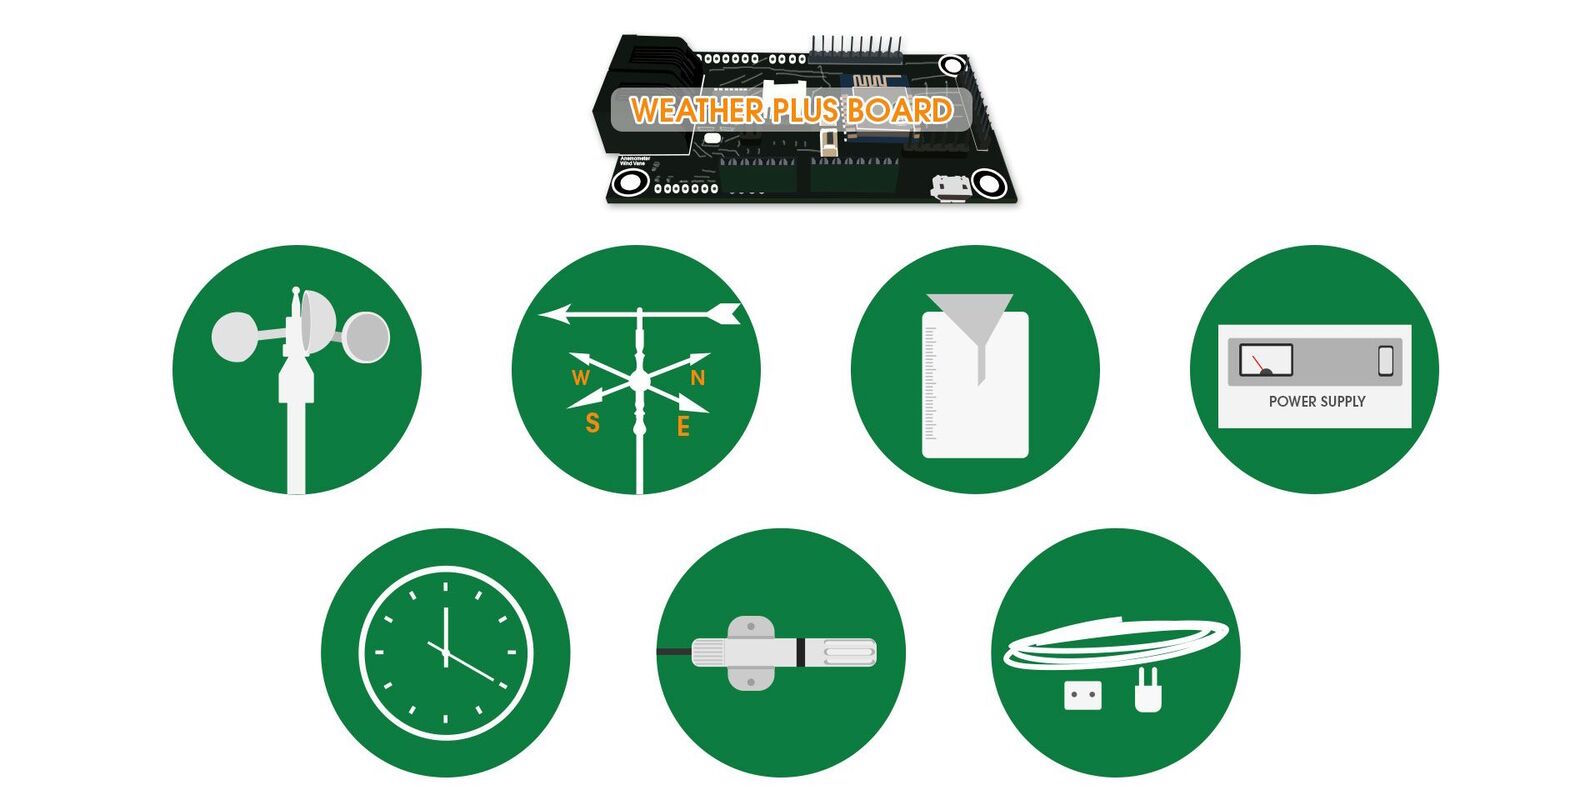 weather. It contains all the sensors and wires to make a fully functional, WiFi weather station. No software programming is required, it works right out of the box. However, if you want to change the way OurWeather works, add your own software or do something entirely different, we have the Open Source software available. And what is one of the coolest features of OurWeather? Building the kit requires NO SOLDERING. It uses Grove Connectors. It is all plug and play based building, with a full step-by-step photograph based instruction manual. It is a safe and educational way to learn about weather, electronics and science topics. You can watch our successful kickstarter video here: https://youtu.be/pw6hSNSQnsM
See the Grove Connector Tutorial Here.
How does the OurWeather to Alexa Interface Work?
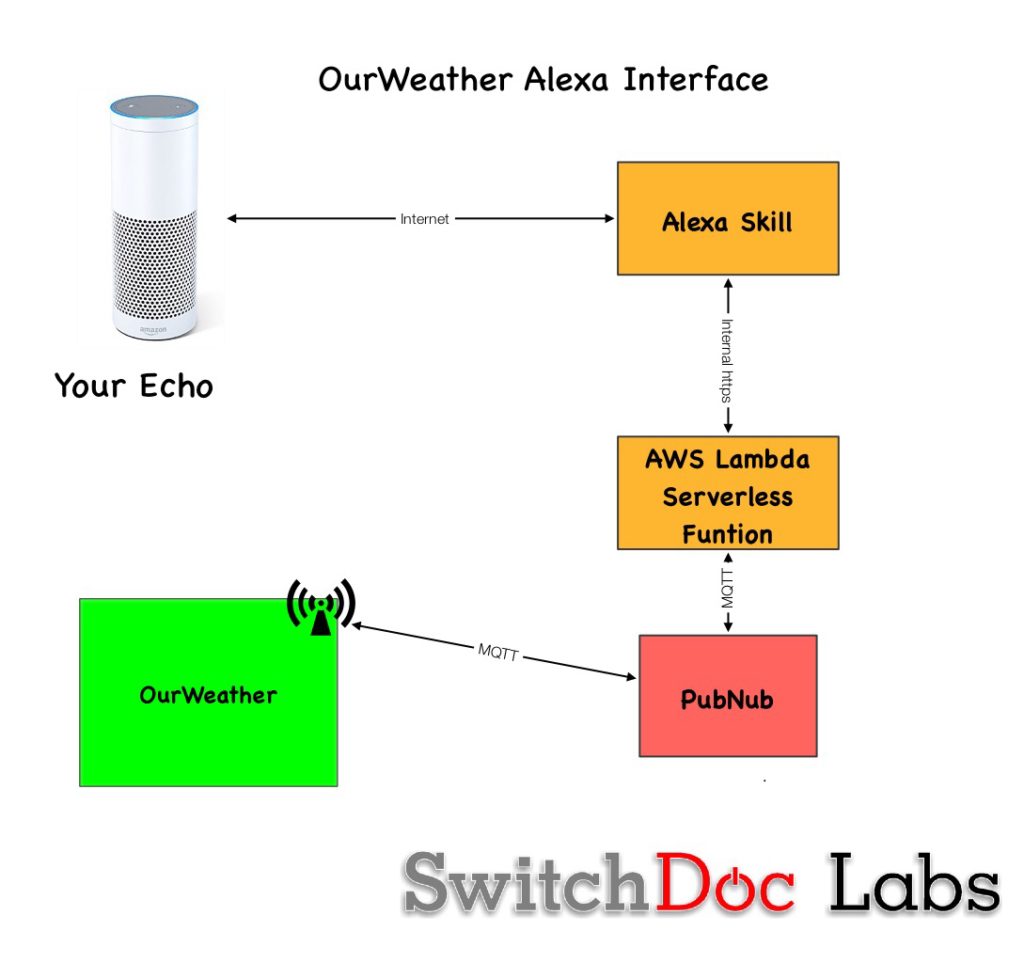
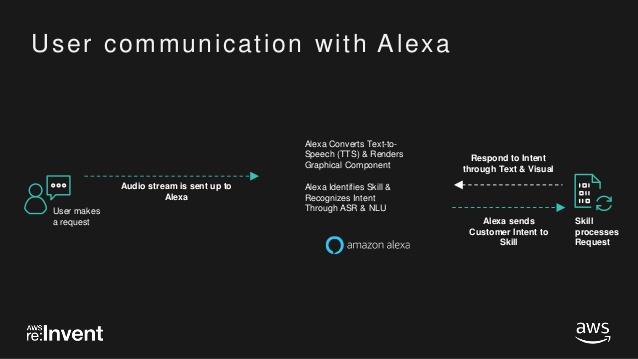
Below is a block diagram of how the system works to get OurWeather Information up to Alexa and how to respond to voice commands with real information.
The Alexa Voice to OurWeather Project
There are four major parts to this project.
- - PubNub - MQTT Broker between OurWeather and the AWS Lambda function
- - The Alexa Skill - Controls Alexa on Echos in your house
- - The AWS Lambda Serverless Function for brokering information from PubNub to the Alexa Skill
- - OurWeather - MQTT Publisher Weather Information to PubNub
What is MQTT?
Since the main transport protocol used in this project is MQTT, an explanation is in order.
MQTT is a publish-subscribe based "light weight" messaging protocol for use on top of the TCP/IP protocol, such as the WiFi packets that we are using in this project. It is designed for connections with remote locations where a "small code footprint" is required or the network bandwidth is limited. The publish-subscribe messaging pattern requires a message broker. The broker (PubNub in this case) is responsible for distributing messages to interested clients based on the topic of a message.
 Publish–subscribe is a pattern where senders of messages, called publishers (in this case our ESP8266 is the publisher), don't program the messages to be sent directly to subscribers, but instead characterize message payloads into classes without the specific knowledge of which subscribers the messages are sent to. Similarly, subscribers will only receive messages that are of interest without specific knowledge of which publishers there are. Mosquitto operates as the broker in this system and routes the published data to the appropriate subscribers.
You can think of MQTT as writing stories for a newspaper where you don’t know who will be subscribing to the article.
What is JSON?
JSON is an open standard format that uses human-readable text to transmit data objects consisting of attribute–value pairs. It is the primary data format ![]() used for asynchronous browser/server communication, largely replacing XML. XML is a "heavier" protocol that is also hierarchical in nature, but with a great deal more redundancy that JSON. Yes, there are class wars going on for people that advocate JSON over XML, but in todays world of higher speed communication, it rarely matters. You can make the argument that the higher data density of JSON is a better choice for IOT applications.
used for asynchronous browser/server communication, largely replacing XML. XML is a "heavier" protocol that is also hierarchical in nature, but with a great deal more redundancy that JSON. Yes, there are class wars going on for people that advocate JSON over XML, but in todays world of higher speed communication, it rarely matters. You can make the argument that the higher data density of JSON is a better choice for IOT applications.
The Four Blocks of the Alexa Voice to OurWeather Project
PubNub
PubNub is an MQTT broker in the same sense as Mosquitto MQTT Broker is on a Raspberry Pi Platform.
PubNub is a global Data Stream Network (DSN) and realtime infrastructure-as-a-service (IaaS) company based in San Francisco, California. The company makes products for software and hardware developers to build realtime web, mobile, and Internet of Things(IoT) applications.
PubNub's primary product is a realtime MQTT publish/subscribe[2] messaging API built on their global data stream network which is made up of a replicated network of at least 14 data centers located in North America, South America, Europe, and Asia. The network currently serves over 300 million devices and streams more than 750 billion messages per month.
The foundation of PubNub is providing you the ability to integrate scalable, realtime data streams into your applications. Using the publish/subscribe paradigm, subscribers to a particular channel will receive any and all messages that are published to that channel. It doesn’t matter if there is one subscriber, 10 subscribers, 1000 subscribers or millions of subscribers, a published message will be delivered to all of those subscribers on that channel in less than ¼ second.
PubNub also supports BLOCKS micro services which can act like AWS Lambda Severless functions. More on BLOCKS in future blog postings.
As in the block diagram above, data from OurWeather is sent via MQTT to PubNub. PubNub stores a short history of messages (the last one will be grabbed by the AWS Lambda function below) as a topic (OWIOT1 is the channel in this case).
The basic level of PubNub (which we are using) is free.
The Alexa Skill
Alexa is Amazon’s voice service and the brain behind tens of millions of devices like the Amazon Echo, Echo Dot, and Echo Show. Alexa provides capabilities, or skills, that enable customers to create a more personalized experience. There are now tens of thousands of skills from companies like Starbucks, Uber, and Capital One as well as other innovative designers and developers.
We are building an Alexa skill that will interface to the OurWeather complete Weather Kit from Switchdoc Labs. It provides the interface from your Amazon echo to the OurWeather system. The Alexa skill manages the voice part of the project. It takes verbal commands ("Alexa, ask OurWeather Status" which gives the current weather on YOUR OURWEATHER). It is important to note that you will never publish your skill to the general market. This is for all your Amazon Echos, etc. at your house wired to your Amazon account. At our CTOs house, he has about 10 Alexa devices all wired into his Amazon account and wired into his various SwitchDoc projects, such as OurWeather, GroveWeatherPi and the famous SmartPlantPi.
An Amazon Alexa skill takes voice input from an Amazon Echo or other device, translates it to text, compares it agains what the skill is expecting ("utterances") and then sends a JSON response to a specific application or server (we have used Apache servers in the past to receive this input, but this requires you to poke a hole in your home firewall and was really too complex for the normal user to implement). This lead to our use of the "event driven" AWS Lambda function. No server. No firewall problems. No software server on your site. Much simpler.
 The Alexa Skills Kit (ASK) is a collection of self-service APIs, tools, documentation, and code samples that makes it fast and easy for you to add skills to Alexa. ASK enables designers, developers, and brands to build engaging skills and reach customers through tens of millions of Alexa-enabled devices. With ASK, you can leverage Amazon’s knowledge and pioneering work in the field of voice design. In Part 2 we will show you how to set up your Alexa Skill to interface to OurWeather. We kid you not. This is a cool set of tools and an interesting process.
 This is another free account with Amazon.
The AWS Lambda Serverless Function
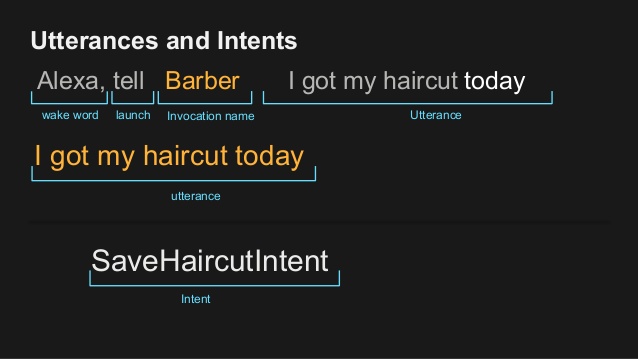
The Lambda function is the most difficult to understand part of this project. Why do we need this? An Amazon Alexa Skill is  concerned with "utterances" and how to interpret them. When you talk to Alexa, Alexa translates your speech to text, sends a request to the Lambda function. The Lambda function interprets this Alexa JSON request, gathers the weather data via an MQTT history request from PubNub (which came from OurWeather via MQTT), and sends a text response (JSON again) to Alexa with the required weather data embedded, and Alexa speaks the result.
AWS Lambda is an event-driven, serverless computing platform provided by Amazon as a part of the Amazon Web Services. It is a compute service that runs code in response to events and automatically manages the compute resources required by that code. It was introduced in 2014.
 We are using node.js to write our Lambda Function. Parts were very challenging (dealing with asynchronous callbacks in a environment that will terminate when you are done running code), but we got it to work perfectly. You will find the open source code in Part 3.
The purpose of Lambda, as compared to AWS EC2 (cloud based servers), is to simplify building smaller, on-demand applications that are responsive to events and new information. AWS targets starting a Lambda instance within milliseconds of an event. Node.js, Python, Java and C# through .NET Core are all officially supported as of 2016, and other languages can be supported via call-outs. However, some runtimes, such as the Java Virtual Machine, may be slower than others to start.
Below is a JSON request from the Alexa Skill to the Lambda Function. Note the Lambda function is event driven, so it wakes up with this request, gets the weather data via MQTT from PunNub, builds the response and sends it back to Alexa (with confidential stuff redacted):
{
  "session": {
    "new": true,
    "sessionId": "SessionId.f02ae7fb-5045-4c86-8937-b44a74e63f6e",
    "application": {
      "applicationId": "amzn1.ask.skill.1XXXXX"
    },
    "attributes": {},
    "user": {
      "userId": "amzn1.ask.account.XXXXXXXX"
    }
  },
  "request": {
    "type": "IntentRequest",
    "requestId": "EdwRequestId.3560fc59-308d-41a4-8396-2e56d4781ce3",
    "intent": {
      "name": "temperature",
      "slots": {}
    },
    "locale": "en-US",
    "timestamp": "2017-12-30T00:45:17Z"
  },
  "context": {
    "AudioPlayer": {
      "playerActivity": "IDLE"
    },
    "System": {
      "application": {
        "applicationId": "amzn1.ask.skill.111c1582-8cc3-43af-afb9-984fb01f805a"
      },
      "user": {
        "userId": "amzn1.ask.account.XXXX"
      },
      "device": {
        "supportedInterfaces": {}
      }
    }
  },
  "version": "1.0"
}
And the JSON reply to the Alexa Skill from the Lambda function: {
"version": "1.0",
"response": {
"outputSpeech": {
"type": "PlainText",
"text": "Outside Temperature is 25.9 degrees F"
},
"shouldEndSession": true
},
"sessionAttributes": {}
}
A valid question at this point, is why the Lambda function doesn't just subscribe (via MQTT) to the Weather Data channel (OWIOT1) on PubNub? The reason is that we don't want the Lambda function to be running all the time (which you need to be running to be a subscriber), we want the Lambda function to awake only on a request from Alexa. Lambda functions are event driven from triggers. Alexa is our trigger in this case. On a technical note, Lambda functions wake up "stateless" every time. The function has no execution to execution built int to the function. You can use an external database (Amazon Elastic Beanstalk for example), but that just increases the cost. Lucky for use, the "state" information we have (the weather information) is stored at PubNub and our Lambda function just grabs it there in the PubNub channel history.
AWS Lambda supports securely running native Linux executables via calling out from a supported runtime such as Node.js.
AWS Lambda usage below a threshold (which we will be under) is free.
OurWeather MQTT Interface
OurWeather is an single board computer ESP8266 based weather station combined with a bunch of different weather sensors. We use![]() the Arduino IDE to program this device and the open source Arduino code is up on our GitHub.com repository here. As of Version 026, the Alexa Interface is supported. This will be up on the automatic update server for OurWeather shortly.
the Arduino IDE to program this device and the open source Arduino code is up on our GitHub.com repository here. As of Version 026, the Alexa Interface is supported. This will be up on the automatic update server for OurWeather shortly.
After you set up the PubNub keys on OurWeather, you will periodically (every 5 minutes) update PubNub via MQTT.
JSON Data Payload
Here is an example of the data packet we are using in the OurWeather code in JSON for the MQTT payload: {
"FullDataString": "-3.30,67.40,23.24,103156.00,503.18,15.56,0.00,315.00,5.00,5.04,15.56,0.00,0.00,0.00,315.00,0,01/03/2018 09:45:39,SwitchDoc Labs,0,-1,0.00,0.00,0.00,0.00,0.00,0.00,3.62,36.40,4.67,14.40,0.00,27.20,V:0,WXLMG ,1"
}
The definition of the FullDataString is given in the OurWeather Advanced Usage Manual, under the downloads section of the OurWeather Product Page.
Step 1: Connect to PubNub

Connecting to and setting up PubNub
See descriptions of MQTT and JSON in Part 1.
PubNub is an MQTT broker in the same sense as Mosquitto MQTT Broker is on a Raspberry Pi Platform.
PubNub is used to provide an MQTT connection from OurWeather to the Amazon Lambda function. We use the ESP8266 OurWeather processor to publish weather information to PubNub, which is then fetched by the Amazon Lambda function and relayed to the Alexa Skill. PubNub is free for the kind of usage we are going to be doing with OurWeather. A message every 5 minutes is nothing to the PubNub system.
Setting Up PubNub
Setup a free account at pubnub.com. Make sure you write down your password. Now let's setup the MQTT info to connect up OurWeather.
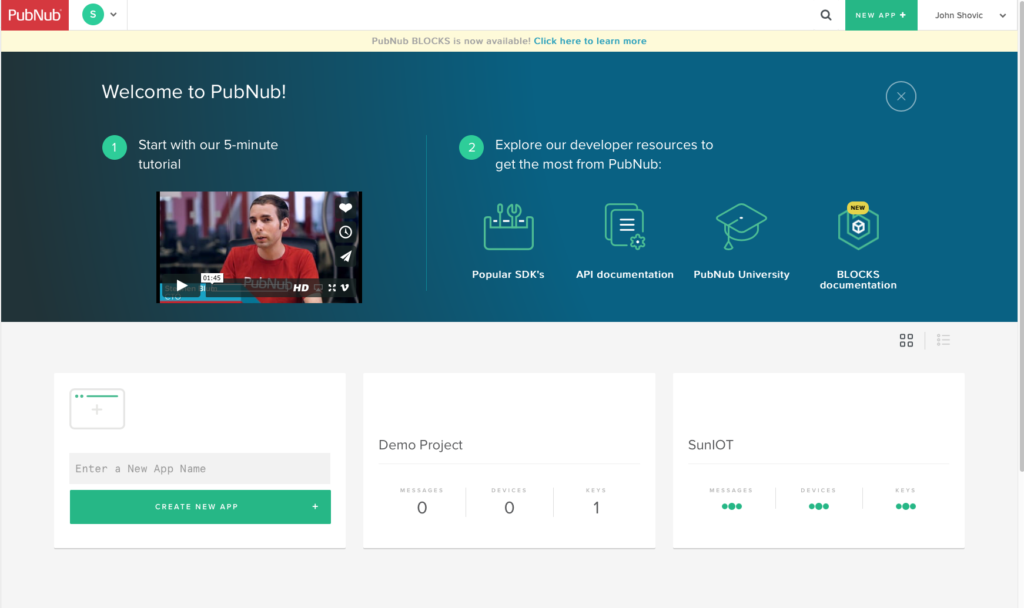
Step 1) Create a new App by clicking on "NEW APP +".. Type in SDL2Alexa in the "enter a new app" filed and hit the "CREATE NEW APP +" button. You should see this (except SunIOT will be SDL2Alexa):
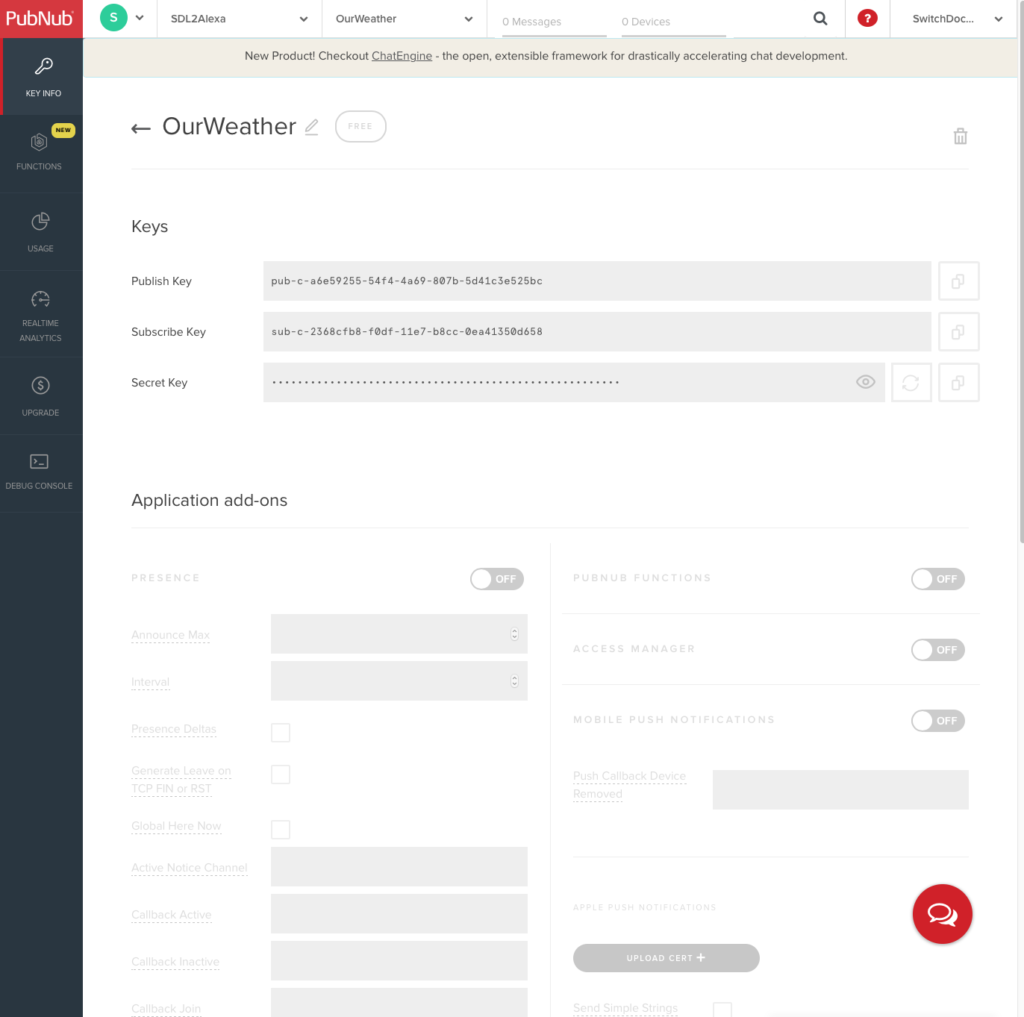
Step 2) Click on the SDL2Alexa App page. The enter "OurWeather" in the "Enter a New Keyset Name" field and hit the "CREATE NEW KEYSET +" button. That will get you a page that looks like this. Note the keys below will not work. They have all been disabled. You need to set up your own. Copy and paste the Publish and Subscribe keys to your computer. You will need these in Part 3 and Part 4. If you don't do that, don't worry. You can always come back to this page.
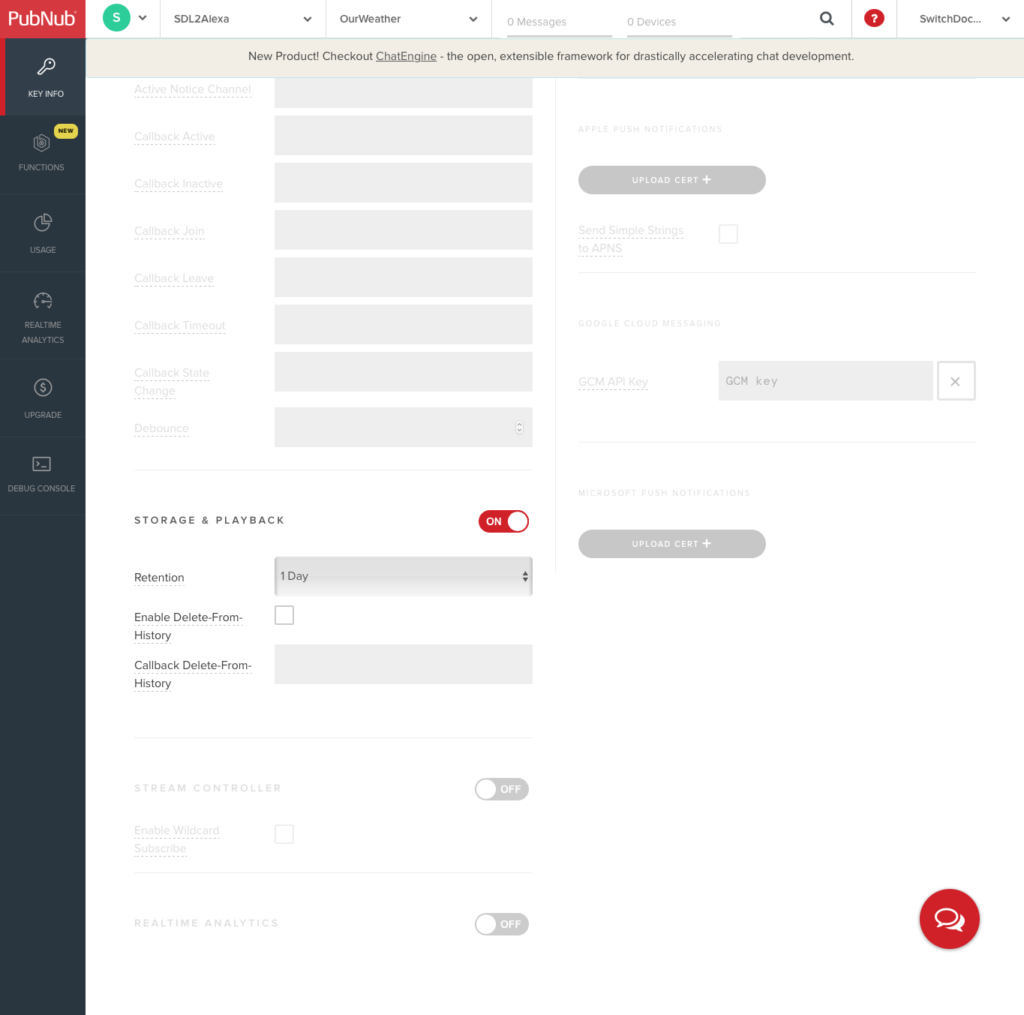
Step 3) Scroll down on the page and turn "Storage & Playback" to On. If you don't do this, nothing will work. Leave the retention on 1 day.
Now you are set up on Pubnub. Next we put together the Alexa Skill.
Step 2: Building the Alexa Skill

Setting up the Alexa Skill
The Alexa skill talks to the Amazon Echo or other Alexa device in your home. It is a bi-directional link, sending recorded voice for translation to text by the Amazon servers, and then returning text that will be rendered as voice through the Alexa device.
Following are the steps for setting up an Amazon Skill on developer.amazon.com. If you’ve done this before, just copy the intents, and sample utterances, and skip to step 3. Copy and paste your App ID and keep it for Step 3.
We will need to tell the Alexa Skill what phrase (“invocation”) we want it to respond to ("Ask OurWeather" in this case),which will activate our app (“skill”) and then what commands (“intents”) to listen for. We also specify what end point it should ping (which we will generate in Step 3 - the Lambda Function).
Set up your Free Developer Account
Make a new Account on developer.amazon.com. Make sure you use the same Amazon account name and password that you use on your Echo devices or else you won't be able to talk to your Alexa Devices.
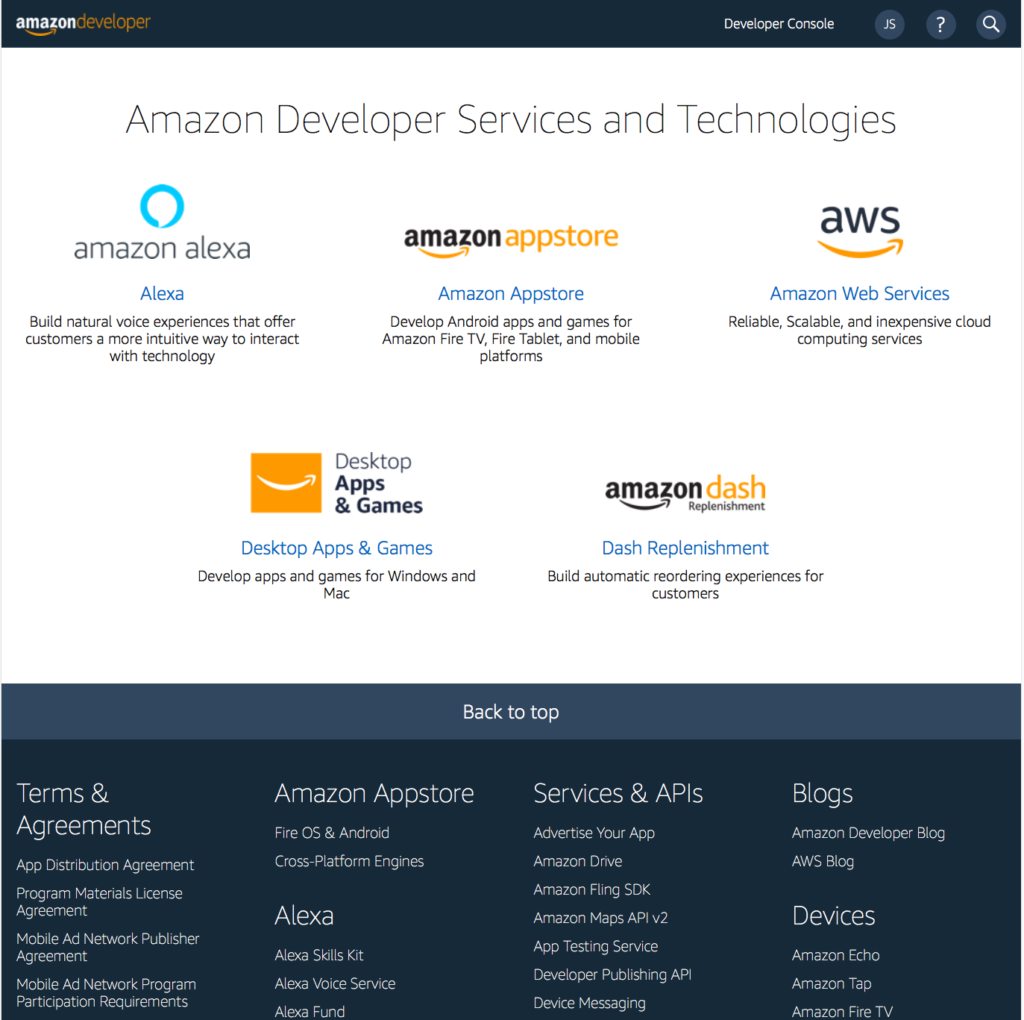
Once you are logged in you should see a screen like this. Click on the Amazon Alexa link.
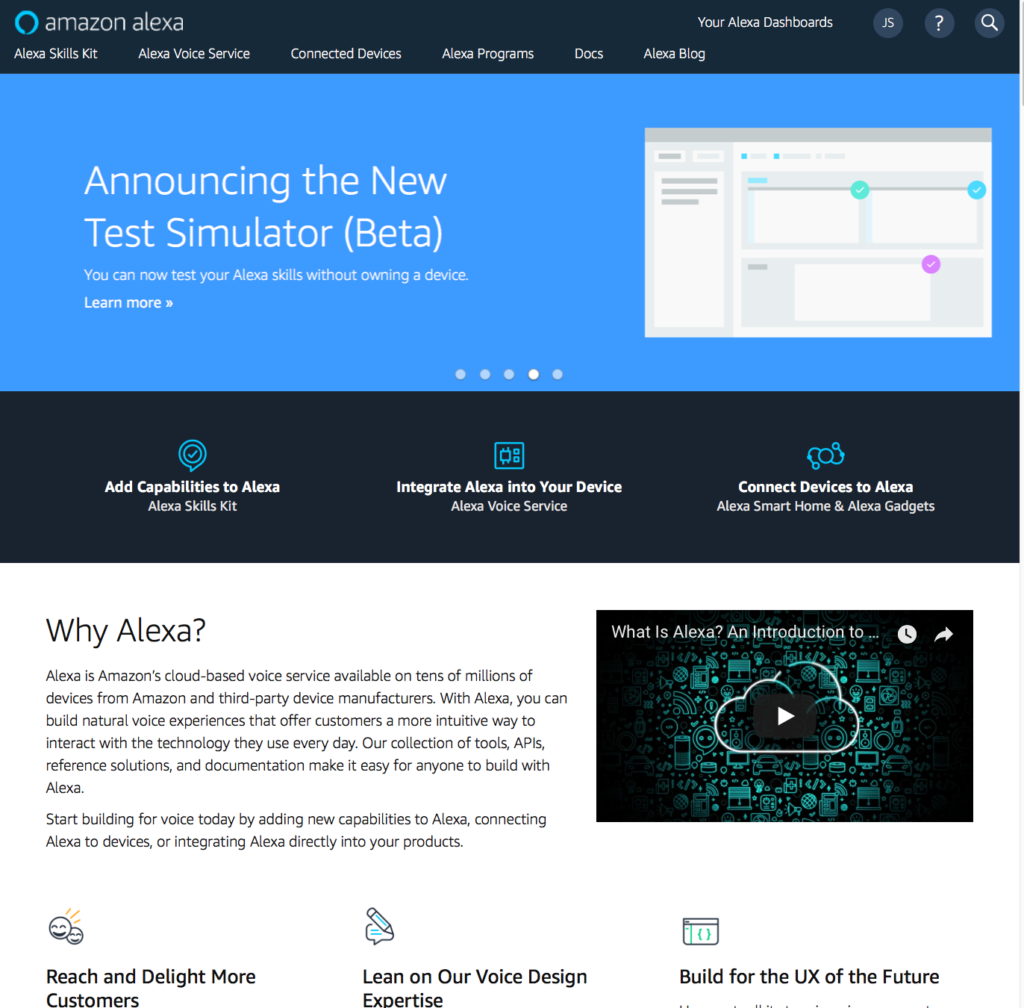
Next click on "Add Capabilities to Alexa" as shown below:
Then click on "Start a Skill" and we are off to the races.
Building Your Skill
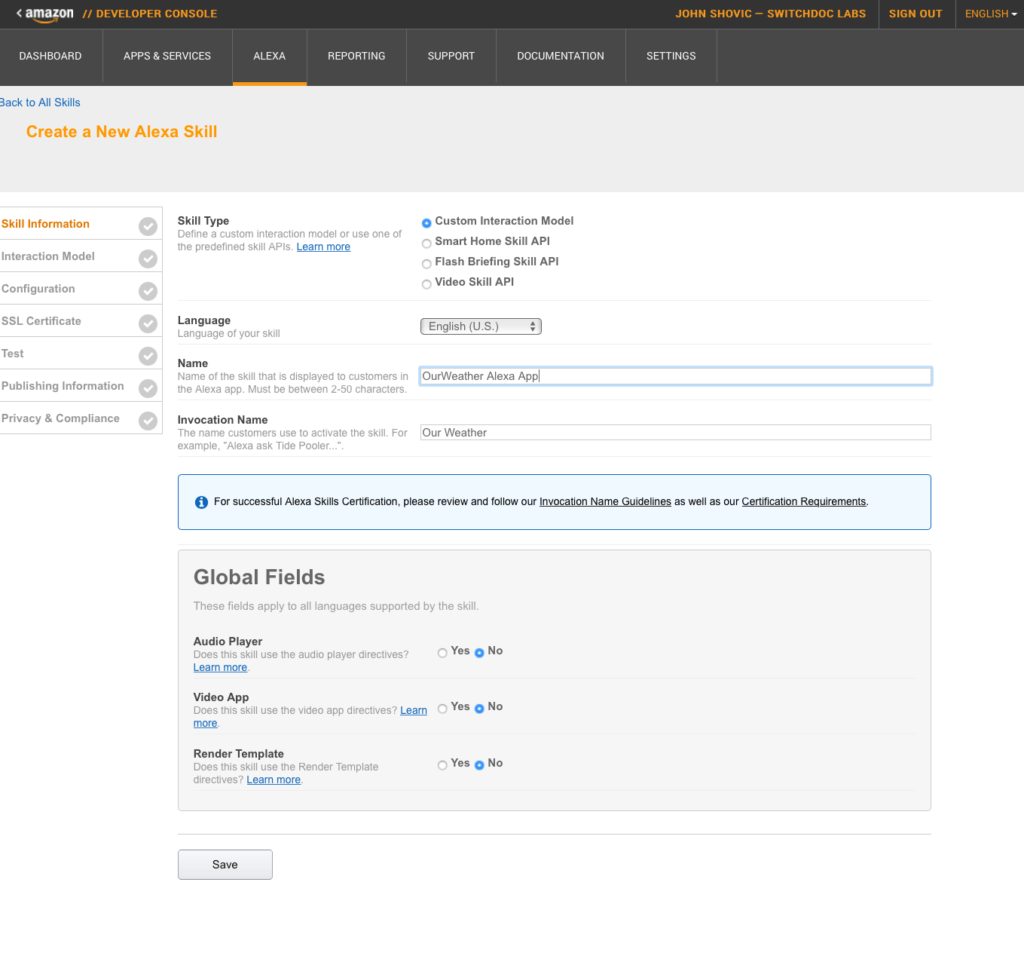
Now we’ll give Amazon some information about your application. If you want to change some of this, you will be able to do that later. The names you use for this Alexa Skill are unique to your account. If we were to publish this (which we will NOT be doing - it is only for your own account) we would need to have a more unique name.
- Leave skill type as “Custom Interaction Model”
- Type in “OurWeather Alexa App” for the name
- Type in “our weather” for the invocation (this is what we’ll say to activate this Alexa app)
- Leave the other fields at “no”
You should have a screen that looks like this:
Click “save” and then the application ID will be generated. Do a cut and paste and save this application ID. We will need it for the Lambda function. Your screen will then look the this. Note: This application ID below will not work. It has been disabled. You must use your own.
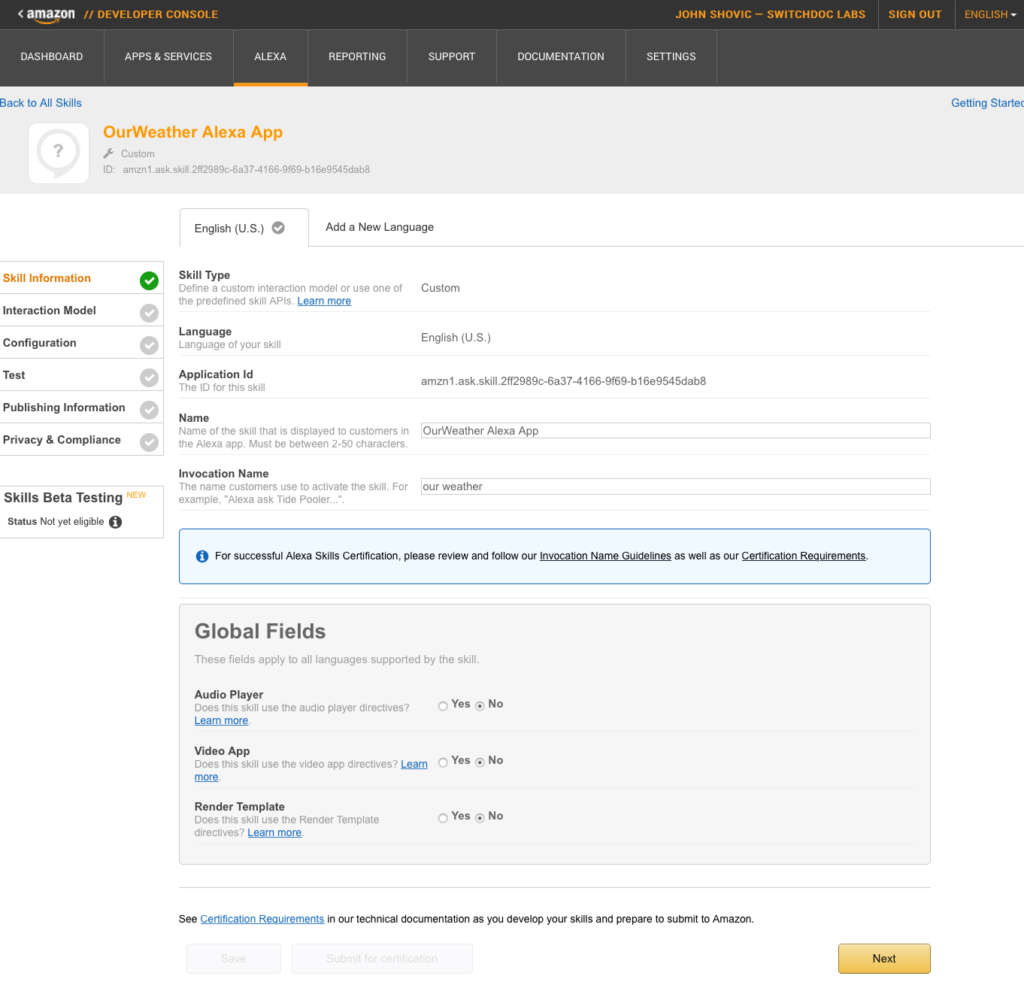
Now click "Next" to continue or on the "Interaction Model" tab to the left.
Enter the Intent Schema and Utterances
When you create a custom skill, you implement the logic for the skill, and you also define the voice interface through which users interact with the skill. To define the voice interface, you map users’ spoken input to the intents your cloud-based service can handle. This is done by inputting Intents and Utterances .
- Intents: An intent represents an action that fulfills a user’s spoken request. Intents can optionally have arguments called slots, which we will not be using. The Intents are entered using JSON format (see part 1).
- Utterances: A set of likely spoken phrases mapped to the intents. This should include as many representative phrases as possible. This is entered in the form: Name of Intent (from above) on right and the phrase a user might speak to signal that intent on the right.
- Custom slot types: A representative list of possible values for a slot. Custom slot types are used for lists of items that are not covered by one of Amazon’s built-in slot types. We are not using this in the OurWeather Skill, but we could.
- Dialog model (optional): A structure that identifies the steps for a multi-turn conversation between your skill and the user to collect all the information needed to fulfill each intent. This simplifies the code you need to write to ask the user for information. We will not building a dialog model for our simple skill.
BTW, do NOT CLICK the Launch Skill Builder Beat at this time. If you do, go to the bottom of the Skill Builder and click "opt-out of the bata program". It's not ready for what we want to do.
Copy and paste the following JSON into the Intent Schema box. We are building a pretty simple skill with simple intents. These intents will show up as input to our AWS Lambda function in Part 4.{
"intents": [
{
"intent": "status"
},
{
"intent": "about"
},
{
"intent": "timestamp"
},
{
"intent": "inside"
},
{
"intent": "rain"
},
{
"intent": "wind"
},
{
"intent": "temperature"
},
{
"intent": "humidity"
},
{
"intent": "solar"
},
{
"intent": "link"
},
{
"intent": "airquality"
},
{
"intent": "AMAZON.HelpIntent"
},
{
"intent": "default"
}
]
}
status tell me status
status tell me all
status status
status give me status
status give me all
about about
about tell me about
about tell me about you
about tell me about our weather
about Where can I buy you
about buy smart plant
about tell me about you
timestamp timestamp
timestamp when was the last value
inside temperature tell me inside temperature
inside temperature inside temperature
inside temperature give me inside temperature
temperature tell me temperature
temperature temperature
temperature give me temperature
humidity tell me humidity
humidity humidity
humidity give me humidity
solar tell me solar
solar solar
solar give me solar
link tell me link
link link
link give me link
airquality tell me air quality
airquality air quality
airquality give me air quality
AMAZON.HelpIntent help
AMAZON.HelpIntent help me
AMAZON.HelpIntent tell me what you can do
default Pardon
Your screen should now look like the following screen:
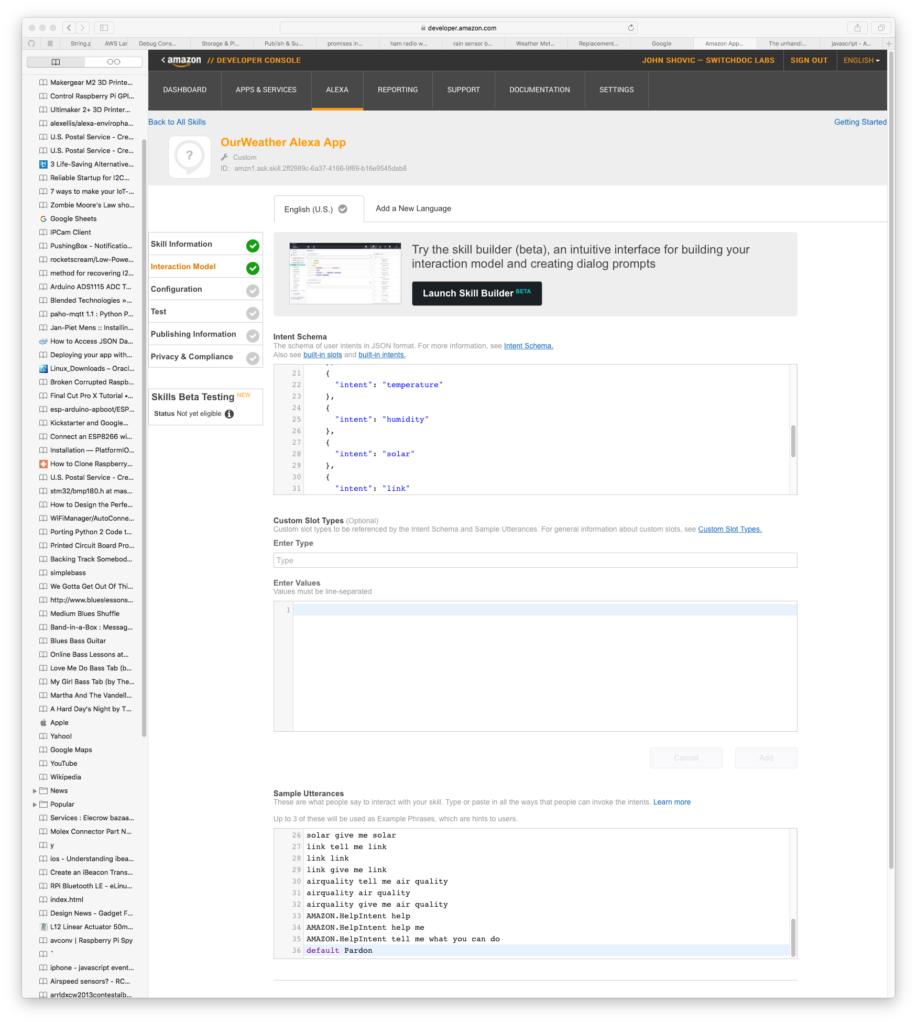
Now Click Save and then click Next.
Configuration Screen
This is the screen where we tell Alexa where to go when we send one of our commands. It can be any endpoint or server (we have used it to point to a web server on a Raspberry Pi for example). What we will be doing is pointing it an Amazon Lambda function for simplicity and since we don't need the function to run all the time. We can use the serverless Lambda function.
We will come back to this screen once we have built our Lambda Function. We’ll come back to enter in the AWS Lambda ARN as the endpoint. Remember to make note of your Alexa app id as we’ll need it in the Lambda code.
Test, Publishing Information and Privacy & Compliance Tabs
We can safely ignore all of the other screens at this point. The Test tab is something we can come back to later.
Now on to the Lambda function!
Step 3: Building the Lambda Function

Review: What is a Lambda Function?
The Lambda function is the most difficult to understand part of this project. Why do we need this? An Amazon Alexa Skill is concerned with "utterances" and how to interpret them. When you talk to Alexa, Alexa translates your speech to text, sends a request to the Lambda function. The Lambda function interprets this Alexa JSON request, gathers the weather data via an MQTT history request from PubNub (which came from OurWeather via MQTT), and sends a text response (JSON again) to Alexa with the required weather data embedded, and Alexa speaks the result.
AWS Lambda is an event-driven, serverless computing platform provided by Amazon as a part of the Amazon Web Services. It is a compute service that runs code in response to events and automatically manages the compute resources required by that code. It was introduced in 2014.
We are using node.js to write our Lambda Function. Parts were very challenging (dealing with asynchronous callbacks in a environment that will terminate when you are done running code), but we got it to work perfectly. You will find the open source code in Part 3.
The purpose of Lambda, as compared to AWS EC2 (cloud based servers), is to simplify building smaller, on-demand applications that are responsive to events and new information. AWS targets starting a Lambda instance within milliseconds of an event. Node.js, Python, Java and C# through .NET Core are all officially supported as of 2016, and other languages can be supported via call-outs. However, some runtimes, such as the Java Virtual Machine, may be slower than others to start.
We are using node.js to program the lambda function. Other language, such as C#, Java 8 and Python are available.
What is Node.js?
Node.js is a server-side platform built on Google Chrome's JavaScript Engine (V8 Engine). Node.js was developed by Ryan Dahl in 2009.
Node.js is an open source, cross-platform runtime environment for developing server-side and networking applications. Node.js applications are written in JavaScript, and can be run within the Node.js runtime on OS X, Microsoft Windows, and Linux.
Node.js also provides a very, very rich library of various JavaScript modules which simplifies the development of web applications.
Features of Node.js
The main features of node.js
- Asynchronous and Event Driven − All APIs of Node.js library are asynchronous, that is, non-blocking. It essentially means a Node.js based server never waits for an API to return data. The server moves to the next API after calling it and a notification mechanism of Events of Node.js helps the server to get a response from the previous API call. Since the Lambda function will completely terminate at the end of running your code, we need to use a method for making sure that the Lambda function sticks around for the return of the asynchronous calls. We use a node.js programming construct called "promises" to make that happen. More on promises below.
- Very Fast − Node.js library is very fast in code execution.
- Single Threaded but Highly Scalable − Node.js uses a single threaded model with event looping. The Event mechanism helps the server to respond in a non-blocking way and makes the server highly scalable as opposed to traditional servers which create limited threads to handle requests. Node.js uses a single threaded program and the same program can provide service to a much larger number of requests than traditional servers like Apache HTTP Server. This programming paradigm fits extremely well with our event-driven Lambda functions.
- No Buffering − Node.js applications never buffer any data. These applications simply output the data in chunks. Again, this fits well with Lambda Functions.
Setting up the Lambda Function

Step 1) Sign up for a free account at aws.amazon.com. We would suggest using the same email address as you used for signing up at developer.amazon.com for Alexa, but it is not required. Using the same account you use for you Amazon Alexa (which we used for the Alexa Skill set on developer.amazon.com) is not required as it was for developer.amazon.com since we are not connecting directly from the lambda function to your local Alexa Echo, etc.
You will still require a credit card number, even though we are using the free tier services.
Once you have signed up, you are presented with many, many options. AWS is a very robust and multi-facited cloud server provider. Type "lambda" in the search bar.
Note. Amazon seems to be always changing the initial screens so there may be differences in what you see.
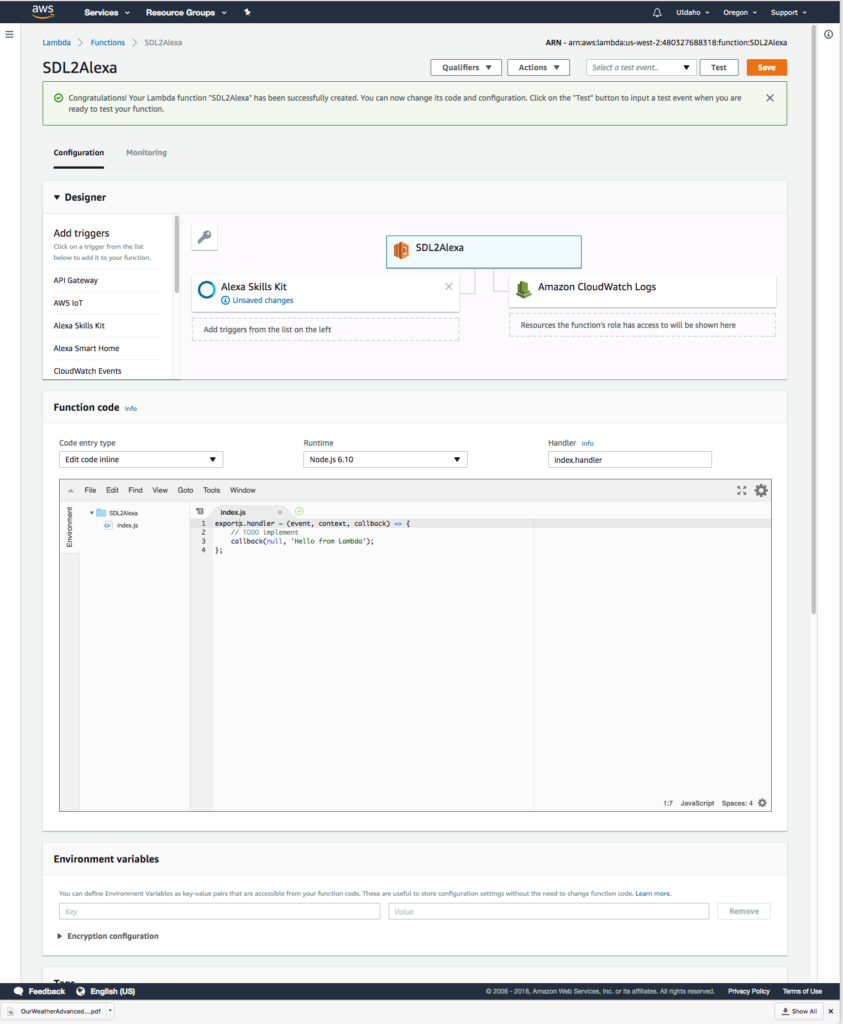
Step 2) Click on "Create Function" and you will see the screen below:
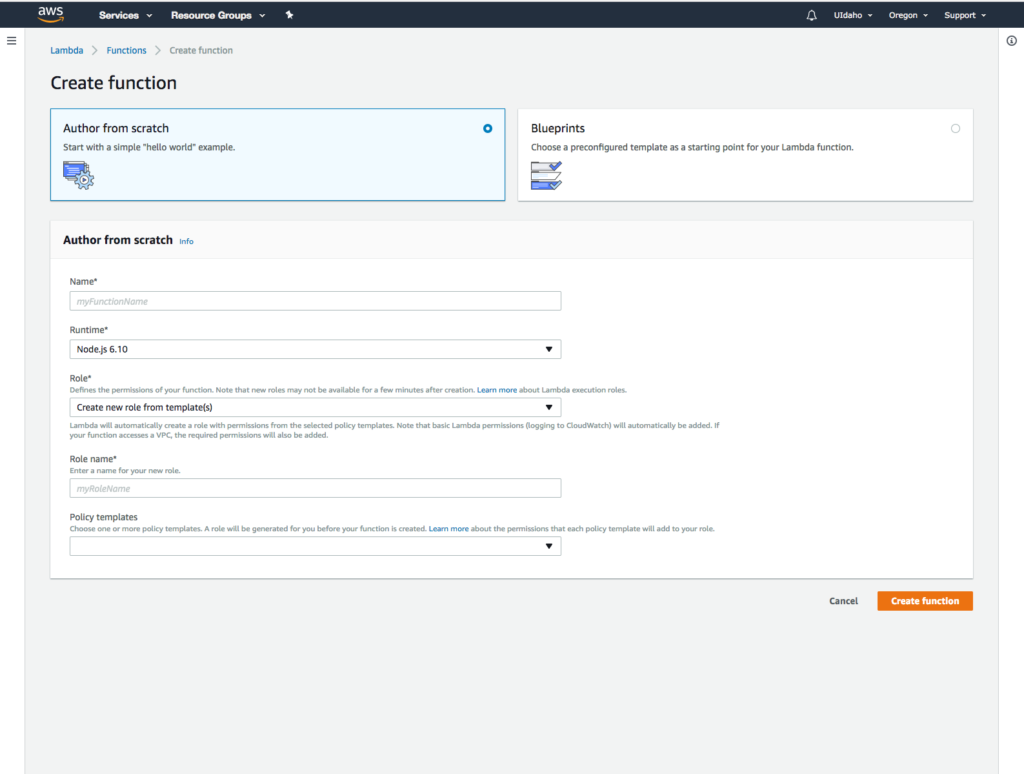
Enter "SDL2Alexa" into the lambda function Name field.
Leave the runtime at the default, "Node.js 6.10"
Click on Creeate Custom Role in the dropdown under "Role"
Leave the defaults on the page below and click "allow"
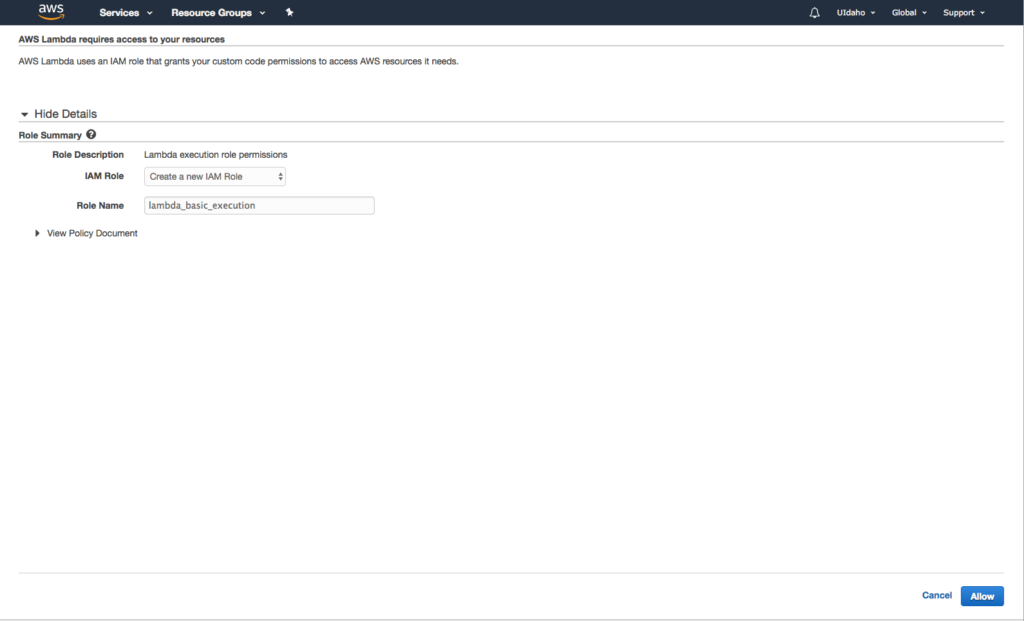
Now select "lambda_basic_execution" under existing role. Sometimes this page glitches and nothing will show under "Role". Click on "Create Function". Now you will have the screen below. Most of these options below, we will not touch.
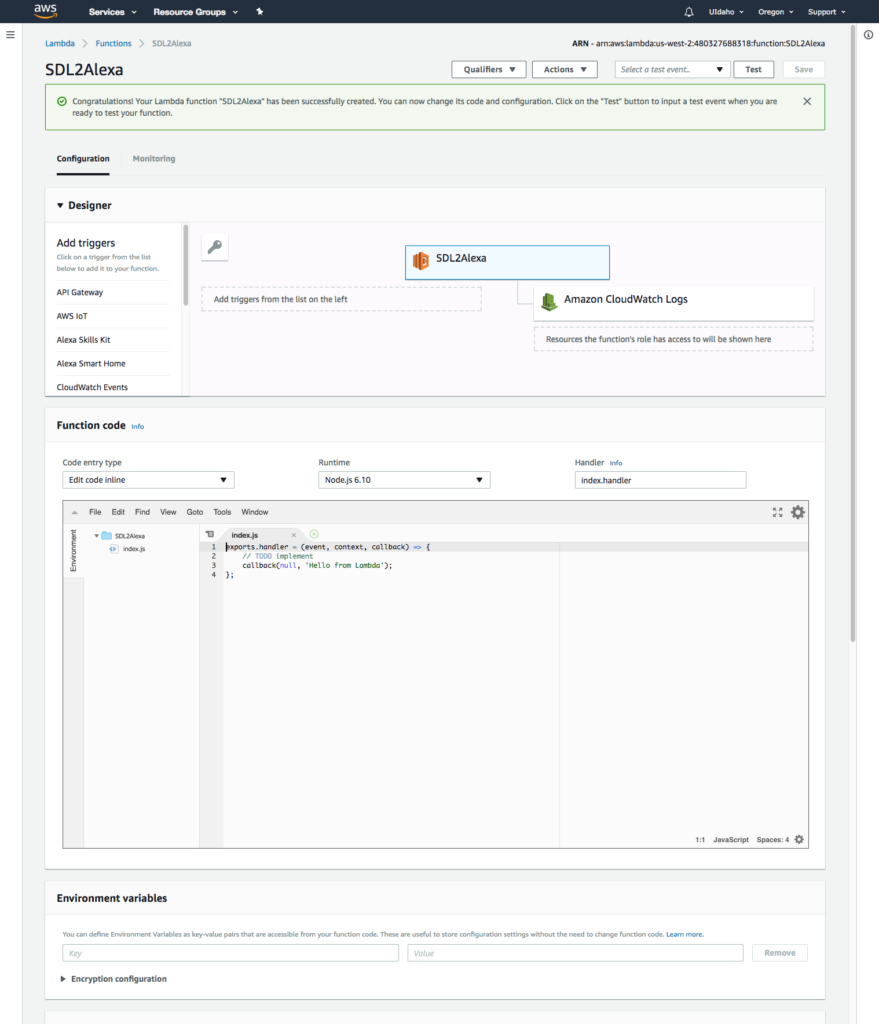
Next click on Add Triggers-> Alexa Skills Kit and then on "Add" under Configure Triggers.
Finally click on "Save" in the upper right corner of the page. Now, you should have this.
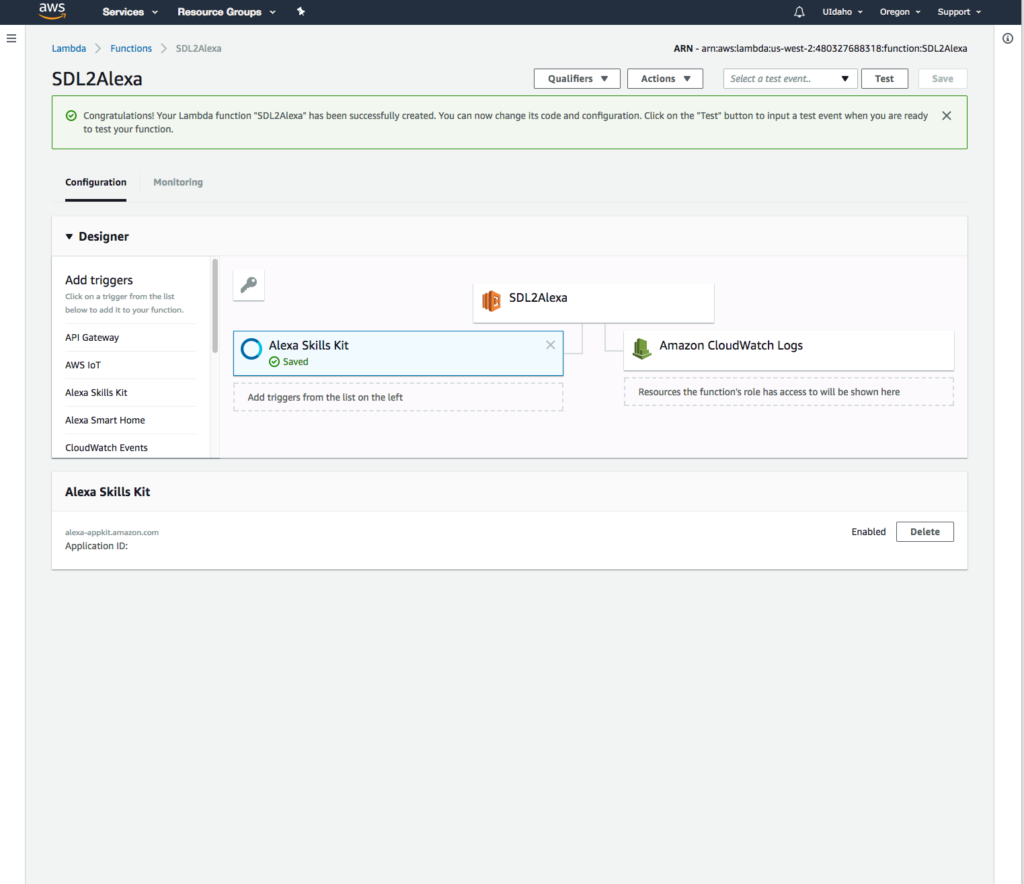
At the top of this screen you will see your ARN (Amazon Resource Name) that we need to connect to the Amazon Alexa Application . Copy the ARN number (behind the "- ") and then open up your Alexa Skill that you set up in Step 2 in another browser (login in to developer.amazon.com). Our example ARN above (which will not work for you, you need your own) was "arn:aws:lambda:us-west-2:480327688318:function:SDL2Alexa".
Click on the configuration tab in your OurWeather Alexa App from Step 2 and click on the radio button "AWS Lambda ARN" and then enter your ARN number as the default under endpoint as below:
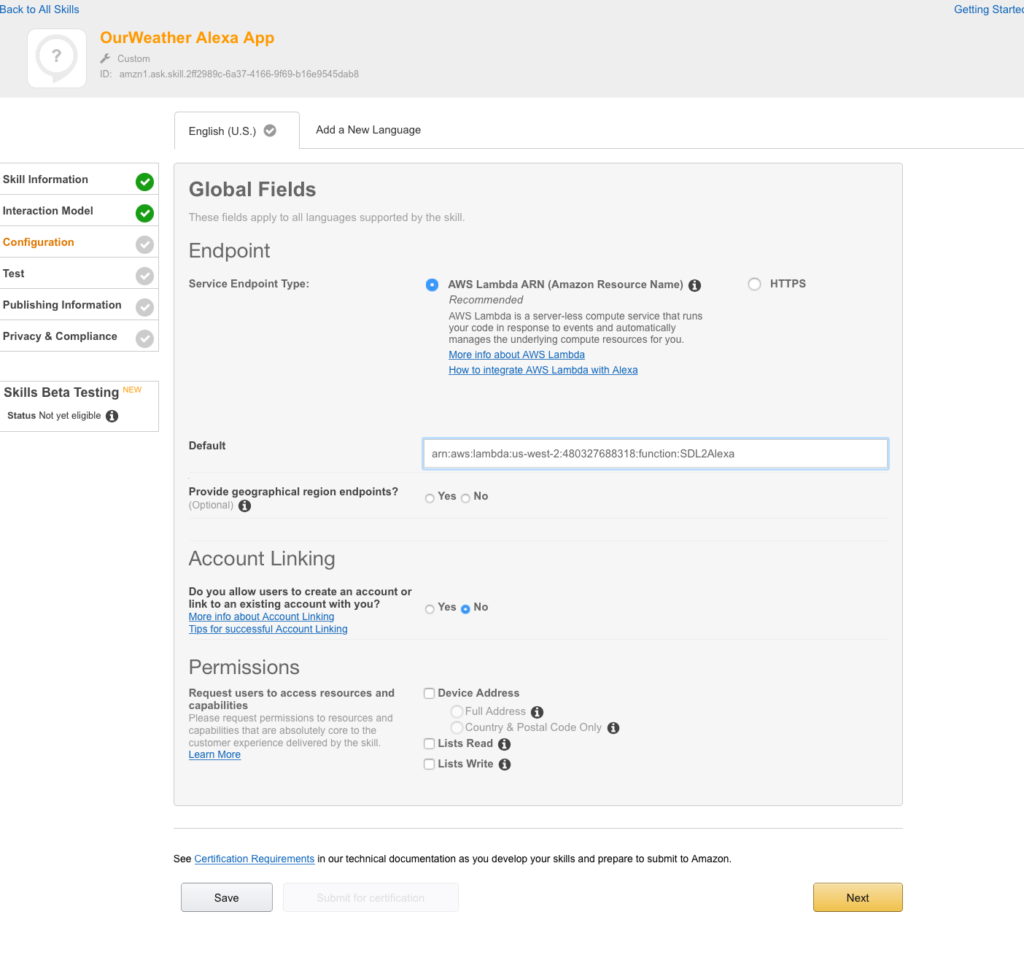
Our Alexa Skill configuration is now complete. We now go back to the Lambda function and install our software.
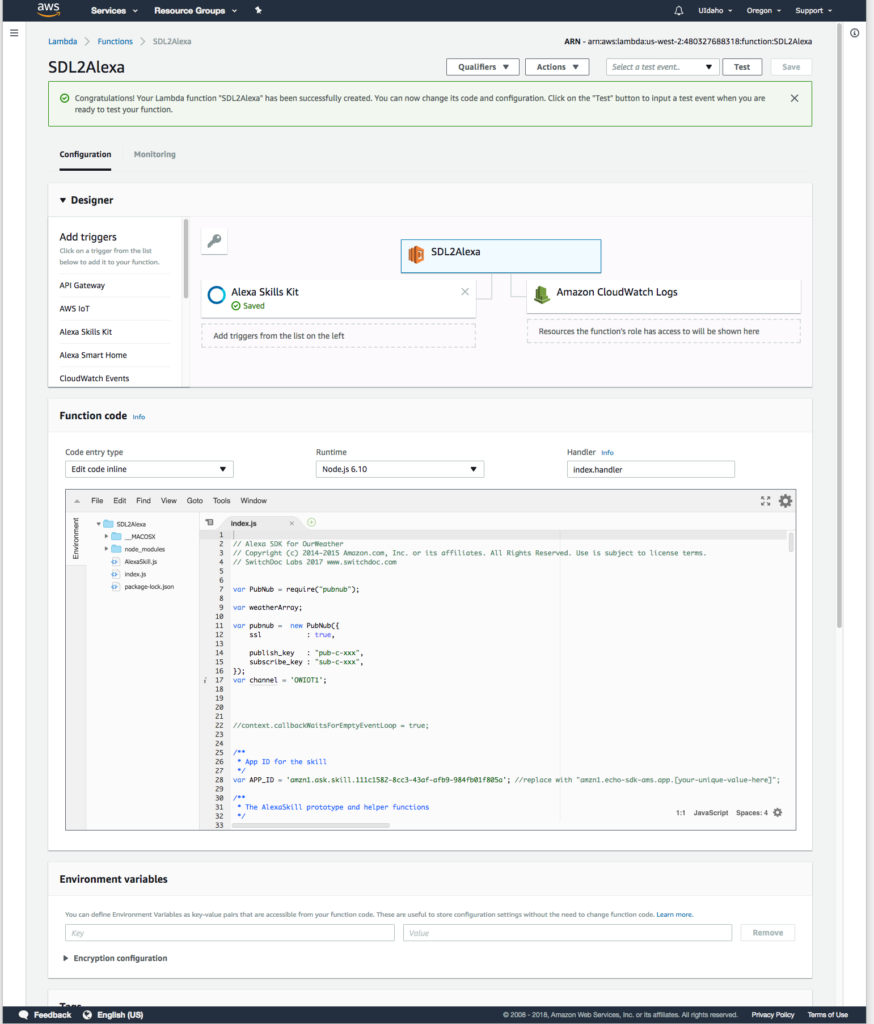
Add the Alexa Skills Kit Trigger, if it isn't shown. (Add triggers->Alexa Skill Kit, then Add). Now finally, click on the SDL2Alexa button at the top of the Designer Block to look at your code.
Your Lambda screen should now look like this:
Now we can install the Lambda Software
Installing the Lambda Software
We have the Lambda software and all required libraries, here in a zip file. Download this to your computer.
Under Function code, click on the drop down "Code entry type" and select "Upload a .ZIP file". Then click on Upload and select the Zip file from your computer you just downloaded. It should be "SDL2AlexaOW.zip".
If you are on a Mac, it may automatically unzip the file, in which case go into the SDL2AlexaOW directory, select all the files, right click, and compress it again (it will be archive.zip in the program directory).
The Click "Save" in the top right corner.
Now go down to the Function code block to the Code entry type dropdown and select "Edit code inline" and you should now see this:
Configure the Lambda Function
Almost done now. We have a couple of things to configure in the Lambda code. In the function code block
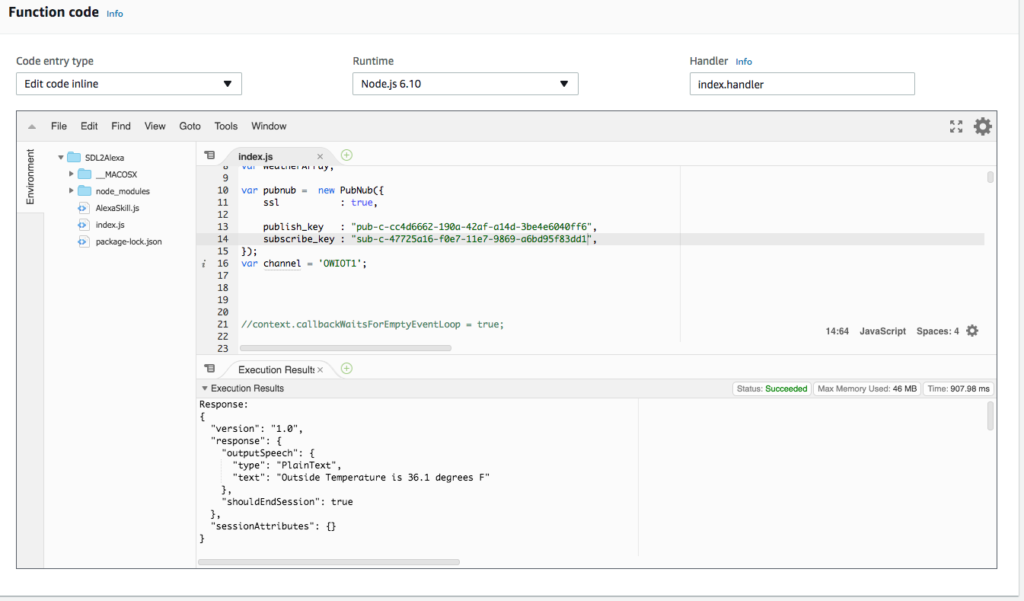
Step 1) Grab your PubNub Subscribe code (from Part 2) and paste it into the text slot string for pub_key and sub_key. Your code should like this after doing this. (Note: Don't use these keys, use your keys).var pubnub = new PubNub({
ssl : true,
publish_key : "pub-c-00d2859b-dd48-44f1-8e23-282aac34129f",
subscribe_key : "sub-c-d541ff28-e691-11e7-b8a6-46d99af2bb8c",
});
var channel = 'OWIOT1';
Step 2) Put in the Alexa Skill ID. The one in the file will NOT WORK. You must grab your Alexa Skill Application ID (see Part 3 - it will be under the Skill Information Tab in your Alexa App).
Now that part of the lambda code should look like this:/** * App ID for the skill */ var APP_ID = 'amzn1.ask.skill.2ff2989c-6a37-4166-9f69-b16e9545dab8'; //replace with "amzn1.echo-sdk-ams.app.[your-unique-value-here]";
That is it for configuration. Save the function. Now on to testing.
Testing the Alexa Skills
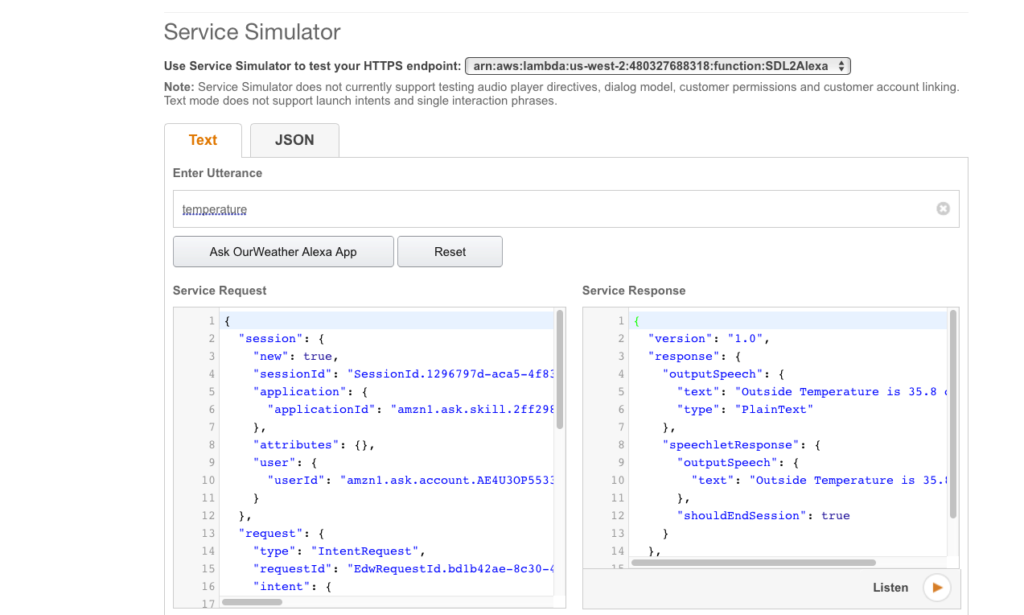
OK. Back to the Alexa Skill. Go to the "Test" tab and enable the test if you haven't already.
Down in the Service Simulator in the text tab, type "temperature" and click, "Ask OurWeather Alexa App". You will get a failure for the Service response (we have no data yet because we haven't set up OurWeather yet), but what we really want is the JSON Service request. We are going to use that in the Lambda Function test. Copy all of the JSON code out of the Service Request. It will look something like this:{
"session": {
"new": true,
"sessionId": "SessionId.4c2e6d85-4fdd-4685-97a4-ec261dcf5140",
"application": {
"applicationId": "amzn1.ask.skill.2ff2989c-6a37-4166-9f69-b16e9545dab8"
},
"attributes": {},
"user": {
"userId": "amzn1.ask.account.x"
}
},
"request": {
"type": "IntentRequest",
"requestId": "EdwRequestId.7cc5ef67-665d-4aea-99a5-340fa26c94cf",
"intent": {
"name": "temperature",
"slots": {}
},
"locale": "en-US",
"timestamp": "2018-01-05T19:40:08Z"
},
"context": {
"AudioPlayer": {
"playerActivity": "IDLE"
},
"System": {
"application": {
"applicationId": "amzn1.ask.skill.2ff2989c-6a37-4166-9f69-b16e9545dab8"
},
"user": {
"userId": "amzn1.ask.account.x"
},
"device": {
"supportedInterfaces": {}
}
}
},
"version": "1.0"
}
Now let's go test the Lambda Function.
Testing the the Lambda Function
Click on the drop down menu next to the test button and select "Configure test events". On the next screen, call your Event name, "Temperature" and then paste the JSON Service Request code from the previous step.
Clicking the Test button now will show a failure. We need to load up some data on PubNub first for the Lambda Function to work.
Setting a Dummy PubNub Message
After we set up OurWeather in the next Part, we will have live data to work on. But right now, let's publish a message that the Lambda Node will be able to pick up. Here is a JSON message from OurWeather to PubNub that we will use3 in our testing.{
"FullDataString": "2.20,65.00,22.85,102428.00,562.27,10.88,0.00,90.00,5.00,10.76,10.88,0.00,0.00,90.00,90.00,0,01/05/2018 11:40:18,SwitchDoc Labs,0,-1,0.00,0.00,0.00,0.00,0.00,0.00,3.58,18.00,4.69,30.40,0.00,26.00,V:0,WXLMG ,1"
}
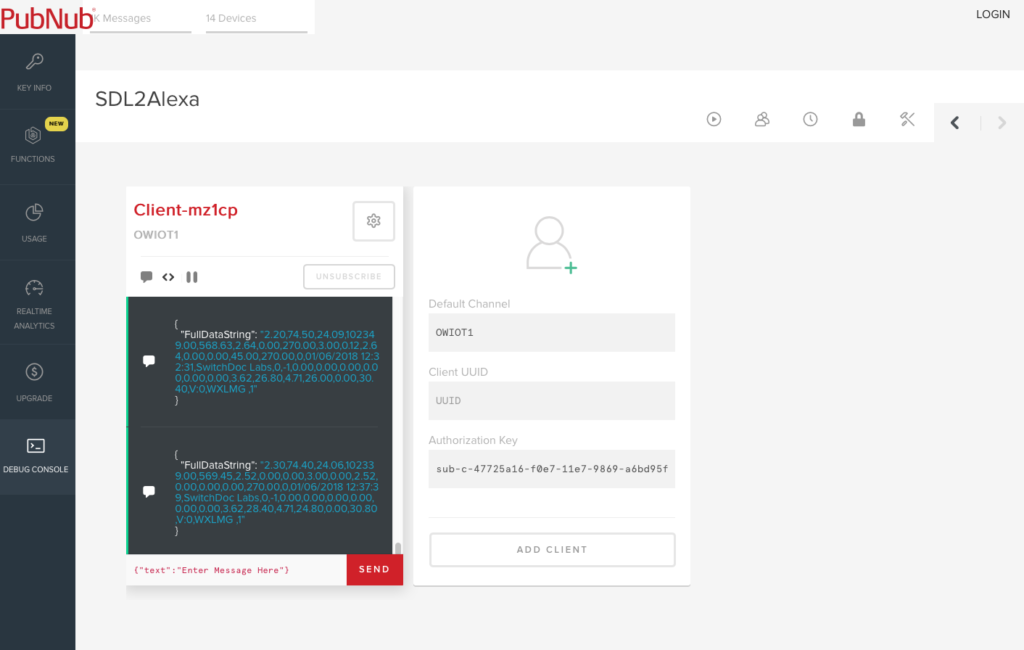
Go to your PubNub account (that you set up in Part 2) and go down into your SDL2Alexa App and then select your subscribe key from the OurWeather Key (you should have this saved somewhere else too).
Next, Click on the side tab to Debug Console. Make the Default channel "OWIOT1" and place your pub-sub key into the Authorization key. Click on Add Client.
Now you should have a screen that looks like this:
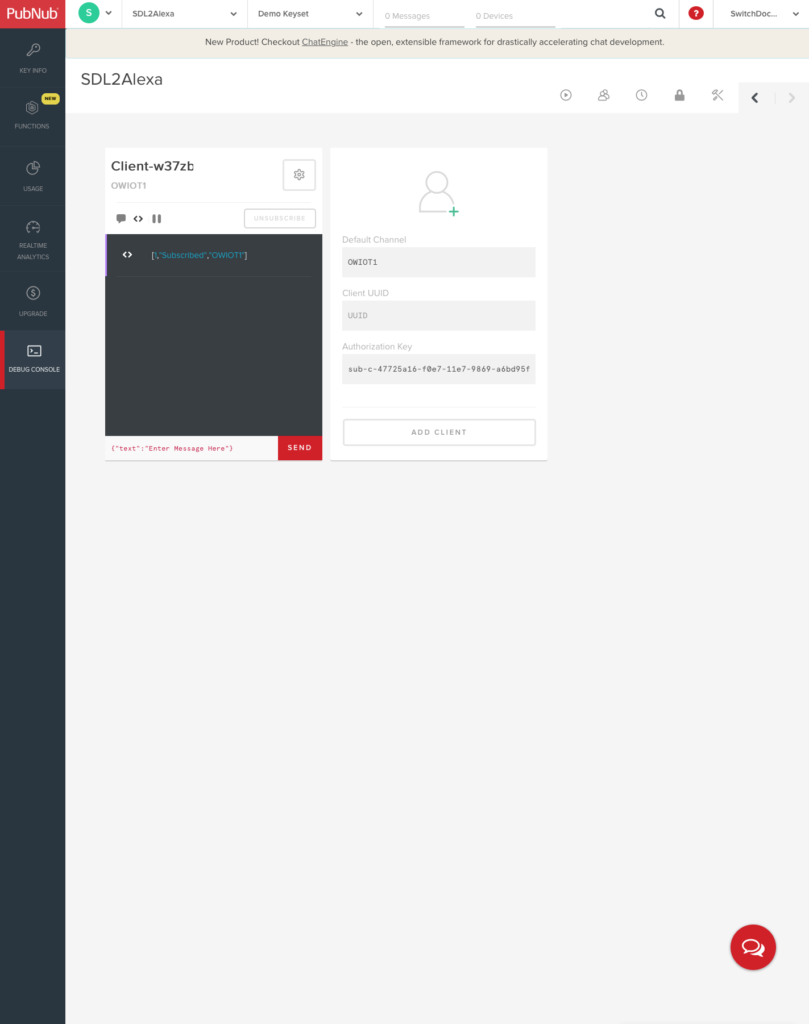
Paste the JSON message from OurWeather (above) into the Test Message slot and press Send. You should then look like this:![]()
Now our Lambda will have something to chew on.
Go back to to your Lambda page and click on Test (running the Temperature Test that we sent up earlier!).
Look down at the Execution Results in the Function code block and you should have your first success full Response.
Now let's go back to the Alexa Skill.
Go back to the Service Simulator, type "Temperature" into the Enter Utterance box and hit the "Ask OurWeather Alex App". Now you have connected all the way from your Alexa Skill to your Lambda Function, which reads the PubNub channel and sends back the temperature. 35.8 Degrees. Hit the listen button to hear what it would sound like on your Echo. Sometimes the browser aren't quite wired into the speaker on some computers, so don't be surprised it if doesn't work.
One More Test - Try Your Alexa
OK, now the rubber hits the road. We have the Alexa Skill working, we have the Lambda Function working, let's go to your phone and add the Alexa App. Note you must be logged into the same email address and account for your Alexa App on your phone (and have registered your Echos to the same account (email address) for your app to show up.
On the iPhone, Click the menu, then select Skills. Then click on Your Skills at the top right. Finally slide over the tabs from Recently Added all the way to the right and you should see DEV SKILL. Click that and you should see something like this:
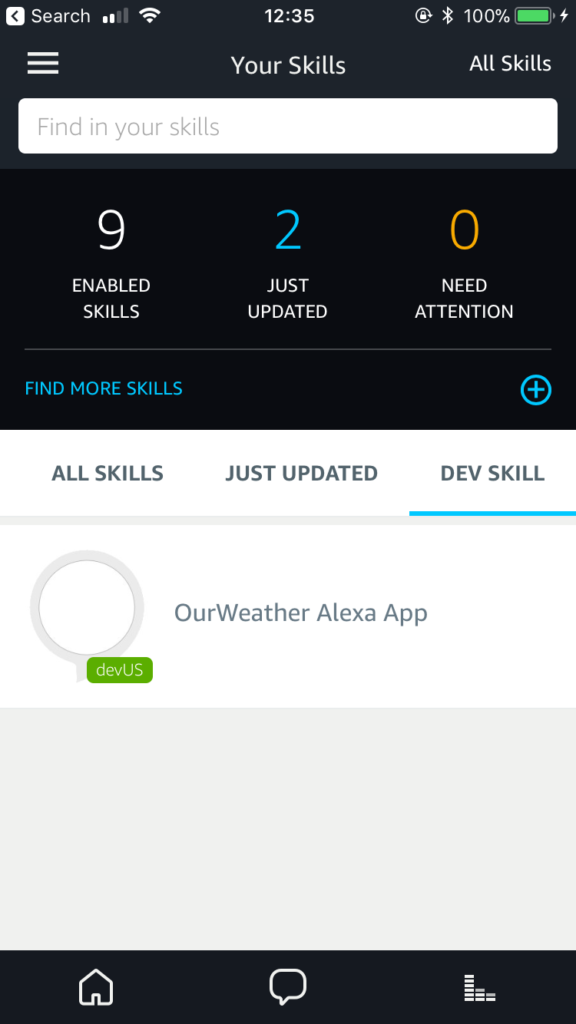
Next is the big moment. Ask Alexa "Alexa, Ask OurWeather Temperature". You should be rewarded as below. In Part 5 we hook up real Weather data from the OurWeather Weather Station Kit to our system.
https://youtu.be/0lbdSpw-J84
The Lambda Node.js Intent Software - Promises, Promises!
 Before we move on to Part 5, we wanted to talk a little about the Lambda node.js code. If you recall, lambda functions quit when they stop running code. This is a problem for a node.js program that deals with asynchronous callbacks. In our lambda code, we request a history on the the weather station channel, OWIOT1 from the MQTT channel on PubNub. This takes a while to come back (on the order of 100ms or so) and if we don't stop the lambda function somehow, it will stop before the callback comes back because of the nature of a node.js program. How to solve this?
The key is Promises. We essentially make the node.js lambda function "promise" to wait until the callback routine returns (or the 3 to 7 second default lambda function time out happens). When the callback is processed (the promise being kept) and the response is then sent to the Alexa skill and the lambda function terminates.
What are Promises?
The core idea behind promises is that a promise represents the result of an asynchronous operation. A promise is in one of three different states:
- pending - The initial state of a promise.
- fulfilled - The state of a promise representing a successful operation.
- rejected - The state of a promise representing a failed operation.
Once a promise is fulfilled or rejected, it is immutable (i.e. it can never change again).
An example promise for the "temperature" intent in the SDL2Alexa lambda code:// temperature intent
temperature: function (intent, session, response) {
var first = pubnub.history({
channel: 'OWIOT1',
reverse: false, // Setting to true will traverse the time line in reverse starting with the oldest message first.
count: 1, // how many items to fetch
}).then((response) => {
var obj = JSON.parse(JSON.stringify(response));
var msgs = obj.messages;
var msg = msgs[0];
var parsedJSON = JSON.parse(JSON.stringify(msg.entry));
weatherArray = parsedJSON.FullDataString.split(",");
return;
}).catch((error) => {
console.log(error)
});
return Promise.all([first])
.then(function (responses) {
var myText;
if (weatherArray[15] == '0') // English
{
var temperature = Number(weatherArray[0]) *9/5 + 32.0;
myText = "Outside Temperature is " + temperature.toFixed(1) + " degrees F";
}
else
{
myText ="Outside Temperature is " + weatherArray[0] + " degrees C";
}
response.tell(myText);
return ;
});
},
The syntax is somewhat obscure, but you can see the return from the history call (the"first" function) is in the Promise.all function call that waits for the history PubNub return and builds the response for the Alexa Skill.
Step 4: Setting Up the OurWeather MQTT and System Tests

Connecting
What is OurWeather?
OurWeather is an ESP8266 based connected weather station containing 7 different sensors that will teach about electronics, software and the weather. It contains all the sensors and wires to make a fully functional, WiFi weather station. No software programming is required, it works right out of the box. However, if you want to change the way OurWeather works, add your own software or do something entirely different, we have the Open Source software available. And what is one of the coolest features of OurWeather? Building the kit requires NO SOLDERING. It uses Grove Connectors. It is all plug and play based building, with a full step-by-step photograph based instruction manual. It is a safe and educational way to learn about weather, electronics and science topics. You can watch our successful kickstarter video here: https://youtu.be/pw6hSNSQnsM
Set up OurWeather
Before starting the next section, make sure you have assembled OurWeather, tested it and updated the software to the latest version available (at least 027+). Look in the downloads section of the OurWeather product page for instructions and manuals to do this.
What Do We Want to Accomplish?
The Alexa to OurWeather Interface works by having OurWeather send weather data every five minutes to PubNub (Step 1) via MQTT. That data is then read by the Lambda function (Step 3) when requested by the Alexa Skill (Step 2) when activated by a voice command to Alexa from an Amazon Echo or similar Alexa enabled device.
In Step 4, we are connecting the OurWeather hardware to PubNub, completing the Design.
Connecting OurWeather To PubNub
Go back to Part 2 and make sure you have your PubNub publish and subscribe keys (we have also used these in Part 4).
Open up the www.switchdoc.com/OurWeatherAdmin.html page.

Step 1) Make sure that your IP Number is set in the page to your OurWeather. The Manuals on the OurWeather page show you how to find your IP Number and do this.
Step 2) Click on "Check For Latest OurWeather Version" to make sure you have the latest software and you are connected to OurWeather
Step 3) Under the OurWeather Alexa Admin Functions section, add the following:
- - Admin Password
- - PubNub Publish Key
- - PubNub Subscribe Key
Now your screen should look something like this:

Click on the "Enable Alexa" button and you should get the following popup:
Reboot OurWeather by removing the power and reapplying the power. You should see the Alexa Screen as it boots up showing that Alexa is enabled and the part of the Publish Key. OurWeather is now connected to PubNub and thus is connected to Alexa.
Wait for five minutes before continuing. OurWeather only sends data to PubNub every five minutes. If you are impatient, look at the "Internals Added to OurWeather" section below for the raw commands that can force an update to PubNub from OurWeather immediately.
Testing
First we can check to see that your MQTT message is getting to PubNub. Go to your PubNub account (that you set up in Part 2) and go down into your SDL2Alexa App and then select your subscribe key from the OurWeather Key (you should have this saved somewhere else too).
Next, Click on the side tab to Debug Console. Make the Default channel "OWIOT1" and place your pub-sub key into the Authorization key. Click on Add Client.
Now you should have a screen that looks like this:
Wait five minutes and you should receive an JSON MQTT message from OurWeather as below:
You are wired up!
Full System Test
Well, now after setting up the Alexa Skill, the Lambda Function, PubNub and OurWeather we are ready to go for our full system test.
Say "Alexa, Ask OurWeather status"
You should hear the following in the following video, with your information.
Internals Added to OurWeather
Here are the REST Interface commands added to OurWeather for Alexa.| EnablePubNub | Enable/disable PubNub (Alexa) on OurWeather - sets the Pub and Sub keys | http://http://192.168.1.102/EnablePubNub?params=admin,1,pub-c-cc4d6662-190a-42af-a14d-3be4e6040ff6,sub-c-47725a16-f0e7-11e7-9869-a6bd95f83dd1Admin password is first parameter. Second parameter is Enable (1) or Disable (0) Alexa. Third Parameter is the MQTT PubNub Publish Key and the Fourth Parameter is the MQTT PubNub Subscribe Key | As of OurWeather software version 026, return_value will be 0 if password fails, 1 if the set pub/sub key succeeds |
| SendPubNubState | Sends an MQTT Message to the PubNub site. Great to start things out. | http://192.168.1.102/SendPubNubState?params=adminFirst Parameter is the Admin password | return value is 1 |
http://192.168.1.102/SendPubNubState?params=adminIf it is successful (which doesn't mean that PubNub was successful by the way, just that OurWeather tried), you will get the following JSON in your browser window.
{"return_value": 1, "id": "1", "name": "OurWeather", "connected": true}
And if you have your keys correct, you should see an update in the PubNub Debug Console. Ask Alexa "Alexa, Ask OurWeather timestamp" and it should reply with the time close to when you sent the above command.
You can easily modify this sequence for your own devices!

Participated in the
Voice Activated Challenge


