

Introduction: Building a Model Railroad - One Foot at a Time - T-Trak- Model Trains


Think you need a huge basement (garage) and lots of money to build a model railroad? Think again! This instructable will show you how to use salvaged materials, a little time and creativity to build your model railroad.
Think that all model railroads run thru massive canyons, forests, croplands and require love for a mode of propulsion last seen in commercial use over 50 years ago?
Afraid you don't have the woodworking skills or tools necessary to build model railroad bench work? We will show how your benchwork can be obtained almost completely premade. You don't need something like this fellow advocates. Most model railroad bench work is over built- capable of supporting more weight than the average table.
This instructable is to enable the modern, geographically mobile or apartment living train enthusiast to indulge this unique folk art form, without tying them to a huge house or immobile layout structure.
Run Trains, build modules or dioramas cheaply, it's up to you. Have Fun. The finished product is in N-Scale (1 foot in N scale = 160 feet in real life) but the techniques can be used in any scale.
Step 1: Obtain Materials - Wooden Clementine Crate


Getting Clementine crates: Buy the delicious fruit, throw it away, use the crate. We are going to build a module that allows combination with other modelers to form a larger railroad for meets and other social networking fun. You don't have to take the module to any of these meets- or out of your apartment - it just presents lots of possibilities!
Alternatively, freecycle.org and craigslist have crates available- suggested retail price- free for pickup.
Kato Unitrack is available online and from your local hobbyshop. You will need 2 20-000 248mm straight tracks and 2 20-040 62mm tracks. To provide power to the tracks use 2 20-041 feeder tracks.
For the legs on the layout module you will need 4 1/4" 20 T-nuts and 4 1/4" 20x2" carriage bolts and some scrap 1" x 2".
For tacking down the track and legs, you will need white glue or hot glue sticks.
Later in landscaping the module you may need paper mache, foam core board, velcro tape, masking tape, craft paint and cardstock paper as well as a printer.
Step 2: Tools Needed

You will find useful a power drill, 5/16" drill bit, power or jig saw, hammer, hot glue gun, ruler or straight edge, pencil or marker and Kato 24-000 rerailer track spacer tool.
If you aren't using a hot glue gun- rubber bands to hold the legs in place while gluing. Masking tape, spray or craft paint. Air brush or paint sprayer if desired.
Step 3: Cut Off Crate Post Ends
It's tempting to use the protruding ends as legs- but they are uneven and cannot be leveled all the time. Bite the bullet-and saw the ends off and follow the next step to put new legs on.
Yes, I know you can drill a 5/16" hole in the end of the post- but trust me- there are staples/nails that interfere with your drill and make a safe and straight hole impossible for the woodworking challenged.
Which, since you are reading this, you are more likely in the sawdust making rather than cabinet making class. We are aiming for 4" from the tabletop support to the rail surface.
Next Step -we add the legs.
Step 4: Prepare Legs
Cut your 1" x 2" board into 1 or 2" leg segments. Drill 5/16" hole in each. Put T-nut in each, pound it in.
Step 5: Place Track
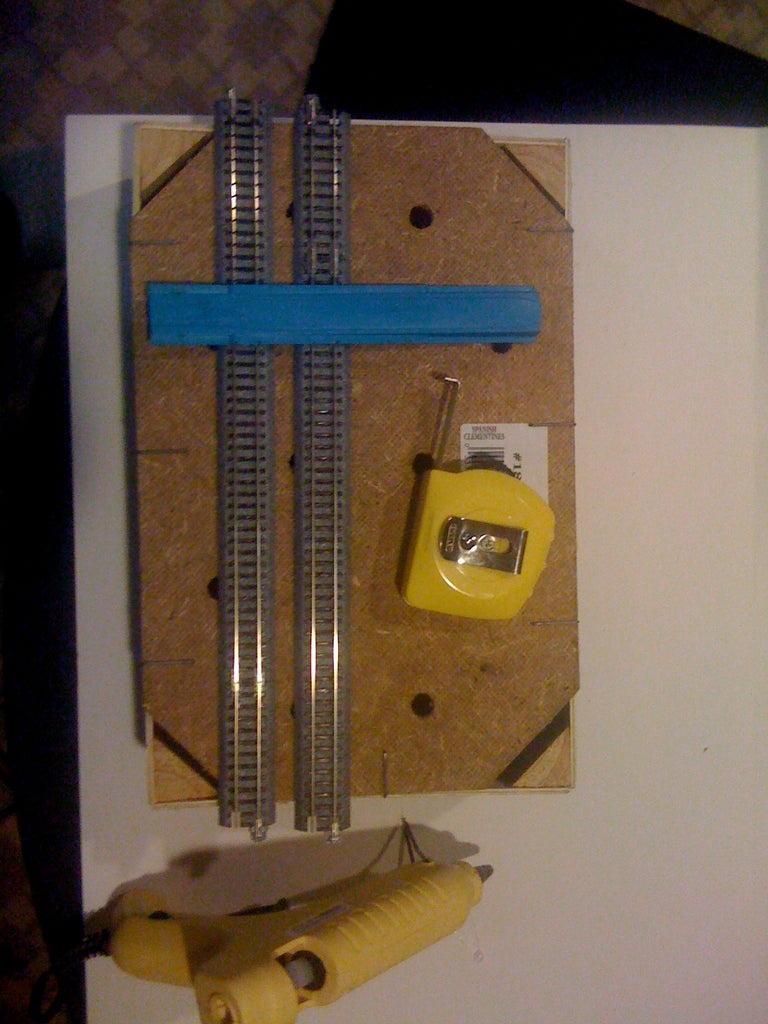


Measure 1.5" from front of module at each end and mark. Draw a line.
Click one of long tracks together with the short tracks.
Place the first track assemblage along that first line. Glue it down-if using hot glue- wait 3-5 minutes. If using other glue wait till cured or stiff.
Use the blue Kato tool to place the second track. Line the notches in the tool up with the first track and then place the second. The track will overhang the module by a bit. Use the blue tool to make sure the roadbeds are square by placing it across the ends.
This is the "Alternate T-Trak" spacing. For Philosphical discussions on this- see below. I use the "Original" spacing on my modules.
T-Trak.org has good standard positioning, you might check with your local T-Trak club to see what they recommend, and another good resource is the 'Un-Official TTrak Guide' by Paul Musselman. BTW this instructable produces a non-standard T-Trak module.
My local club NVNTRAK.org uses the alternate spacing as their standard, but many of my modules are built to the 'original standard'.
Why would you use the alternate spacing? On curves it gives more space for the swing of long locomotives and cars.
Step 6: Glue Legs
Use the glue gun to attach the legs to the crate legs- the extended bolts should raise the height of the bottom of the crate to 3.75 to 4.25 inches from the table top.
Step 7: Paint Module

Tape off track, spray or paint module. Tape the underside of the track-where it hangs over to prevent any over spray. I use flat black paint that is safe for plastics. Sprinkle ground foam if using as part of your landscaping.
Step 8: Landscape the Module
Detail each module as you see fit- on my Clementine line; the largest body of water is a puddle, the canines all have careers in the security divisions of auto recycling firms, and every module (almost) is a stop on a mass transit line.
But you can have a lighter touch, like Jesso,
Lots of help is available on Google, from Kalmbach Publishers, from Scenic Express, and from Woodland Scenics.
Try the free first.
Step 9: Connect With Others - Set Up Your Own Home Layout.


Here's my favorite link: NVNTRAK.org, and the Unofficial TTrak site, South Hampton Roads TTrak, look- it's a unique form of folk art that you can practice and share with your kids or by yourself- bring out the 'boy at heart' or the little girl who played with trains.
For unique art, cross cultural melding try Japan Model Railroaders or East Penn Traction Club.
Participated in the
Homemade Holidays Contest


