

Introduction: Building a Wooden Deck Over a Concrete One


So we've had this very sturdy but extremely plain looking concrete porch in the back of the house, and we've always wanted to make it warmer and more inviting. The obvious solution, to us, was to replace it with a wooden one. Wood is by far warmer and better looking than concrete, and if you maintain it properly it can easily last a couple of decades before you need to start replacing a piece here or there. On the downside, obviously, is the commitment to maintain it regularly. And by regularly, I mean a thorough cleaning and restaining (or repainting) once every two or three years.
Replacing the concrete deck with wood could have been done in one of two ways: completely demolish the concrete porch and build a 100% wooden one in its place, or use the concrete as a base and just add wood on top of it. Since our concrete was in good condition and would offer a solid base we decided to keep it and just cover it all with wood.
Building a wooden deck this way does offer the advantage of not needing to worry about digging foundations, putting in joists, etc, but you do have to worry about the proper slope of the concrete porch, allowing for good water drainage, ensuring any parts that would be subjected to possible water pooling are treated against it, and such. I've done my best to protect against those things and take notes/photos of them, but I'm sure there's always room for improvement. If you're going to build something like this, remember this really important rule: an extra ten minutes spent putting in better water protection at this point will save you from headaches, lots of hours and $$$ in replacement materials down the road.
Step 1: Materials, Tools, Etc


The material should be pretty obvious - wood. And plenty of it. When you go buy your supplies, make sure you get at least 10-15% extra of everything, because some beams will have unsightly knots, will not be perfectly straight (even straight ones might warp a bit in the sun if left unused for a few days), etc. Same thing applies to screws - get a lot of them.
Protection
This one comes before anything else. I've gotten dust in my eyes more times than I care to count, and have felt my ears ringing more than once after drilling and cutting. I don't want to deal with that any more, and want to avoid any damage. You should be very concerned with this as well, so make sure you use a good pair of goggles that seal the space between the lenses and your skin, as well as good ear plugs. Do yourself a favor and get a pair that can be easily removed and put back on (like the pair in the photo) even if your hands are dirty, as you'll need to do this often.
Wood
Depending on where you live and what is available, you'll probably have a choice between treated yellow pine (the green stuff) and cedar. The latter is naturally water and bug resistant, smells awesome and looks great as-is. The former is three to four times cheaper. You do the math.
Treated pine can always be stained and painted any color you like, but make sure you follow the stain/paint instructions carefully. I'm staining our deck, and the instructions I found were that you basically cannot apply any stain for several months because the chemicals injected into the wood will not let the stain penetrate too deeply and this means it won't last long. I'm going to let the wood weather until next summer, at which point I'll apply wood brightener/cleaner to it and then the stain.
You also have the choice of going with composite decking materials which look like wood but are made of much more weather resistant materials. These will cost you even more than cedar but will last way longer. Their down side, though, is that they really don't feel like wood (in my opinion). You don't get the same feeling of warmth, the slight creaking, the color, etc.
Quantities - this one will depend strictly on what design you choose for the flooring, the railing and any extras like storage under the deck, benches, etc. I've used the most common sizes of available lumber, though:
2" x 2" and 1" x 2" - floor support, railing balusters
5/4" x 6" x 10' - floor boards, railing top caps
2" x 6" x 10' - skirts
4" x 4" - railing posts
2" x 4" - top and bottom railings
Screws and bolts
There are a whole bunch of screws you can use on lumber, but you must absolutely ensure the ones you get are meant for use with decking (i.e. weather and [if using treated wood] ACQ resistant). The chemicals in treated wood will interact with non ACQ-approved screws and cause them to corrode (due to high levels of copper in the preservative), so you want to avoid that.
Sizes - most of the screws I used were 2" long, as that would go through the boards and offer a good amount of catch onto the base beneath them. For the handrails I used 2" screws (and nails) for the balusters and 3" screws to attach the railings to the 4" x 4" posts.
You'll also need concrete screws (e.g. Tapcon) for attaching the floor supports to the concrete. I used 3" screws for this step.
Finally, for the railing posts, you'll need 0.5" x 6" (for notched posts) and 0.5" x 7" bolts (for non notched posts) to attach the railings to the sides of the porch. The concrete in my case is 6" thick, which is enough room to attach to bolts one on top of the other, about 2" apart. If yours is any thinner I'd suggest looking for alternatives.
Nails
I used 4" nails to attach the balusters to the railings (along with the 2" screws). Same rules applies as for the screws - get ACQ approved (perhaps even galvanized would work) nails.
Glue
I used a fair amount of construction adhesive for places like the floor support, the skirts and the balusters, so you'll need several tubes of it. I also used carpenters glue when gluing the supports for the benches, but could have used the construction adhesive there as well.
Silicone
Anywhere the water has a chance of accumulating near wood should get extra attention, and the first place this happens is on the concrete next to the runners. The wood is already treated against water, but since these places will be inaccessible in the future you want to do as much as possible now to prevent water damage later on.
Wood sealer
Treated wood is basically wood into which a preservative liquid has been inserted by using a vacuum and lots of pressure. It's important to note, though, that this preservative does not make it all the way to the core of the lumber, and only infuses the first inch or so on all sids. This is just fine if you'll be using the lumber as-is, but you won't. You'll be making a ton of cuts to fit the wood into different sizes and shapes, and will be exposing the untreated innards to the elements. To protect these areas against moisture and bugs you'll need to treat them with a wood sealer, which is basically a liquid that smells a bit like paint thinner. It is transparent and does not leave a trace (you'll see it for the first couple of days but nothing afterwards), and can just be brushed on to the freshly cut ends. Keep this stuff nearby as you'll be using it often.
Tools
I most certainly don't envy people who had to build stuff before the advent of power tools. Even with the following ones you'll still need a bit of strength for some of the steps.
A regular drill and a hammer drill - You'll be needing two drills throughout the whole process because the vast majority of the holes will have to pre-drilled before putting screws in them. You'll also be needing a hammer drill for the sections where screwing into the concrete are concerned, so I had a regular drill with a screw head on it, and the hammer drill with either the masonry bit or wood bit on it depending on what step I was on. You don't need the drill to hammer when drilling pilot holes in wood, so a hammer drill that can turn the hammering action off is preferable.
Saws - you'll need a regular handsaw (for finishing cuts), circular saw, miter saw and a reciprocating saw. The last one is optional, though. I thought it would be a help in trimming the posts to their final height but could have just done it with a circular and hand saw.
Usual toolbox of stuff - hammer, screwdrivers, level, chisel, etc.
You'll also need wood drill bits, as all screws should be going into pilot holes instead of into raw wood. Using pilot holes on everything will certainly take you longer, but will avoid cracking and reduce the stress on the wood helping it last longer.
Step 2: Preparation, and Installing Runners and Skirts


Cleanup and preparation
This part is relatively easy. In our case we just had an old wood skirt that had been attached to the concrete sides with some bolts, and a simple railing attached to that skirt. All of it was removed. Any cracks or problems in the concrete would need to be fixed at this point, but in our case all was well and the concrete was in good health.
Installing the runners
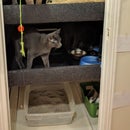
Your concrete porch should already be slightly slanted away from the house in order to drain rain water away from it. This grade is good and needs to be preserved. When you're installing your wooden deck over this, the floor planks will not be installed directly over the concrete but rather on runners that are installed perpendicular to the house (so water drainage is not blocked). The planks then get installed parallel to the house (i.e. perpendicular to the runners) or, as I chose to do, at a bit of an angle (I went with 45 degrees).
If you choose to add a design to your deck and install the planks in any other way, just remember that they must be at an angle to the runners so they have good support. And if your design means that the runners are any way near parallel to the house, then you've got a problem with drainage. You might just want to carve drainage channels on the bottom of the runners, or have interspersed small runners, but both of those have issues (i.e. clogging over time, and potential support issues). Just give this good thought before you choose a complex design.
Since the floor planks are a bit over 0.5" thick, and I was going to use 2" screws, I needed runners that were at least 2" high so I wouldn't risk bottoming out when attaching the planks. My runners were there composed of 1" x 2" pieces sitting on top of a 2" x 2" ones. This gave me a height of 2" (for those of who have not dealt with north american lumber - the measurements aren't wrong; the labeling system over here is just messed up; e.g. a 2" x 2" piece is actually just 1.5" x 1.5". There's probably some historical reason for it). I then used 3" concrete screws and construction adhesive to hold them down to the floor.
I could have used 2"x3" beams sitting on their short sides, but their total height (2.5") would have left the concrete screws with just 0.5" to grab into the concrete and I didn't feel that was enough. I think there were also 4" screws available, but their price increased dramatically.
The runners are spaced out 18" apart from each other, and the same goes for the actual concrete screws - they're 18" from each other as well.
When the runners are all installed, it's time for some silicone. All lines where they touch the concrete, where the two layers of the runners meet and where there are holes left by knots, are all filled up with a high grade exterior use silicone in order to prevent water from accumulating and getting in there.
And as with all other steps - any freshly cut piece of wood gets some preservative brushed on to to avoid water damage there as well.
Installing the skirts
Skirts are needed on all vertical surfaces, but at this point I only installed the ones on the sides of the floor. Those on either side of the steps were done after the steps were completely finished because it was much easier to measure and fit them at that point.
When putting the skirts on its important to keep water drainage in mind. As it drains away from the house it will reach the end of the concrete floor and simply want to fall down onto the ground. This should not be hampered, and you need to make sure there is plenty of room for the water to drain here. The old skirt had been bolted directly onto the concrete, and there were a total of four narrow vertical channels molded into the concrete. When the skirt came off I could not even see these channels because they were completely clogged. To avoid a repeat, I left a full 0.5" gap between the concrete edge and the skirt; this way it will never clog and water will always drain properly. Note, by the way, that this gap is only really necessary on the front of the porch and not on the sides. You can leave it there as well, but I found the drilling, and especially the screwing of concrete screws, to be quite a job, so the less I did of those the better. I left the gap at the front skirt, bolted the side skirts right up against the concrete, and just applied silicone where the side skirts met the concrete (this way it acted just like a runner).
Finally, note that the skirts top edge is flush with the top of the runners since the floor boards will be sitting on both of them. The bottom edge is flush with the bottom of the concrete floor since this is where the frame for bottom panels will be installed.
Step 3: Installing the Floor Boards and Skirts for the Staircase


The floor
Once the runners and the skirts are on, it's time to start showing some real visual progress. The runners were placed perpendicular to the house with the original idea of running the boards parallel to it, but I changed my mind at the last minute and went for a 45 degree angle. This results in a bit more that 18" between runners (26.5" on center, so not exactly "a bit more" ...), but after placing a couple of experimental boards and seeing that there was very little spring to them I figured I'd be ok. The only caveat I could think of at this point was that I would need to abstain from any short floor boards (i.e. those spanning just two runners), as they would bow too much in the middle.
The first board goes on starting from the far corner and moving towards the house. It's important to get the angle right and to choose a very straight board, because all the others that follow will laid down parallel to this one.
The boards get two screws running through them and into each runner, and where a board ends it must be cut at 45 degrees and end right in the middle of a runner. The next board starts from the same spot and keeps on going until you reach the house or need another board. When attaching two boards on the same runner, angle the screws such that they are at least 0.75" away from the edge of the board and still going into the runner. Staggering your board cuts so no two contiguous lines have the cut on the same resting on the same runner will make your floor stronger and look much better.
When laying down additional rows of wood, you need to leave a bit of space between them to allow for the wood's expansion and also for proper water drainage. I had found that 1/8" worked fine, and the simplest spacer I came up with was a few thick nails that I just bent in the middle. This made for a sturdy spacer that was also easy to grab onto with a pair of pliers and pull out (some of them will be really stuck after the board is attached).
Not all of your boards will be perfectly straight, but that's ok and can be fixed (to a degree...). Simply put the board down, set the proper spacing at one end, and screw that end down. Then move down the line, set spacer, and either pull or push the board into place. Keep on screwing it into the runners as you move down, and the end result will be straight. Obviously some boards are way too crooked to begin with, so just skip them - that's why you bought an extra 10% of material to begin with.
Install the boards with a bit of an overhang at the edge of the floor, as this will all be cut off in one shot at the end. Do not cut the boards one by one and install them flush with the edge because you can easily be a little bit off on a few boards and this will show. Instead, wait until all the boards are attached and then just cut the edges off in one shot with a circular saw. Once they're cut, use a router to round off the edges.
The steps
Once the floor is done and the edges have been cut off, finish off the steps by installing boards on their respective runners. These can just be simple parallel boards; no need for a design at this point. Start from the front of the step with full width boards and work your way towards the back, ripping the final board to the proper width with the circular saw (or, preferably, a table saw if you have one).
When the steps are covered, use some bristol board to outline the exact shape of the skirts on the sides of the steps. The board is thick and won't flop everywhere, so just hold it up against the sides of the staircase and crease it along the edges of the steps in order to know where to cut them. Trace the lines, add extra pieces for areas larger than the board. Once you have a complete template for the skirts, lay it on top on a 2" x 10" board, transfer the shape, and cut. Then cut additional pieces of 2" x 10" to fill in any parts of the template that extended beyond the size of the beam. Those pieces can just be attached with carpenter's glue and some screws. As long as the pieces are well attached, you're good. They won't be supporting any weight so don't worry too much about how strong they are.
Attach the finished skirts to the concrete using tapcon screws and you're done. You can then quickly remove the stair boards to apply silicone where the skirts touch the concrete, and put the boards back on.
Notes
Cupping - if you look down the short edge of a board, you'll see the rounded grain that indicates this was once part of a circle. The curves will either point up or down, and this is important to keep in mind. Wood will have a tendency to bend (over time) in the direction of those lines, so it's crucial to install the boards with those curves facing down. Being screwed onto a firm surface will hold that cupping back, and if you install the board with the curves facing up its edges will rise over time and become both unsightly and dangerous (easy to trip over).
Finally, make sure you pre-drill all holes so the screws don't end up stretching and potentially cracking the wood. This is crucial especially around the runners where two boards meet. And as always, brush on wood sealer to all cut ends.
Step 4: Railings


Railings can be installed in many ways and designs, but I picked one that was relatively simple and looked good. It consists of evenly spaced posts, between which rest sections composed of an upper and lower railing beam (basically 2" x 4" beams lying flat) with balusters strung up between them (simple 2" x 2" pieces). The whole thing is then topped by a railing cover that gives everything a homogeneous look and hides the screws.
You should check your local bylaws for the rules regarding minimum height, but there seems to be a standard across North America that dictates 36" for first floor railings and 48" for anything above that. There's also a concern regarding the spacing between the balusters, and although I don't recall the actual number, it was pretty small. Basically small enough to ensure a kid cannot get a limb stuck in there. I simply used scrap 2" x 2" material to leave even spaces between balusters, which amounts to a 1.5" spacing.
Setting up the posts
The posts are 4" x 4" beams that are 36" + the height of your skirts + the height of the floor boards (in my case a total of 45"). You want to remove half the width of the post for the height of the skirt + floor, such that the post will be sitting on top of the floor. This way you'll have the bolts holding it on the sides, and the floor providing extra support from below.
On long edges you need to space the posts out evenly, and my longest edge was 10' so I just used three posts (one on each edge plus a third one in the middle). Again, check your local guidelines for the proper spacing. I've seen indications of both 3' and 5' sections out on the net.
On the corners you'll be using two posts, roughly 4" away from the actual corner. Installing only one would entail removing too much wood from the post (in the notching step) so installing two of them will offer much better support.
Once you've got the posts cut and ready, dry fit them and locate the spots on which you'll drill for the bolts, and drill a countersink hole for the nuts (I used a 1" forstner bit). Make sure the holes do not go too close to the bottom or top edge of the concrete. My floor is 6" wide, so I bore the holes 1.5" from each edge. When the holes are ready, simply tap the bolts in with a hammer and tighten the nuts. And of course, don't forget to make sure everything is level ...
Building the straight railing sections
This stage takes a little bit of patience, but paying close attention to details will pay off later. Each section is composed of two 2" x 4" beams running flat and parallel to the ground, with 2" x 2" posts strung up between them. The bottom 2" x 4" will be raised off of the floor (just set it up on a scrap piece of the same material to get a good height set up).
Start by cutting all the posts to length. I did not have a proper workbench and stopper for the miter saw, so I cut one piece to the right size, then put a heavy toolbox at the end so that I could easily set more material next to it and cut everything to the same length.
When the posts will get attached to the 2" x 4", they have to be centered on it. I drew a line down the middle of the 2" x 4" (to know where the screws would go in), laid it down on it's narrow side (with the line facing me) and placed a floor beam right behind it (the beam provides about 1" of lift to the balusters, effectively centering them on the 2" x 4"). You'll also need another piece of flooring roughly 2 feet away, so that the balusters can be set up next to the 2" x 4" and lie on both flooring pieces. It's a bit hard to visualize in words; just refer to the photos for this one in case it's unclear.
Then start placing the 2" x 2" posts (using a scrap piece of the same material for spacing) and drive a screw right into the middle of the post. Move the 2" x 2" spacer over, add another baluster, and screw this one in too. Keep on going until you're down with the entire section. To add a bit of extra strength I also put a bit of construction adhesive on the bottom of the baluster before screwing it in.
When the section is complete, lift it and set it into place between the two posts. Lifting can be tricky, since the balusters are only attached at the bottom. To make it easier, pull up on the flooring material that was lying under the balusters about 2' away. Then lift the flooring piece up straight, position it on two scrap 2" x 4" pieces between the posts, and screw the bottom of the railing into the posts. Attach the screws from underneath so they don't show and also reduce the possibility of water pooling.
Once the bottom of the railing is attached, add the top railing on top of the balusters and screw it into the posts. This 2" x 4" should also have a line drawn through the middle. Use the same technique as with the bottom railing to get the right spacing; i.e. a scrap 2" x 2" to space the balusters, and a scrap piece of flooring to space them away from the edge of the railing. Drive the screws right through the top of the railing, and don't worry about the screw heads remaining visible as the whole thing will be covered with the railing cap later on.
Building the staircase railing sections
The railing sections on either side of the stairs proved to be a little trickier than the rest due to their angles, so they were not measured and built ahead of time for exact sizes. Rather, I built the railing right into place and measured lengths and angles as I went.
Start by clamping some scrap material to the posts for the top railing to sit on. Position the railing on them, mark your cut lines, and cut it to size. Repeat the same with the bottom railing, ensuring the perpendicular distance remains 36" just like with the straight sections.
The balusters need to have their bottoms and tops cut at a specific angle for them to sit flat between the railing and still be level, so I just positioned one, used a level to ensure it was straight, and marked it. I then cut several more balusters to the exact same length and angles, and attached them in between the railings with screws in the same way I did the straight sections.
Finishing off and installing the top caps
When all the railing sections have been installed, drive 3" nails down through the top of the railing and into the balusters. In addition to the glue at the bottom, this will help avoid the twisting and turning of the balusters over time.
Use a reciprocating or circular saw to cut the tops of the posts down to the height of the railings. Then cut 5/4" x 6" beams (basically the same thing used for the floor) to length and install on top of the railings. Attach the 2" screws from below the railings, cut the corners at 45 degrees, and you're done. At the end, no screw heads should be showing from the top of any surface.
Step 5: Adding Storage Benches


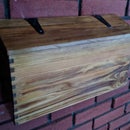
The benches are of an extremely simple design and don't take long at all to construct. They are basically 17" tall and 17" deep (the numbers were just taken off of a regular plastic deck chair), and the tops are hinged in order to provide storage room. I used 5/4" x 6" material to cover the sides and for the seating area; basically flooring material, so that the two would match.
The frame of the benches is constructed of 2" x 3" beams, and then covered on the sides with flooring material and attached to the deck by driving screws diagonally through the bottom square of the bench directly into the deck. The cover then has it's own frame made out of 2" x 2" beams with more flooring screwed on to it in top.
To attach the cover and install hinges, I added a 2" x 3" beam lying on its side and running along the entire back of the bench. This hinge beam has to be very strongly attached as you'll have the seats swinging off of it (and they're not exactly light). I glued it down, added metal brackets and screws on the front (one every foot or so) and 3" screws running diagonally through the back and into the sides of the bench (also one every foot or so).
Once the hinge beam is set up, measure the size for the seat frame, and then just make a square made out of 2" x 2" beams. Attach flooring material to the top of the frame and you're done. The hinges I used were regular door hinges that were safe to use on treated wood, out of the same concern with the ACQ approved screws. I just chose steel hinges that were coated in weather resistant paint.
Attach the hinges to the seat covers and hinge beam (recess them to make it a bit nicer and have the seat cover lie right next to the hinge beam), and you're done.
Step 6: Finishing Touches, Enclosures, Hindsight Remarks, Etc.


I'd love to say that the project is over, but it unfortunately isn't. I still need to close of the space underneath the deck, but the weather is beginning to turn over here, the days are getting shorter, and I'm running on of time. I think I'll leave the enclosures for next summer and update the article then.
Overall this has been an awesome project. It took a few weekends and several weeknights, but was well worth it. We now have a beautiful wooden deck that is extremely warm looking and inviting. The railings are big and sturdy and offer shelf space for drinks and small objects. There's a new power outlet, the stairwell has been covered in new siding, and the entire thing just looks great.
It's definitely not a quick or easy project, but is most definitely worth it if you want to spruce up a cement deck.
Final thoughts
* I would have skipped using the reciprocal saw all together. I had seen a few decking videos where it's used to cut off the tops of the posts, but found it to be too much of a hassle and too slow. It is much faster to mark the line, use a circular saw for what you can reach, and a handsaw for the rest.
* Railing sections - I'm not really happy with the effort it took to lift the half finished sections into place, screw them in, and then add the top railing. Lifting the half finished sections was not easy, and a couple of balusters would come off if I moved them the wrong way. I guess I could have used even longer screws on these.
* For the enclosures underneath the deck - I plan on burying 6" x 6" parallel to the edge of the floors such that their top surface is flat with the ground. Then attached 2" x 3" beams to the cement, and use these two to build a wooden frame in between them to hold the lattice. Problem is, though, that at the front of the deck the top of the frame will lie right under that 1" gap I left behind the skirt (for drainage), so this will pretty much block it. Moving it back would work, but then it would not be flush with the skirt and not look as good. Need to get another idea for this.
* Benches - I plan on building a second bench right next to the stairwell, following the same design as the first one. This bench, however, might end up housing a water collection system that is fed from the gutters right above it. It would consist of inter connected plastic drums that fit right inside the bench, with a faucet that fits right between the railing balusters on the right hand side of the staircase. Just an idea.
That's it for now. As always, comments and suggestions are always welcome.
See you next year!
---
June 9 2012 update - Finally got around to building the panels underneath the porch, and they're quite straight forward. I first buried a line of 6x6 beams in the ground (with gravel underneath) parallel to the edges of the porch. This way the panels would have something to rest on. I then added vertical spacers every 3-4 feet so that the panels would not be too big, and stop blocks about 1.5" inches in so the panels would have something to rest against when they're installed.
The panels were then assembled by cutting 2x2 beams (with a "C" type cut in them) at 45 degree angles and sliding plastic mesh in the middle. I had initially thought of using the wood mesh (so I could stain it), but that one proved almost impossible to cut without shattering. The beams are then held together by 3" screws going through each corner and then 45 degree metal brackets on the back.
The only thing I have not really figured out yet is how to lock the panels in place, but seeing that they're quite snug to begin with I'm thinking of just leaving it as is.


