

Introduction: CNC Routed Tombstones


In this Instructable you'll learn how to make your very own tombstone for yourself or a loved one...or a not-so-loved-one. Probably these are best for use as Halloween props. I made these using the ShopBot CNC router at the Tech Shop in San Jose.
Although the text looks much more professional when CNC routed, you can also do the lettering by hand or tracing from a computer printout.
Step 1: Tools and Materials

What you'll need:
- Foamular foam board (2" thick is best but 1" will also work; a 4'x8'x1" sheet is ~$12)
- DryLok paint; tint to a cement-like gray (one gallon is about $30 and good for 6-10 tombs)
- Liquid Nails (~1/2 of a $3 tube) or other glue good for foam
- small amounts of black, brown and green latex paint
- paint brushes and small paint roller (optional)
- 18" to 24" of 12" PVC pipe
- two 24" lengths of 3/8" rebar or other stakes
- razor and/or saw (table saw, band saw or hack saw blade) for cutting the foam
- small soldering iron or other tool for melting cracks in the foam
- ShopBot router (at the TechShop) or Dremel; plus 1/8th inch bit
- (optional) Dremel instead of ShopBot
- Hand drill and long 1/2" or 5/8" bit
Step 2: Design You Tombstone


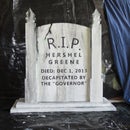
The first thing you have to do is to choose your epitaph and overall size and design. There are plenty of web sites with ideas. I show three examples, two with a zombie theme (from The Walking Dead). Don't overdo it on your first tomb. The foam normally comes in 4' by 8' sheets so you'll have enough to do several designs.
Some guidelines:
- don't use too much text
- to get a clean cut you need to use at least 100 point type and 125 to 150 point is better. You'll need to use a 1/8th inch bit for most fonts at this point size
- you need to set the kerning (character spacing) to 110% to 140%, depending on the font, to keep the letters far enough apart to keep the foam from breaking off in between characters. Also, set the line spacing to 110% to 120%. Be sure and choose a font that will work well with the size of bit you will cut with. This means Arial unless you have practiced first with a more detailed font.
I used CorelDraw to do the layout, but other programs should work equally well. You can see in the screen shots where you set the character attributes...the range kerning of 40% in the tab on the right. Be sure and set the page size to your actual foam size, such as 20" x 28" for a typical small tombstone or 24" x 36" for a larger one. Once you've completed your design, after saving it you need to export to a file type that the ShopBot's software can use. I use the .dxf file format (drawing exchange format).
Step 3: Prepare ShopBot Cutting File(s)


Once you have your dxf file, import into the software for the ShopBot. The best choice is the VCarvePro. In this software you can highlight one or more objects and create a cutting toolpath. You also select the cutting tool and cut depth.
In VCarvePro you start by setting your material size and thickness. Be careful to note where the x,y origin point is so when you go to cut your coordinates match up. To cut a few lines of simple text follow these steps:
- select the text
- open the toolpath tab and choose a cut depth (0.15" is a good choice)
- pick a "pocket" cut for the text. A pocket means you want all material inside the lines to be removed. (You would use a profile to just cut on a line). Since the default tools sizes are 1/2" and 1/4" you must enter your own custom tool for a 1/8" bit. The default speed is usually to fast for cutting foam, you should slow it down to 50% to 75% of the default RPM (5000 - 8000 RPM is OK). The feed rate for text of 5 inches per minute works well. However, you will probably still get some fuzzy edges which can be fixed by brushing gently with an old toothbrush, perhaps from the deceased.
- create your cut path and view the tool's path (as seen in photo) so you aren't surprised by what the machine does. Export the toolpath for the ShopBot.
- repeat the above for each object or groups of objects you want to cut. You can combine objects if you wish, but keeping them separate allows for a bit more flexibility, practice cuts, tool changes, etc.
- I've added other drawings in the tombstones I cut, such as a simple line drawing of a crow
The photos show setting the 1/8th inch endmill bit and its speed and federate, followed by the calculated cutting path.
Step 4: Cut Text on the Shop Bot


Mount your raw foam material on the ShopBot table. It is fine to just use wood screws with washers. Be sure and screw down all four corners in places where you will not be cutting. The holes can be patched up later or the damage can be made part of the aging process. If your material isn't kept flat the depth of cut will vary because the vacuum on the ShopBot may suck the foam off the table a bit. You may want to leave the vacuum off.
Run the ShopBot3 cutting software, following all applicable safety guidelines taught at the Tech Shop such as proper eye protection. Set the tool Z height somewhere in the center of your foam. Set the X and Y zero points at the lower left corner of your foam (if you followed the normal origin point in all the software).
Load and run your toolpath file exported from VCarvePro.
Alternative cutting by hand
If you do not have access to the ShopBot, instead you will print out your text from your design software. Even PowerPoint will work for this. You'll have multiple sheets of paper. Tape to your foam then using a knife or razor carefully outline each letter on the paper cutting through to the foam. Poking with a small nail or pin may also work.
When done you might want to fill in each letter with a marker. Now use your Dremel to do the cutting. This can be time consuming so take it slow for best results. I've only cut one tombstone this way and switched to the ShopBot for increased speed, quality and detail.
Step 5: Cut Out Final Tomb Size and Shape
Now that your tombstone's text and other details have been routed out you can cut any final overall shapes, curves or other designs. Neatness may or may not be important because at some point you will probably want to inflict some damage to the tomb.
Step 6: Laminate and Insert PVC for Standing


If you are using 1" thick foam it may be best to glue two pieces together at this time (or before cutting the final shape in the prior step). Your loved ones deserve the higher quality and longevity of the more rigid 2" thick stones. It is also much easier to hide the rebar or stakes inside 2" thick foam than 1" thick foam. Having the security of two rebar stakes is needed to keep the tombstones from twisting or blowing away in the wind.
Before gluing together with Liquid Nails, cut notches to insert two lengths of 1/2" PVC pipe, as shown.
If you started with 2" thick foam, then instead of gluing you should drill out holes for a place to insert the PVC pipes. This can be tricky because the holes have to be fairly straight. All is not lost if you bust through...just spackle it up and/or make the damage part of the aging. Try drilling with the foam lying flat on the ground. Cut one end of the PVC pipe at an angle to help it pierce into the foam. Gently push, twist and tap the PVC into the hole, remove and repeat, removing the foam crud as you go until the pipe has been fully inserted.
Step 7: Add Textures And/or Cracks


Now that you've carefully crafted a nice neat tombstone it is time to beat it up and make it look old. You can break off a chunk, sand it, use a rasp or chisel. The important thing is to make it look like it aged naturally over a few hundred years and this takes practice. But we don't have a few hundred years so here are a few tips.
- start small and try things out on a scrap chunk of foam first
- a hot soldering iron and a shaky hand make for nice cracks
- rather than "breaking off" a chunk, try the soldering iron. The heat helps melt the foam giving it a natural worn look
- a wire brush, especially on a drill, gives a nice texture like natural spalling of cement. Brush a few square inches (paint later) and it will look like a surface layer chipped off. Add some spackle around the edges of the region to make it blend with the normally smooth foam.
Step 8: Paint to Give Aged Look


Start by using black paint to paint inside of the text. This step is optional but makes it easier to read. Alternatively you can fill the text with the same gray paint as the entire surface.
Next use a small roller or brush to paint on the gray DryLok. Other paints will also work, but the DryLok has a sandy texture that gives the tombstones a more realistic look. Use a Q-tip to remove any big globs that get into the text grooves. Allow to dry. Touch up the black in the text as desired.
Now for the fun part. Adding the aged look. Gather your paints, brushes, water and spray bottle. It is best to start on the back for practice, but don't worry, you can undo almost anything without ruining it. Lightly dab small spots or vertical streaks with black or brown paint (diluted after you have some on your brush). Then spray with a little water and get some or all of it to run down. Repeat many times starting the dabs or streaks where rain might naturally fall and collect dust and grime, especially near edges or cracks made in prior steps. Be sure to cover all sides and the top. If you think there will be someone digging up from below make sure to paint the bottom as well. If you want, add more cracks with your soldering iron, paint the inside black, spray with a little water and watch before your eyes as your tomb ages 20 , 30 even 100 years in just 5 or 10 minutes. Use small amounts of green to add a bit of lichen growth on the top, in cracks and other places and spray lightly. Allow to thoroughly dry.
The entire aging process can be seen in a time lapse video in the SampleAging file
Finally dry brush using a light gray paint. Dab tiny amounts on a dry brush and wipe most of the paint off on a rag or paper towel. I mean wipe 90% off. Then quickly and lightly brush the very outer surface with long full vertical strokes. Be especially careful to not get too much in one area...but make sure and get some on the darker areas to highlight the dark stains. This gives a nice realistic stone texture. Note the red oval area in the photo for a good example. If you mess up, just wash off and start again.
Attachments

Step 9: Stand Up in Your Yard


This is the final step.
Optional. Check with your local authorities first before burying any bodies. Local regulations may vary.
Place stakes or rebar into the ground and slide the tombstone in place.
Add a nice flower arrangement. A dozen dead roses are my favorite.


