

Introduction: CR2032 Battery Holder With Switch


The purpose is to create a CR2032 battery holder water/dirt resistant with a power switch, using low cost or recycled material.
In this way the battery can be easily installed near the hub of a bicycle wheel to feed LED lights fixed on spokes or on a crash helmet (I will illustrate these applications in other Instructables).
I used a very common plastic (PE) cap of a water bottle that has an inner room that fits the dimensions of a CR2016 or CR2025 up to a CR2032, and the back of another cap to seal the battery inside, welding the PE parts with the tip of a soldering iron.
The switch was pinned on the side of the main cap and electrical contacts to the battery were made with jagged washers and some pieces of a PC flat cable for the wiring.
The outer rim that results can be used to obtain at will buttonholes/holes to install the kit on the final destination using plastic tie wraps or screws.
Step 1: Some of the Things Used

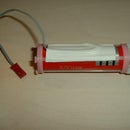
The material used are a micro switch, a CR2032 Battery and two water bottle PE caps.
It is better to use caps for still water because they don't have reinforcement ribs on the inside or bulges as the ones for sparkling beverages have. This reinforcement is not needed here because of the small weight of the battery (about 4 grams) and mainly not to waste room inside the housing.
You can chose the colour of the caps following your personal taste, but since you will have to connect pieces together, it is advisable to make a welding test to see if the colour charge doesn't give problems.
For my personal choice and to avoid any issue I used white-transparent caps as shown in the picture.
Step 2: Shaping the Plastic Cap for the Switch and Tie Wraps


The switch will be fixed on the side of the cap.
Remove with scissors all the threaded side of the cap up to the base except a convenient part to fit the switch.
The width of this tab should be at least 2-3 mm wider than the switch to allow its case pins to be folded sideways, the exceeding material could be removed later.
Refine the scissors cut with a sharp cutter for a better look.
Step 3: Drill a Hole for the (-) Negative Wire

Drill a hole of convenient diameter on the vertical rim for the wire to go from inside to outside the battery housing.
As I used a piece of an old PC flat cable the diameter of the hole will be about 0.8 mm.
It's advisable to keep this hole as small as possible to improve the sealing once the wire is inside.
Actually the plastic coating of the wire should have a little interference with its hole.
To improve the electrical contact with the battery I welded a jugged washer to one side of the wire.
Step 4: Installing the Negative Wire and the Switch

Bend and distort the tab that was kept from the side of the cap to make it as straight as possible to fit the switch, you can use small pliers, PE is easy to deform plastically.
Trace and drill 0.8 mm diameter holes on the tab for the 5 pins of the switch .
Insert all the switch pins and fold sideways the outer ones along with the one not used. This will guarantee mechanical strength to the bounding.
Insert the wire in its hole so that the washer is placed at the centre of the housing.
Step 5: Connect the (+) Positive Wires


Weld the battery (+) positive contact wire on the middle pin of the switch and the output on the other.
Now you are ready to insert the battery inside the housing.
Step 6: Make the Cover to Seal the Battery

To make the sealing cover for the battery take another plastic cap and remove anything but the inner rim and its bottom .
Trim the rim so it is about 1 mm high from its bottom. Some little material in excess will be useful in the welding phase.
Step 7: Welding the Cover

Put the parts in place and hold them in a vice.
Then with the tip of a soldering iron melt the material in the junction blending both sides.
The temperature of the iron should be enough to melt PE but not to burn it.
Be careful to clean the tip of the soldering iron frequently to prevent any material to burn and produce nasty fumes.
Use a fume extractor or do it in a open space.
Once the PE is melted locally you can apply some pressure with a cold object (e.g. a flat screwdriver) to help the flow of the material and revome holes and cavities.
Step 8: Remove Cold Drops From the Welding

Scrape the welding surface with a sharp cutter to remove cold drops and if necessary use the soldering iron again where the welding was not good enough.
Test the switch and the battery with a multimeter and if everything is fine you are ready to use it for your applications.
The outer edge will provide the fixing to other parts using screws, tie wraps and so on, buttonholes/hole can be obtained in the appropriate positions.
I use tie wraps to fix this battery next to the hub of my bicycle wheels to feed the high luminosity LED lights I have installed on the spikes for night visibility and safety. I also put white reflective tape on the battery holder to use it as a reflector.


