

Introduction: Calculator TI 83+/83+SE/84+/84+SE Tutorial Lesson 1: Basics


Hey, it's me, Sorunome!
As some of you might already know, I love programming.
My first programming platform was my graphical calculator so I'm making now a tutorial for it!
I hope I'm able to explain everything well.
Oh, and don't forget to comment, rate and SUBSCRIBE!
I'm also trying to make weekly ibles, let's see for how long that's possible :D
Oh, and for more cool Projects please check out my website!
If you have any questions about programming be sure to check out Omnimaga!
Step 1: Creating a New Program

Ok, first of all you need to know how to make a program so...
Frist step is to press program
Now press twice right so that you are at the new tab
Next hit enter and enter your program name
Now hit enter and you should be in the editor
YAY! You made a program!
Now some stuff about the editor:
To insert some stuff you have to hit [2ND] and then [DEL].
To exit the editor hit [2ND] and then [MODE].
To start a new line hit [ENTER].
For letters hit [ALPHA] and then the letter key.
For alpha-lock hit [2ND] and then [ALPHA]. You exit it by hitting [ALPHA]
Now lets go to the next step.
Step 2: Taking a Look at the Menus

This step is VERY important so that you know where which command is found and for fast programming.
First of all you have to know that you exit menus by pressing [CLEAR]. Exiting by [2ND] and [MODE] will also quit the editor.
So, let's start with the special program menu. You enter it by hitting [PRGM]
 |  |  |
|
Here are control elements in to control code-flow. |
Here are display and input commends in |
Here are all programs listed to be executed |
Now let's take a look at the Maths menu. You enter it by hitting [MATH].
 |  |  |  |
| Here are various math-operators in. | Here are operators to modify numbers. | Here are operators for complex numbers. | Here are operators for probability. |
Now it's time to look at the draw menu for drawing stuff. You enter it by pressing [2ND] and then [PRGM].
 |  |  |
| Basic drawing stuff. | Drawing single points/pixels. | Storing graphical stuff. |
Now we'll go to the stats-menu which you enter by pressing [STAT].
 |
| I don't know much about the stats-menu as you don't really need it to make games. :D |
Now let's go to the list-menu. You enter it by pressing first [2ND] then [STAT].
 |  |  |
| Here are just all lists listed. | Here are some list operations. |
Here's some stuff to do maths with lists. |
Now's a VERY important menu: the logical test menu. You enter it by hitting [2ND] and then [MATH].
 |  |
| Here are some comparison signs. | Here are the logic operators. |
Now lets take a look at the variables-menu where you can find all variables except matrices. The matrices you find by pressing [2ND] and then [X^-1]. The variables-menu you access by pressing [VARS].
 |  |
| Many variable-types | Y-Variables |
Now there are only special menus left. You have a blinking courser and that token where you hover over by pressing enter is parsed into the editor.
Ok, first the format menu, in that is stuff that you can do with the function screen like turning the axes on/off. You access it by pressing [2ND] and then [ZOOM].
 |
| The format window |
This is the mode menu, in there are a lot of different modes of the calculator. You access it by pressing [MODE].
 |
| The mode menu |
Now you'r almost done with the menus! Now's just the catalog left where every token except the variables are in. You access it by pressing [2ND] and then [0].
 |
| The catalog |
Whew. You'r done. It was pain but it is important for you to know your calculator before programming for fast results. Some commands are only in the catalog. I also didn't show you all the menus, there are even more, but I don't really use them.
Step 3: Sending Programs From and to Calc

That way you can share your programs via the internet and you can also download other programs and put them on your calculator.
I usually use a different program called tilp as ticonnect isn't for Linux. (Caution: Linux-fan here! :D)
First of all you need a program to send all the programs. The one for windows is called TI-Connect. You can find it here.
Now install and run it (obviously :P)
It should look like this after the loading screen:
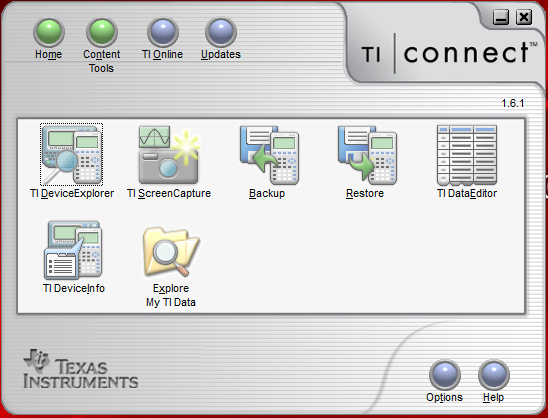
Now click on "TI Device Explorer".
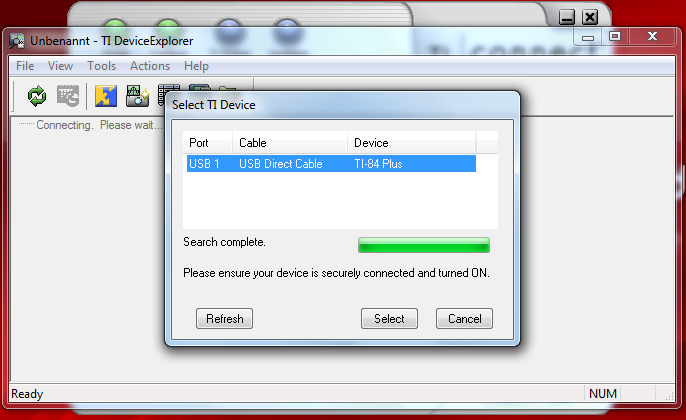
It should as you for your calculator. Windows will need to install drivers in order that TI-Connect can link to it, it should be working all automatically, it will just take some time. If it still doesn't find any calculator try a different USB-port.
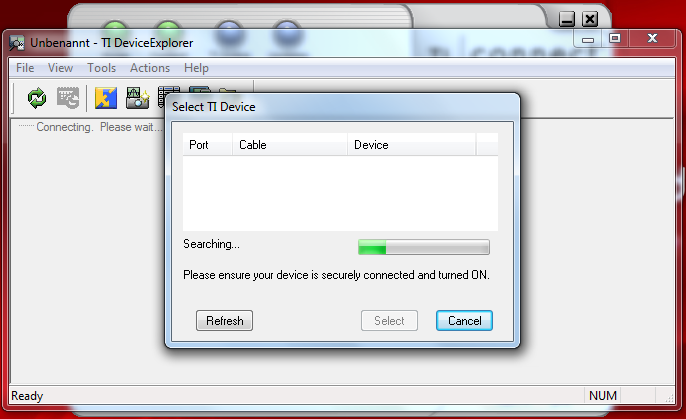 |  |  |
| Still loading... |
There's my calculator! Now I just have to hit 'select'. | This is how it should look now like |
Now it's very simple to transfer data from and to the calculator. You just have to navigate through the menus to find your program and then just simply drag&drop to the desktop. To put files on the calculator just drag&drop them into this file browser.
 |  |
| If it could just load quicker... | This is what a normal program looks like on the pc. |
Please not that you can edit the file name on the computer as you want, it won't change on the calculator.
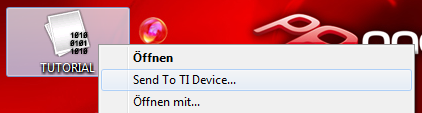
Now, there is also a other way to send files to the calculator without starting TI-Connect by right-clicking the programs and selecting "Send To TI Device...". TI-Connect will now start automatically in a different mode and will search again for your calculator, so have it plugged in! The menu for sending looks a bit different there.
 |  |
| Yeah, that is german... |
This is the different menu. Just hit 'Send to Device' to send. |
Now that you know how to send programs from and to calc let's move on to the next step!
Step 4: A Simple 'Hello World' Program

To those who are knew to programming: everything a hello world program does is displaying "Hello World!", waits for a key-press, and then quits.
That way you see basics of the programming language.
So...how to make a program you already know...
And here's the code (Try to find all the tokens yourself, I'll show you later where they are if you can't find them):
:ClrHome
:Disp "HELLO WORLD!"
:Pause
For the tokens:
This is how it should look like:

Now let's take a look at the code, what each line does.
The program will exit automatically as it is at the end, there are also commands to exit a program but I'll come to them in later lessons.
It is good to understand this fully before moving on to the next step.
Step 5: Doing Some Math

It's time to do some math!
Even thought you could do all this without a program it is important to know how to do it with a program.
Math inside a program is just as simple as if you'd normally calculate with it normally, you can also use all the operators that you can do normally.
So, let's start with a example program!
:Disp "3+3="
:Disp 3+3

As you may notice, as here isn't a ClrHome at the beginning you can still see the prgmMATH line.
Numbers are displayed with the Disp command always on the right of the screen.
You can modify the equation as much as you want, it will always display you the answer.
Here's another example:
But at the moment you can't do to much, you can just directly display the answer yet without doing anything else with it, so it's time to move on to the next step!
Step 6: Variables

Well...not really! Variables are the most important thing while programming as you can store some stuff in it.
A variable is something e.g. 'X' where you can store some stuff in it, in this case numbers. You can call it then and it just gives out the number, you can also store numbers in it.
Here's an example code:
:Disp A
Well, what does this program do now?
The first line stores 3+3 (what is 6) into the vatiable 'A'
The second line displays the variable 'A', so in this case it will display 6. It will be at the right side because it is a number.
You have on the calculator 37 variables, the numbers A through Z and θ.
Now you will say something like: "Wait a sec. Why should I store '3+3' into a variable and then display the variable? Wouldn't it be much better to display directly the variable?"
Well, in this case you are correct. But you need to understand how variables are working. :P
A good thing about variables are also that you can continue calculating with them.
Another example:
:5*3→A
:Disp A
:Disp "SQUARE IT"
:A²→A
:Disp A
15
SQUARE IT
225
Now let's give you a little task...
Make a program with two variables.
The first variable is 5
The second variable is the first variable times 9
Now dived the second variable through the first variable.
Then let the answer be displayed.
For a possible solution:
The program should display 9 if you made everything correctly.
After understanding this step we can finally move on!
Step 7: Input

Well, this is exactly what this step is about!
For that there is a nice command, called Input!
You use it by typing after that the variable where the value should be stored in.
Here's an example code:
:Input B
:Disp A+B
But there is just this stupid question-mark before the input blinking courser. Isn't there any way to let there be some text displayed instead?
Obviously, there is, otherwise I wouldn't have asked.
You do that by entering some text in quotes (") after the input line, then put a comma (,) , the one that is above the 7, and then you enter the variable.
Example:
:Input "2ND ADDEND",B
:Disp A+B
Now, there is also a way to enter many variables in a row. For that there is the Prompt-command. After that one you enter all the variables you want to enter, separated with the comma.
Example:
:Disp A+B
Now that you can ask for user input you have a LOT of possibilities to program already!
Step 8: The Ans Variable

The Ans-variable is called via the Ans-token ([2ND] and then [(-)]).
If you try to define it with e.g. 5→Ans it will give you a syntax error as it isn't the way how to use it.
Ans is always the value of the calculation of the line above.
Ok, I think you can learn best by examples, so here is one!
:A+B
:Disp Ans
Some other example:
:Disp Ans
:Ans+3→A
:Disp Ans
:A-5
:Disp Ans
:Disp A
The first one will display 15 as that is the answer of 7+8
The second one displays 18 as you take the variable Ans, in this case it is 15, and add 3, so Ans changes. About storing that into a variable, that doesn't modify Ans.
The third display line will display 13 as the answer of the line above is the variable A minus 5, so 13.
The last line just displays 18 as it just displays the variable and you didn't change that one.
To be honest, the Ans variable isn't to important, but it is good if you want to optimize code. You could also 'define' Ans by just writing e.g. 5 into a line.
Step 9: The End

Ok, this was it for this tutorial!
I will continue making TI-Basic tutorials, so be sure to subscribe me!
And as the pic already says, I'm making a little contest! It is only for newbies, for some practice, please be honest.
The first five persons to make that task will receive a patch from me!
Ok, here's the task:
make a quadratic solver!
Please send me then the code of the program via email with the subject 'Contest TI-Basic tutorial Lesson 1'.
Mail me!
If you are to lazy to re-type everything you can use ChemetechsSourceCoder which will make your calc-programs into text (and also the other way round :D) So, good luck and I hope I could teach you a lot in this lesson!


