

Introduction: Cat Enclosure
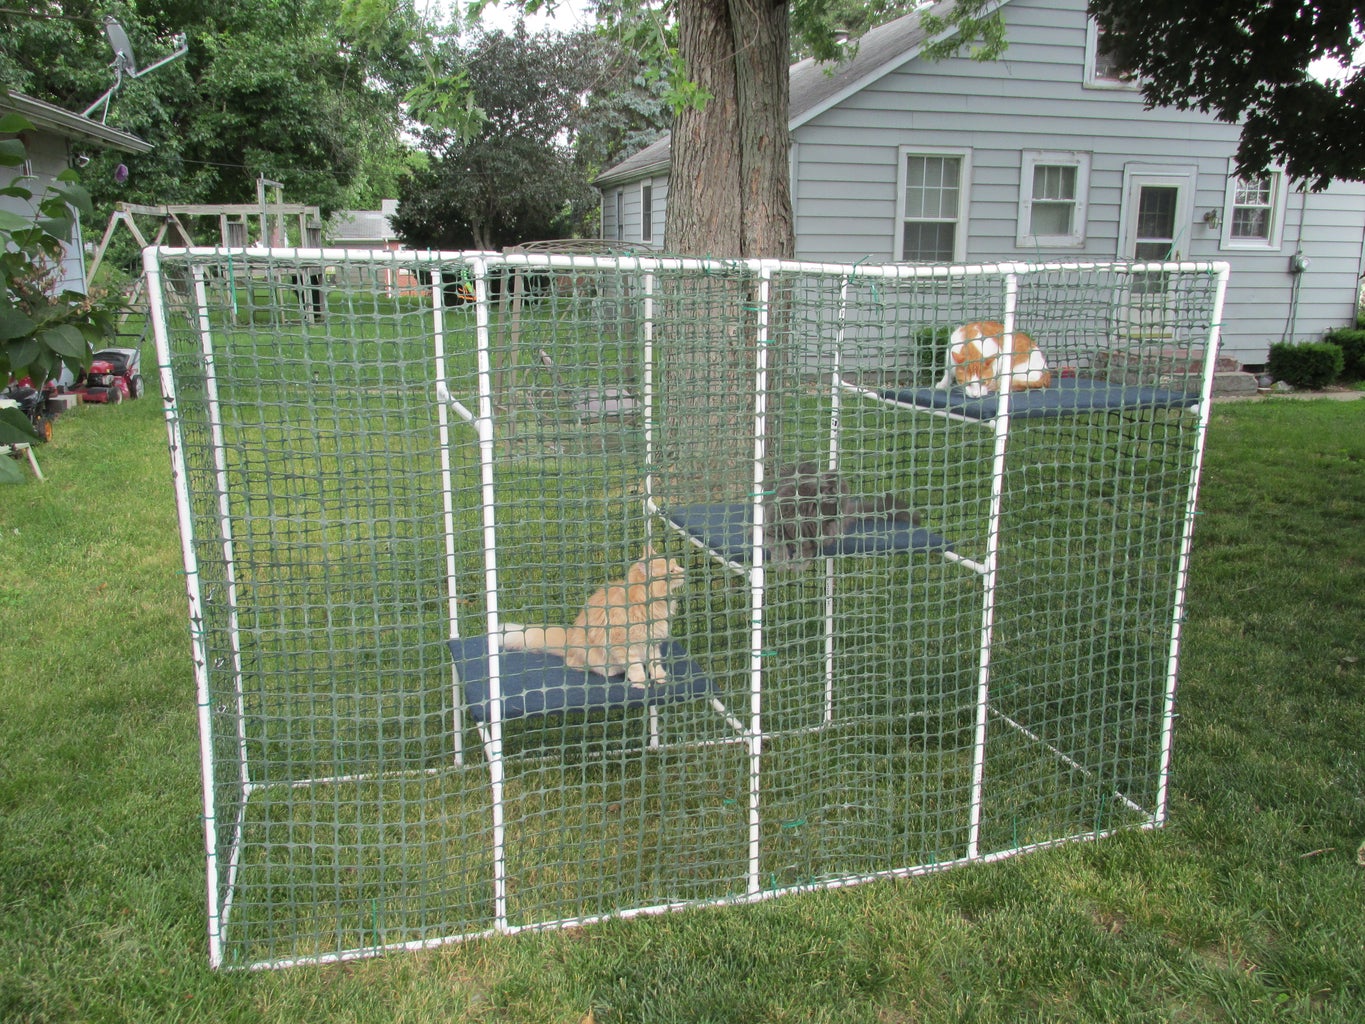

My parents recently got a third cat, and it became too much of a hassle to keep track of them outside so I decided to make an outdoor cat enclosure. This instructable will take you through all the necessary steps to create mine or your own cat enclosure. The cage is made up of a schedule-40 pvc frame, plastic chicken wire (poultry fencing?), and some composite wood platforms.
Step 1: Make a Plan

Start off by deciding how much space you have in the yard and how much your cats are going to want. Keep in mind that the pipe is cheap and that fancy fittings like the three way joints are what will rack up. I chose my dimensions, 7X5X3, because my cats love to climb and the length and width facilitated three levels of platforms that would fit in the shade.
here was my shopping list:
1.) 12 - 10 foot schedule-40 1/2'' PVC
http://www.lowes.com/pd_23966-1814-PVC+04005++0600_0__?productId=3133079&Ntt=pvc+3-way+1%2F2&pl=1¤tURL=%3FNtt%3Dpvc%2B3-way%2B1%252F2&facetInfo=
2.) 8 - 3-way fittings (most stores have the third direction tapped but Lowes had the right ones in my town)
http://www.lowes.com/pd_315498-1815-413005RMC_0__?productId=3344666&Ntt=pvc+3-way+1%2F2&pl=1¤tURL=%3FNtt%3Dpvc%2B3-way%2B1%252F2&facetInfo=
3.) 24 - T fittings
http://www.lowes.com/pd_26051-1814-PVC+02400C+0600HC_0__?productId=3514896&Ntt=pvc+t+1%2F2&pl=1¤tURL=%3FNtt%3Dpvc%2Bt%2B1%252F2&facetInfo=
4.) 36'' X 50' plastic poultry netting
http://www.lowes.com/pd_157764-13113-090786_0__?productId=3457516&Ntt=poultry&pl=1¤tURL=%3FNtt%3Dpoultry&facetInfo=
5.) ZIP TIES (100 - 150 will be plenty, cheap at dollar tree)
Got it all for $80.00
You might also need:
1.) a pipe cutter
2.) a marker
3.) tape measure
Step 2: Make the Frame
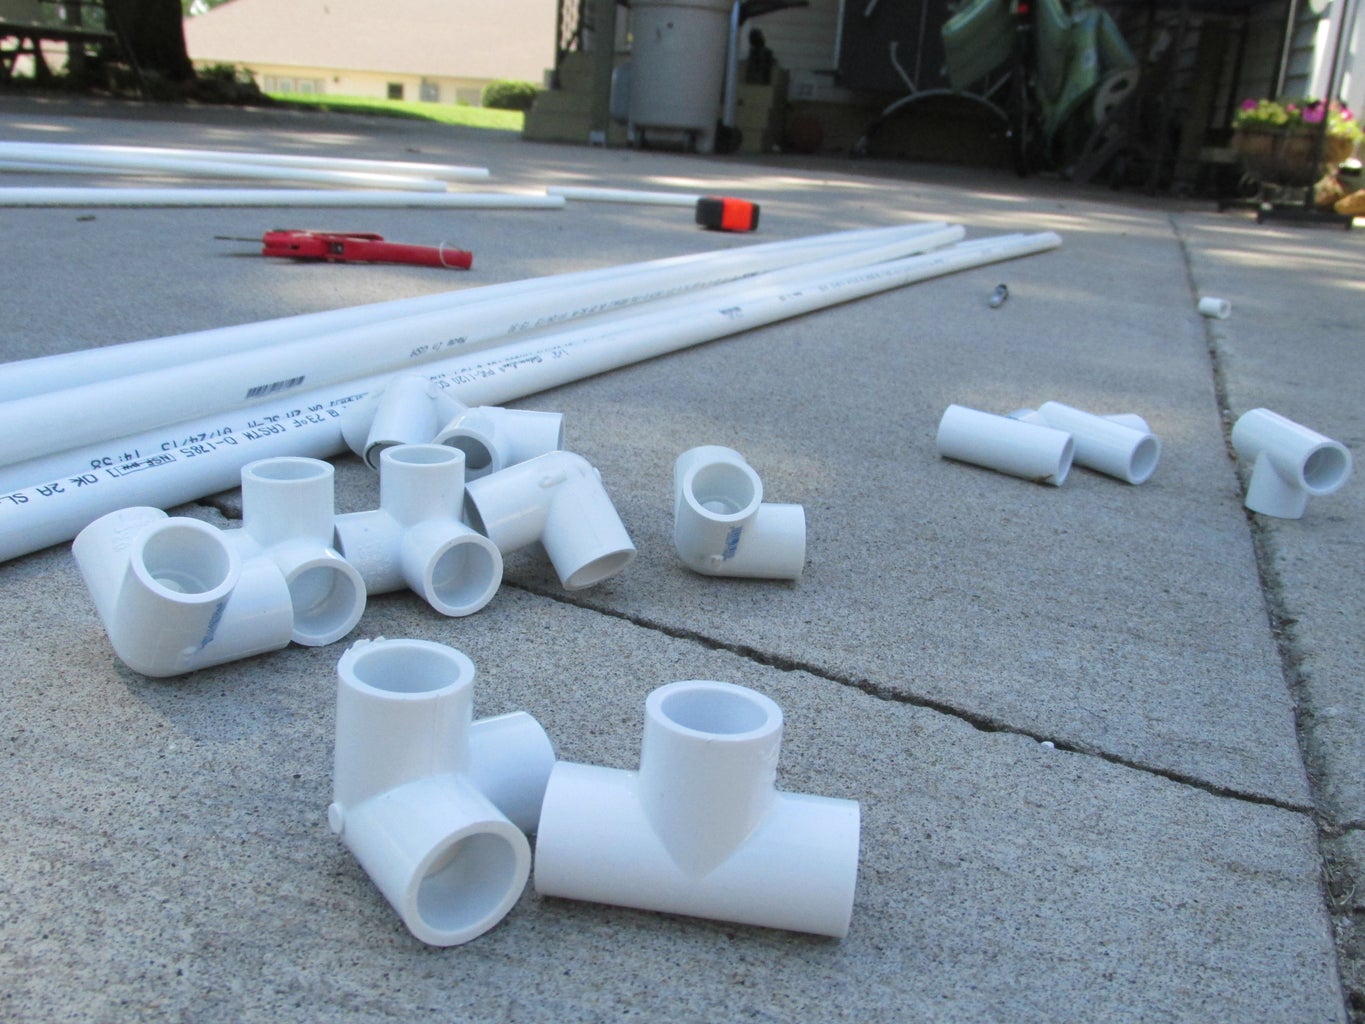


Start off the build by creating the shell of the enclosure to get all the sides the correct length.
When cutting PVC you want to endeavor to get a straight cut, if you might not be to confident have plenty of sandpaper.
A note for when you are measuring, fittings add length to the pipe. To get the correct length on the pipe you have to measure to center.
Which means you have to put the fitting on and measure your cut to the center of the fitting (most come with helpful notches).
However I knew that the 1/2'' fittings added 1/4'' per pipe so I measure accordingly (i.e. for the seven foot segments there are two fittings on either side, 3-way, so I cut them a 1/2'' short (1/4 + 1/4).
If you want to follow my plan this is what to cut.
1.) 4 X 6' 11.5''
2.) 4 X 2' 11.5''
3.) 4 X 5' 11.5''
Step 3: Support and Platforms


Next take it all apart and start cutting down the frame so the supports for the platforms can be inserted.
I apologize for the lack of pictures here, it started raining and lost focus.
So first you have to take the frame apart of course, the idea for this step is to take your long frame pieces and essentially cut space out for the fittings. My plan called for the length of the pin to be split up into fourths. To do that, take the measuring tape and mark off each 1 3/4' however I did it with fittings on the side (measuring from the center) to ensure the cuts wouldn't be off by a 1/4'' each time. With these marks in place, mark a line a 1/4'' left and right of each segment to allow the T fittings to not add length to the enclosure. once cutting the first pipe down you can use a piece as a template and just cut to match instead of measuring and marking three more times.
After the cutting this is what you should have:
16 X 20.5 inches
Step 4: Support and Platforms 2


After putting together the frame again (add T's to the smaller segments to get four 7' pieces) hopefully you can see where six more 5' ( 4' 11.5'') poles can fit in, they will be used now to hold some cross bars for the platforms. It is a similar process as the 7' pieces. Take them out, cut out a space for the T fitting and put it back in.
My plan called for three platforms spliting the distance from the ground, 0', and the highest the cats would want to be (away from the ceiling) 4'. With some wonderful math we get a platform every 4/3'. The platform is supported by 4 of the 5' poles which I will call legs.
sooooo since each leg doesn't need a 3 spots cut out for each platform (they are like stairs) they don't need to be cut into equal portions like was done along the length.
Here is the cuts leg by leg:
1.) The first leg will be left as it is (to be used as a door later)
2.) The second leg will support half the bottom platform, cut a 1 1/3' piece but don't forget the 1/4'' less for the fitting, and then take 1/4'' off the longer (3 2/3') piece.
3.) The third leg uses the same bottom as the second, next take a 1 1/3' piece off the longer scrap (minus 1/2'' for the fitting on bottom AND top) and then take off a 1/4'' for the longer top piece.
4.) The fourth leg is pretty much the second leg but upside down! so just make four of the third leg.
5.) The fifth leg is the second but upside down, I cut this to match the fourth's top column but just making four of the second leg should hypothetically work.
To finish off the cross supports, take out one of the 3' frame pieces and use it to measure off six more of them, cut and put it together by now it should be feeling pretty sturdy but if you want to add in some more support go for it. I even considered using 45 degree fittings to add in some super strong triangles but it wasn't worth the extra cost as compared to just more straight across.
Step 5: Install Platforms and Wrap It in Chicken Wire


My mother went pretty crazy on the platforms for this. She painted them for weatherproofing purposes (the minimum you should do) and then covered them in some outdoor carpet. To make some, just cut out some rectangles from a board of scrap composite we had laying around. Make sure the width is correct to lay on both cross supports, and screw them into the PVC once they were completed (paint and carpet).
For the plastic chicken wire covering, just take the roll of wire on the long side and toss it over the top to the other side, pull it taught and zip tie it all down. The long side will take two goes (and possibly a little 1.5' piece in the middle to close it off), after that all you will have to do are the small sides. On one side cut a flap out (a square without the bottom cut (I only cut one column strip free, it can be seen below)) which you can use to put the cats in, afterwards you can use many things to hold it up, I would recommend bungee ties.
Step 6: Finished!!


