

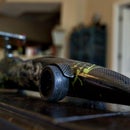
Introduction: Catamaran Stand Up Paddle Board (SUP)


This is a fiber glass catamaran stand up paddle board or simply SUP. SUP boards are more related to a boat like construction rather than a surfboard. The sport of stand up paddle boarding came about in the era of surfing. It is a much larger board used along with a paddle in a standing fashion, to explore, race or surf. The shape and weight will be more determining of what the board is suitable for. This particular model I designed for a fast, long distance, touring style. My board is 12'6" long by 28" wide and weighs around 30-32lbs. The catamaran shape is great for a more stable board. I have not surfed with it as of yet and it is not suitable for a race that has many turns due to the lack of surface area in the rear (the method used to turn a sup is shifting the weight to the rear, raising the nose). Hope you enjoy! Btw: Eventually I would like to create these completely hollow. If you like what you see, I would appreciate any help. Below is a link on how you can help. Thank You!!!
Step 1: Foam

Buy Blue insulation foam. Panels are 4x8 feet and about $14. You will need 3-4.
Step 2: Cut Foam


Once you have traced a design you like, sketch it on the foam. Measure twice cut once!!
Step 3: Place Pieces Together


Before any glue is used, place the pieces together to make sure they fit correctly.
Step 4: Glue

I used water resistant glue since it will be glassed later anyway.
Step 5: Cut Upper and Bottom Parts


Once the basic shape is glued and pieced together you will need to make the top and bottom of the pontoons.
Step 6: Glue


Once it is fitted and glued. Begin shaping. I used 150 grit sand paper.
Step 7: Second Pontoon

Repeat the steps for the second pontoon.
Step 8: Middle Piece

Join the two pontoons.
Step 9: Deck


Add a deck to stand on.
Step 10: Shape


Shape using sandpaper. Take your time.
Step 11: Get Rid of 90 Deg Corners


I added a rounded edge underneath to ease with glassing.
Step 12: Glassing


Add fiber glass. Use two part epoxy.
Step 13: Add Fin Boxes


After adding 2-3 layers of fiber glass prepare fin boxes. Research angles for the size you are building. Also add any leash holds or net holds at this time.
Step 14: Paint

Design a color scheme and begin painting base color first.
Step 15: Design


Continue with your design scheme. I chose a post apocalyptic look.
Step 16: Glass/epoxy

You can finalize with a thin 4oz fiber glass to seal the images or glass with epoxy alone. Add the epoxy with a brush and add 3 layers total. Let the epoxy sit for 3 hours exactly before its cured to add the next layer.
Step 17: Help Support Us!!
ATTENTION EVERYONE!! I have launched a small campaign to fund my company PH822 Composites & Design. Please checkout the link below for a chance to purchase a high quality T-shirt with my logos on the front and back. I have 21 days to meet my goal of 282 shirts (but I can go above)!!!!! Please share at the very least!!! teespring.com/makusup


