

Introduction: Chain Master Link Pliers


Removing chain master link clips is much easier with this simple home-made tool. Rather than shooting the master link across your shop by prising it off with a screw driver, these pliers make the job effortless, safe and simple.
Step 1: Collect the Tools and Supplies Needed


Tools and supplies needed:
-Dremel-style rotary tool with small-diameter cylindrical grinding stone, ideally 6mm (about ¼”) or smaller (the target size is the same diameter as the chain link pins). But its not critical.
-Bench grinder, or, a larger grinding stone in your rotary tool.
-Cheap pair of pliers. Linesman pliers are OK. Slip-joint (channel-lock or multi-grip) pliers are even better. Target price is less than $10.
There's a video above of the whole operation, and I've repeated it below with some text for those who prefer to read the explanation.
Step 2: First Grinding Operation


We need to shorten one of the jaws. If using linesman pliers, it won’t matter which one as these pliers are normally symmetrical. If using slip-joint pliers, we’ll grind the bottom jaw (hold the pliers in your normal grip and identify the bottom jaw.
Use the bench grinder to grind the jaw shorter. Not much! The precise distance is equal to the thickness of a master link clip. If you can’t measure one, or don’t have one handy, then aim for 1.5 - 2.0mm (which I think is about 1/16”-3/32”).
Just grind the same amount off across that jaw. When you are finished, it should look like the third photo.
Step 3: Second Grinding Operation


Fit the small diameter cylindrical grinding wheel to your rotary tool. We’re going to grind a semi-circular recess in the jaw you shortened in step 2. This groove is going to fit over the end of the chain link pin, making it harder to slip off.
I found this was easier when holding the pliers in a vise with the jaws open. Take the rotary tool and hold it parallel with the pliers, facing the jaws.
Turn the tool on, and, with a forwards and backwards motion, use the grinding stone to carve out a semi-circular groove in the lower jaw, parallel with the handles of the pliers.
Step 4: Go Forth and Remove Master Link Clips

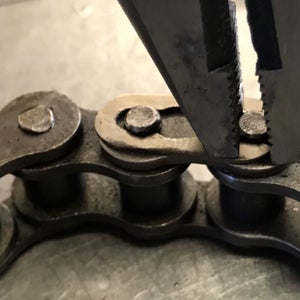


Inspect your master link clip. To remove the clip from an assembled chain, the open end needs to be driven oven the pin.
Get your pliers ready. Put the shortened jaw (with the groove) over the other master link pin. The the longer jaw behind the open end of the clip.
Keep some pressure on the pliers towards the chain, so it doesn’t slip off. Squeeze the plier handles. The motion of the jaws closing should drive the open end of the clip over the pin.
At this point, the clip might fall off, or you might have to grab and and dislodge it from the other pin. Done!
Step 5: Reinstall the Master Link Clip


This is like step 4, but in reverse. Reassemble the chain master link, and put the clip recess over the first pin in the link
This time, we’ll use the pliers to force the open end of the clip back over the pin. The long jaw of the pliers now hooks over the other end of the clip (closed end). The shorter end hooks over the master link pin.
Keep some pressure on the pliers and squeeze the handles. The master link clip should snap over the pin and secure the master link.
Don’t forget the clip fits into the tiny grooves in the master link pins.
You might have to squeeze the master link joint together to expose those grooves before fitting the clip.


