

Introduction: Change Led Color on the Logitech G502


If you own the G502 from Logitech you know how good this mouse is. However it lacks the possibility to change led colors so that it matches your other stuff like keyboard,case lighting or gamepad lighting. If you are like me and want things to match then this is how to do it.
Step 1: What Do You Need


• Pry tool or a guitar pick
• Philips screwdriver
• Soldering iron
• Solder wick
• soldering tin lead wire
• 10x or more (As you will loose some while soldering) smd leds size:0603 minimal voltage 1,5V Max voltage 3,5(Any color you like)
• Hotline games mouse skates for G502
• Gloss black spray paint
• And some experience with soldering/desoldering
Step 2: Mouse Disassembly


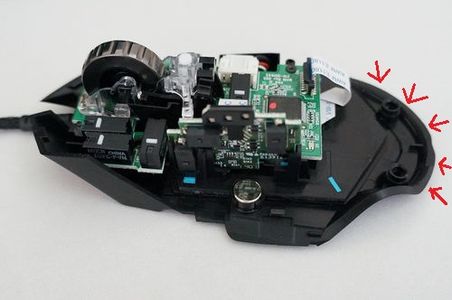

Remove the mouse skates that are labelled in the picture with the red circles. Underneath them there are four screw that need to be removed. Once you've done that you start to carefully pry the back of the mouse open like you see in the picture. Use the pry tools so you don't damage the mouse. Work your way to the front en try to unclick the the pins that are showed in the picture.
Step 3: Changing the Leds


Once you've opened the mouse you will see the two smd leds where the red circle is in the image. First you need to desolder them to do this you need to add soldering wire so that both side are fluid at the same time. Then you can remove the smd leds by using tweezers or something else to push them. There is a trick to make it easier but you need a piece of copper wire. When the leds are removed you can start to remove the remnants of the tin with the solder wick. As you see on the image there is a dot on the pcb wich shows the - wich is the cathode of the led. This dot and the green line on the led must be on the same side. the two leds need to be placed next to each other. The original leds are two in one but the ones we use are seperated so you need to solder one by one. If you like you can also change the blue indication leds that show the dpi setting. These are marked in the image with the red circles.
Step 4: Painting the Blue Part


You can paint the blue part black if you like so that it looks better. To do this all you need is some gloss black spraypaint some tape to cover the the parts you dont want to paint and some solvent to clean the part before painting it. I used white spirit
Step 5: Placing the New Mouse Skates


When your mouse is ready and closed then you can put the new mouse skates on. It's very difficult to remove the original skates without damaging them. So I recommend you to buy the hotline games mouse skates off ebay or amazon so that your mouse looks like new again. If you have any questions feel free to ask in the comments area I will reply as soon as I can.


