

Introduction: Cheap and Easy DIY French Knitter


A French Knitter is a fun little toy that allows you to easy knit a very long cord. After creating my Knit Spaghetti and Meatball Scarf , it was pointed out that a French Knitter could be an easier and faster way to make it. True. So I tried one, and decided to experiment with making one.
In this Instructable, I will show you both the most basic way to make one and different ways you can alter it to make it smaller or bigger, and easier to use.
This is a great craft for kids and adults. The easy one is, well, easy, and the upgrades you can do to it make it even more like the plastic ones you can buy from the store.
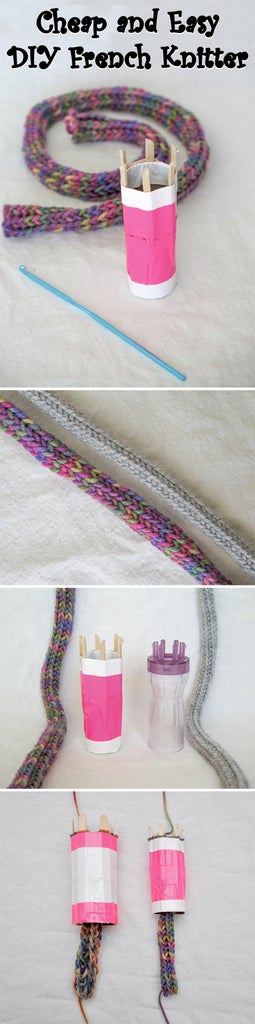
Step 1: Supplies


There are only a few basic supplies you need and then a few other things you'll need if you want to make the "fancier" version.
Basic Supplies:
- Paper towel roll (seemed sturdier to me than a toilet paper roll)
- Popsicle Sticks
- Duct Tape (or tape of choice, I like the sturdiness and colors of duct tape)
- Scissors
- Scotch Tape (optional)
Extra Supplies:
- Exacto Blade and Cutting Mat
- Hot Glue Gun and Glue Sticks
The second image shows the normal Paper Towel roll French Knitter on the left and the upgraded one on the right. They both work, but the one on the right allows you to make smaller, tighter stitches.
Step 2: Cut to Size


Start by cutting your paper towel tube to size. I would suggest to cut it so it just fits your hand. You don't want it too long and if it is too short, it will be hard to hold.
It will be tempting to flatten the tube to cut it, but don't. You just put creases in it and weaken it. Try to poke a hole in it, and then cut around.
Step 3: Attach Sticks and Tape


Time to stick on your sticks. I used another tape to just get them into position, but you can use just duct tape.
You want the sticks as evenly spaced as possible. I'm showing how to do this with 6 sticks, but you can use more or less (less might be hard to use as the sticks will be spaced a lot).
You need to make sure the popsicle sticks stick off the end enough so you can at least wrap the yarn twice and so the yarn loops won't just slide off. Mine stick up about 7/8"
If you are doing an even amount, I would suggest starting by putting two on across from each other. Then try to evenly space the others between those two.
Once you have everything where you want it, duct tape it down. I covered the whole thing, but you don't have to.
Also, for the sake of making this one as easy as possible, I did not cut the sticks, but you can see they are much longer than you need them.
That's it. You're done!
Step 4: Make It Bigger


It's pretty easy to make it bigger, though I'm sure there is a limit of how big you can get it.
Start by cutting two tubes the same size. This time you can cut down the side and then cut the pieces off because you don't need these in one piece.
Carefully start to stretch the tubes out so they hang open like in the second picture.
Take the two tubes and fit them together. I suggest taping them on the inside, outside, and taping over the overlap of what will be the top. Taping the overlap together will help for when you actually use the French knitter. I didn't do this the first time and my hook kept going between the overlap and getting in the way. Taping it will just save you hassle later.
The first image shows you the normal tube along with a smaller one and bigger one.
The last image shows the normal tube (right), compared to your new bigger one (left).
Step 5: Make It Smaller


This is what I wanted in particular as I like my knit cords to be tight.
Cut a piece of cardboard to size and cut down the side. Carefully squeeze the tube so the sides overlap. Once it is as small as you want it, stick a piece of tape to hold it down. Like with making it bigger, I suggest taping inside, outside, and the overlap.
On the right is the normal paper towel tube, and on the left is my new smaller one.
Step 6: Smaller Sticks


Again, I wanted to do this so I could make tighter, smaller stitches on my cord.
You are going to need your Exacto knife and cutting mat. Do not use scissors. When I used the scissors, it caused my popsicle stick to break and shed off into pieces. Or, try scissors. Maybe I just had bad luck :)
All you need to do is cut the stick down the middle and then cut those pieces in half. So each popsicle stick makes 4 smaller sticks.
Here is how I did this to get the cleanest results:
- Carefully make a cut down the center of the stick (deeper is better, but don't cut yourself, and you won't be able to cut all the way through on one cut).
- Cut down the center one more time, same spot as 1.
- Carefully bend the stick at the cut until you hear the stick start to splinter and break, stop.
- Make one last cut down the center, same spot as 1 and 2; you should be able to easily cut the stick apart now since you aided it along by cracking it in 3.
Now, you can just break your skinnier popsicle sticks in half, but you'll probably get splinters. To get a clean cut, I suggest:
- Cut one side of the stick
- Cut the edge of the stick (so you can line up your cuts)
- Cut the other flat side of the stick
- Carefully bend it back and forth to break it all the way.
If you bend it just one way, you'll get splinters, but if you carefully bend it back and forth, you'll get a cleaner break. Though, you can always trim off any splinters with your knife.
When you are done, you can stick these on just like before.
NOTE: I would suggest you have the curves of the popsicle sticks, face the way you pull the yarn over the stick (if that makes sense). I found having them the opposite way (as shown in the pictures above) made it harder to drag the yarn loops over the sticks. Example: I pull the loops over the left side, so I should have had the rounded part of the popsicle stick face left.
Step 7: Hot Glue (I Suggest This Regardless of If You Make the Easier or Upgraded French Knitter)


As soon as I started using my smaller French Knitter, I noticed that the loops were coming right off (because I was trying to make it tight).
To fix this little issue, I put a small dab of hot glue at the end of each stick. This will catch the loop that stays on the stick.
Step 8: DONE!


Now, to use your knitter, you are going to need something like a crochet hook to get the yarn loops looped. I suggest a smaller size hook so you can get in between the loops.
Step 9: How to Use It and What to Make


To learn how to use your French Knitter, check out this handy Instructable.
For something to make with your French Knitter, try my Knit Infinity Tube Scarf or you could try and see if you can make some small cords for my Spaghetti and Meatball Knit Scarf.
Also, try this Easy Earmuff Headband.


