

Introduction: Chimney Liner Installation: Step-By-Step Guide


Installing a stainless steel chimney liner is an easy and economical way to repair a deteriorated, unsafe, or inefficient chimney flue. You will be able to install a chimney liner after reading this instructable and you can do the job with common household tools. A chimney liner should be installed to reduce the chance of a carbon monoxide leak, chimney fire, and creosote buildup. Chimney liners also improve the energy efficiency of the appliance and makes fireplace maintenance easier. Most stainless steel chimney liners come with a lifetime warranty.
First, you must determine the appropriate size chimney liner for your specific setup. The chimney liner diameter size you will need equals the size of the exhaust hole on the appliance. The chimney liner length you will need will equal the height of the chimney. I recommend ordering slightly over that amount to give room for error. Visit http://www.rockfordchimneysupply.com for more information about stainless steel chimney liners.
Step 1: Installation Tools You'll Need

Only a few tools are needed for a successful chimney liner installation. You'll need a razor knife, flat head screw driver, caulk gun, a pair of working gloves, and safety glasses. Shown in the picture is a grinder with a cut off wheel. The grinder will give you the best cut when cutting off the excess chimney liner. A sawzall or hacksaw will also work fine. A power drill will also be needed for the project but is not shown in the picture.
Step 2: The Chimney Liner Kit

Every basic chimney liner kit is going to come with four main components: the stainless steel chimney liner, connector (in this demonstration we will be featuring a two part tee connection), top plate, and rain cap. This demonstration will show a basic installation, but a chimney liner kit can be customized to fit any particular chimney. The top plate is going to be the main variable for a chimney liner kit. For this application, a terra cotta top plate is going to be used. This top plate is only used when a terra cotta clay sticks out of the top of the chimney. We've already covered our basics, now lets get started!
Step 3: Prepare the Stainless Steel Chimney Liner


Start by using your razor knife and remove the plastic wrap that the liner is coiled in. Once you have the liner out, start to straighten the liner. Make sure to do this on the grass or a soft surface so you don't puncture it. Straighten the liner out as best as you can.
Step 4: The Tee Connection


For this application we will be demonstrating the two part tee connection. The part of the tee connection with the cut out on the side is known as the vertical part of the tee. The part of the tee with the looping hose clamp is known as the horizontal part of the tee. Start by locating the vertical part of the tee and insert the liner into the top of the female end. Tighten the clamp at the top of the vertical part of the tee around the liner with your flat head screw driver. This will give you a great, tight fit without having to drill screws through the liner.
Step 5: Insert the Chimney Liner Down the Flue


The first part of the chimney liner that will be going down the chimney is the vertical part of the tee connection attached to the liner. Proceed to lower the liner down the chimney until you reach the thimble. The thimble is referred to as the hole on the side of the chimney in the living space that allows stove pipe to attach to the chimney.
Twisting the flexible liner will help you install the liner if you are getting caught or hung up on the chimney walls.
Now you will need to head into the house to finish connecting the tee.
Step 6: Finish Installing the Tee Connection


Locate the horizontal part of the tee connection. First, insert the horizontal section of the tee, hose clamp end first, into the thimble. Snake the vertical part of the tee through the horizontal hose clamp until the lips of the tee are inside the horizontal part.
You will find when you look through the inside of the horizontal part of the tee that there is a worm screw. With your flat head screw driver, tighten the worm screw until the two parts of the tee connect. Take this step slowly. As stated above, the lips of the vertical part of the tee should be inside of the horizontal part.
Step 7: Connecting Stove Pipe to the Tee Connection.


Once the tee connection has been installed correctly, it is time to connect the stove pipe to the stove. Most stove pipe comes with three screws per connection point. Use your drill and drive the screws into the horizontal part of the tee and through the exhaust collar of the stove.
Now it's time to head back onto the roof to finish installing the top plate and rain cap.
Step 8: Installing the Chimney Liner Top Plate


Once the chimney liner is all the way down the flue to the point of the thimble, the next step is to connect the top plate to the top of the chimney. The main function for a top plate is to seal the existing flue from rain, wind and critters from entering the chimney. It also has a clamp located on the inside collar of the top plate to support the weight of the liner.
Start by using your caulk gun and a tube of weather resistant silicone to run a bead of silicone along the top edge of the clay flue.
Next, thread the chimney liner through the round collar of the top plate so that the top plate is sitting on the top edge of the clay flue.
Locate the locking bolts welded on the four sides of the top plate. Center the top plate on the clay flue and use your flat head screw driver to secure the top plate to the side of the clay flue. Warning: Make sure not to overly tighten the locking bolts. If tightened too much the clay chimney flue could crack.
Step 9: Remove the Excess Liner

When you have successfully installed the top plate, the next step is to cut the excess liner flush with the top of the collar of the top plate. Shown in the picture is a grinder with a cut off wheel. The grinder will give the best cut, but a sawzall or hacksaw will work just fine.
Step 10: Connect the Liner to Top Plate

Once you have cut the excess chimney liner, the next step is to connect the liner to the top plate. The top plate is meant to bear the weight of the chimney liner inside the flue. On the inside collar of the top plate is a hose clamp. On the outside of the collar is a worm screw that will tighten the hose clamp. Once the liner is flush with the top of the collar of the top plate, take your flat head screw driver and tighten the worm screw so that the hose clamp tightens around the liner.
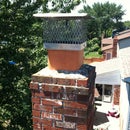
Step 11: Installing the Chimney Rain Cap


The next step is to secure the rain cap to the top plate. The collar of the top plate will get inserted inside of the rain cap. There is a suspended hose clamp at the bottom of the chimney rain cap. See the bubbled-out flange on the collar of the top plate? The chimney rain cap will bottom out on this bubbled flange. The clamp will be suspended just below the bubble to ensure a secure fit. Tighten the rain cap clamp with your flat head screw driver.
Congratulations, you have successfully installed a stainless steel, flexible chimney liner!
Please feel free contact me if you have any additional questions.


