

Introduction: Chrome Plating of Car Headlights and Parts


If there's anyone interested out there, I will help out as good as I can.
Sorry about the lack of pictures and video from the buffing and polishing. I was so focused, that i completely forgot to use the camera :)
An IMPORTANT thing, is to check out with your country's regulations regarding these chemicals. And NEVER EVER dispose them out in the nature. Some of them are harmful to the environment, and poisonous to yourself.
The gases from the plating are odorless, but extremely corrosive. I was just slightly unaware a moment, and got some nose bleeding after this. NOT recommended..! Show respect for the chemicals, and always read the datasheet before start. Use goggles and gloves.
Step 1: Before Dismantling.


Here you can see the old chrome of the headlamp. Its really worn out. And the door handles are in poor condition. Heavily infected with Zinc Pest. Had to clean out all the pitting with my dremel drill.
Step 2: Equipment You Need / the Chemicals


The easiest way to get a good result, is to buy the ready made kits from companies that supply these.
The kit I ordered, I purchased from http://www.gaterosplating.co.uk/ .
I`m sure that you can get these ingredients some other places, but the prizes are ok, and the service and support are exellent.. :)
I started with :
Bright Copper plating KIT
Nickel Plating KIT
Replica Chrome Plating KIT
GP Alcaline Cleaner
Acid Picle
Chrome Stripper
Step 3: Tank Setup !


I have no pictures from the mixing. It is really important to use all the safety equipment recommended..! Use goggles,and
proper gloves. Remember to have plenty of water nearby. And make sure to remove any spills.
The Chemicals :
Replica chrome 5 ltr
4 litres distilled water
1 kg nickel sulphate
125 g cobalt sulphate
220 g nickel chloride
160 g boric acid
230 ml nickel brightener
Copper 5 ltr
4 litres distilled water
560ml of 36% sulphuric acid
900g copper sulphate
100 g sodium chloride
50ml cupracid ultra make up
3ml cupracid part A
3ml curpacid part B
Nickel strike 5 ltr
4 litres distilled water
380 g nickel sulphate
380 g sodium sulphate
115 g ammonium chloride
Heating
When the ambient temerature drops and the plating tanks are unheated then it is time to consider some form of tank heating. All plating electrolytes will benifit from tank heating of some form. Easy ways to heat the tanks are as follows:
For small tanks
1) simply place them in a bowl of boiling water and wait for them to warm up.
2) Fill a plastic bottle with near boiling water and place inside the tank taking care not to overflow the tank.
3) Place the tank on a heat mat normally for lower plating temperatures but will still raise the temperature.
4) Thermostatic tank heaters are the easiest method as you can preset a temperature and leave it to warm up. Remember to give it several hours from cold to get to the correct temperature.
For larger tanks
1) Thermostatic tank heaters are the best method for larger tanks.
2) Heated air agitation is sometimes used in very large tanks.
3) Combined heat and filtration systems are also used.
4) Heated tank jackets.
Once up to temperature the process of plating will keep the tank warm or if continuous plating is done then it may be a case of cooling the tank if it gets too hot!
Temperature ranges for our plating electrolytes.
Metal Range Ideal
Zinc 15°c - 40°c 25°c - 30°c
Copper 15°c - 50°c 25°c - 40°c
Nickel 30°c - 50°c 30°c - 40°c
Rep Chrome 30°c - 50°c 30°c - 40°c
Brass 20°c - 40°c 25°c - 35°c
Cobalt 30°c - 50°c 35°c - 45°c
Step 4: Cleaning..!
Cleaning (Copy/past from Gateros Plating Home Page)
After seeing one or two customers of late with contamination problems (most of which we have been able to solve with having to replace the electrolyte) I want to stress again just how important cleaning is to both good quality plating and to ensure that the electrolyte is kept in prime condition.
It is vital that cleaning is carried out carefully and that the items to be plated are ultra clean.
First step is a good de-grease. This can be done with a solvent type degreaser or a hot alkaline degreaser such as our GP1 alkaline cleaner.
The next step is to remove any traces of rust, paint or dirt. This can be done by electro-cleaning, bead blasting or even buffing on a wire may be sufficient. Remember once you have started the cleaning process you must always wear gloves as even the grease off your fingers will cause the plating to blister at a later date!
Once you have completed the first part of the cleaning process, I would now advise a water break test. Just dip in clean water and see if the item is covered with a water film or if it beads. If it has a good water film all over it with no beading then it can go to the pickle stage. If you can see the water beading then you need to wash in detergent and water, rinse well and repeat the water break test again until it passes.
Now onto the pickle. Some people try to skip this part but it is very important not to as it will ensure a good bond between the surface of the metal and the following plate.
Our dry acid pickle is specially formulated for use as a plating pickle or as a metal activator. You can also use HCL ideally at concentrations of about 20%. Some people use sulphuric acid but I find it a bit smutty on some metals. We have had customers use vinegar but this is just not strong enough for the job! Pickling time varies according to the type of metal and the strength of the pickle used. It is normally between 1 minute to 20 minutes and remember always rinse well after pickling.
Once pickled and rinsed, you need to plate straight away. This way you will not give the metal any time to form an oxide layer on the surface.
The better you can prepare a surface the better the results will be so spend time flatting, buffing and polishing if needed. This is essential when brush plating as you are only putting a very thin plate on the base metal so the more polished you can get the base metal the better. If buffing or polishing remember to remove the polish film with a solvent cleaner if needed and wash in detergent and water again after. Always check with the water break test before pickling.
Think about investing on a bench buffer/grinder. You should be able to buy one for as little as £35 for a 3/4 HP 220v one. The amount of time and effort it will save you will make it well worth the cost.
Remember cleanliness is next to godliness so if you want to be a plating god then clean, clean and clean again!
Step 5: Prepairing the Parts...


The plan is to strip the parts from old chrome. Then smooth the surface and fix dents.
The first Plating will be a relative thick layer with copper. Then a layer of Nickel, and finally a thin layer of chrome.
I had no sandblaster at the moment, so I had to sand down the surface first. One of the headlights were badly bumped and had a crack. Had to weld it first with a silver soldering rod. I made a mistake, and used to coarse paper . So I had to put on a thicker coating of copper first.
The doorhandles were badly pitted(Zink pest) , and had to be sandblasted first, and then I used a Dremel tool to grind out all of the cracks.
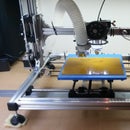
For circular objects like the headlight and rim, it is a good solution to make a jig. Then you can mount it in a handheld drill in a wise.
I even used this method during buffing. Just put the felt polisher in another drill ,and counter rotate.
Step 6: Next Step, the Doorhandles...aargh


The Doorhandles is made ofPOT Metal. This is an alloy of : zinc, lead, copper, tin, magnesium, aluminium, iron, and cadmium.( Also known as ZAMAK, and Monkey Metal )
To plate the handles with copper, you first have to Strike Nickel plate the handle. This is to seal the surface. Other-vice the copper will kind of react with the pot metal, and peal off.
The handles is best sandblasted. You can not use chrome stripper like you use on other metals. Othervice you have to sand it down by hand. The old chrome have to be completely removed. Remember to use gloves to not contaminate the part with oil/grease. Then, the part is dipped in the Acid Picle solution for about 20 seconds. The part will now appear to be boiling! Then in to the Neutral Nickel Strike bath. The low acidity makes the nickel bind to the POT metal. When a dull even light gray surface is achieved, the part is rinsed and goes in to the copper bath. After a uniform build up by copper, the part is rinsed and dried. Then you cover the part with soldering flux. Be extremely consentrated while soldering to prevent disaster..! The temperature range between the solder and the parts melting point is quite narrow. Start with the thickest part first, and work the solder towards the thinnest part.
Then, sand down, strike plate with Nickel again. Then a thicker coat copper. Sand down to a smooth surface using finer and finer sandpaper. Wet or dry sanding .. THEN its time to start buffing. I used a Felt wheel on a bench grinder for the job. The compound used is BLACK compound. HERE : http://en.wikipedia.org/wiki/Polishing_(metalworking) it is explained on Wikipedia about polishing and buffing.
Step 7: Headlights..!


Strip off the old chrome. (Sandblast if possible)
Get a smooth surface using coarse-fine sandpaper.
Plate a layer of copper.
Solder dents/cracks.
Sand down the soldering .
Plate it with another copper layer.
Start buffing, and get the surface MIRROR like,using right compounds and right felt disks.
Clean and rinse (see previous step)
Then strike plate with Nickel.
Buff the Nickel to a mirror like surface. (What you see is what you get finally after the chrome)
Clean and rinse
Plate with Chrome.
Buff and Polish ...
Finished...!
Step 8: Rust Removal


You will need 12V dc from a powersupply or battery. The negative lead on the part you want to remove rust from (cathode) . As a anode(positive+), you can use whatever of scrap iron you have. I use Lead strips also, as you only need to get the electrons to flow through the solution. Lead wont deteriorate itself. On the video here, I use steel wire for concrete armoring as an anode. They completely dissolve in this process. Just connect, and leave over night.Remember to treat the parts quickly after this. Otherwise it will rust again. For my tools, I used a steel wire brush on my bench grinder. Then sandpaper, cleaning, and a layer of nickel. A good buff, and the part is ready for many years service..!
Step 9: Finally... Some Results, and My Car !


I am very pleased and exited with the result myself. It was much more work that I could even imagine. But the reward afterwards were huge. Now it is easy for me to plate almost anything, and get a predictably result. I have all of the equipment ready for the next job now. This is absolutely recommended. But you should start with simple things first, and not with the main thing first, as I did..!!


