

Introduction: Circuit-Bent Big Mouth Billy Bass


Remember those fake fish mounted on a plaque that flopped about and sang "Take Me To The River" and "Don't Worry, Be Happy"? Well, here's your chance for revenge.
The idea for this project I owe to Tom Koch of TechDweeb.com. His Billy BASStard inspired me to crack on of these bad boys open and find my own bends. View the original here: http://www.techdweeb.com/BillyBASStard.html. Enjoy!
Step 1: Collect Your Materials
1. 1 Big Mouth Billy Bass in working order
2. 4 C-cell batteries
3. 2 SPST toggle switches
4. 1 Normally Open momentary pushbutton switch
5. 1 output jack of your choice: 1/8", 1/4", RCA, etc.
6. Solder, soldering iron, wire, clippers, something to drill holes with
Step 2: Exploration


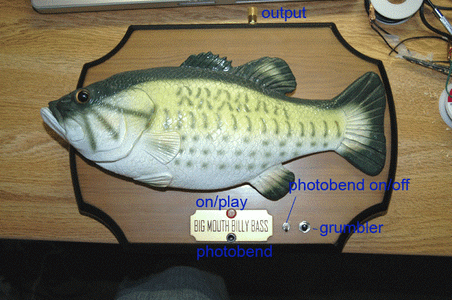
Unscrew the 6 (or so) screws on the back of the plaque. The back half should come off fairly easily, but BEWARE: there are several very important wires running from the back to the front half, and to disconnect them would surely cause some grief.
Take a look at the circuit board. Many of the solder points connect to the motor mechanisms that make the bugger flop around. The specific area you are looking for is where the IC (really just another PCB soldered in at a right angle to the main PCB) connects to the board. There is a row of rectangular solder points: this is your goal.
Locate points A, B, and C on the board. These are the points you will be soldering to to make the main bends.
Also, there is a photocell already in the the front half; it's that thing that makes the fish go off every time you walk by it, hidden in a little pit under the red button on the front. Locate this on the inside, as this will be instrumental in the coolness of the completed project.
Step 3: Bending, Part 1

Here's where the fun begins: First, we will create the connection that makes you able to control the pitch of the singing with.... light. That's right, a light controlled Billy Bass. Booyah.
Locate points A and B on the circuit board. There is a resistor running between them, and we are going to bypass it. First, clip or desolder both wires connecting to the photocell. Next, solder a wire between point A and one of the lugs on a toggle switch (SW 1). Then, connect the second lug and
one of the solder points on the photocell. Finally, connect the photocell back to the board at point B. Voila! Your light-sensitive bend is commplete!
Step 4: Bending, Part 2

Here's the part where you make the bend which slows good ol' Billy Bass wayyyyyyy down.
Locate points B and C on the PCB. Point B was already used in the previous step, and it will be used again in this one. First, connect points B and C to the lugs on the toggle switch, one per lug. Next, run another wire from each lug of the toggle switch to a normally open pushbutton switch. This scheme makes the rumbler (as I like to call this circuit) able to be pushed on and off quickly, or held for long amounts of time.
Step 5: In Goes the Output

There is a speaker already installed in the Billy Bass, but it's kind of wimpy and not suited to live use, such as in a show. We will fix that by adding an output jack.
The speaker has two wires coming to it from the PCB. One goes to the positive terminal, one goes to the negative terminal. These should be marked on the speaker itself, but if not, dont worry, it's pretty easy to fix if you wire it backwards.
Take your output jack of choice (I used a 1/4" mono guitar jack, but you can use 1/8" jacks, RCA plugs, etc.) and wire one lug to each of the lugs on the speaker. I recommend trying out the various possibilities for wire placement with some alligator clips first, as those are easier to reverse than soldered wires. When you find the configuration that works, solder in the wires.
Step 6: Case It
Now that you've got all your parts wired up, you can mount the controls on the plaque. I use a soldering iron to melt holes in the plastic because I have no drill, but this is messy, smelly, and ruins good soldering iron tips, so I strongly recommend investing in something that drills holes. After the proper sized hole for each component is drilled, insert it and secure it.
Ideally, you planned ahead and allowed enough wire for you controls to go where you wanted them to go. If not, rewire! Mine are mounted in the lower-right-hand side of the front of the plaque for easy thumb access, and my output is on the top side of the plaque.
Step 7: Rock It
Now for the moment of glory: put in your 4 C-cell batteries and press the red button on the front. If everything is working correctly, you should here good 'ol Billy start to sing a song. Now, flip the switch going to the photocell. Hear how he got really high and fast? Put your thumb over the hole where the photocell resides. Use a flashlight to make him shriek. Fun, eh? Now, flip the grumbler switch, and hear him go realllly low. You can use the photocell with this too, and make him speed up a little, but not back to normal by any means.
That's it! You've now bent a perfectly good Big Mouth Billy Bass, and it was quite enjoyable, no? I've attached an audio clip of mine, it should give you an idea of what to expect.


