

Introduction: Kyoto Trough Solar Cooker Mimics a Parabolic Dish Without a Thousand Cuts!


The kyoto trough uses troughs with their curvature at right angles to each other to mimic a parabolic dish. Bending and cutting sheet material to make the trough requires as little as 2 cuts of the sheet material.. On the other hand
Cutting sheet material to make a parabolic dish is a massive undertaking!
I have made a first prototype and it works.
It is"tweaked" to provide 2 hours of cooking time at pretty much full power. So you can set it and leave it. A parabolic dish on the other hand needs to be adjusted every half hour.
The trough arises from a solar software project I did.
I have uploaded the most recent scene file here thirdcombined troughblabla.aoi If you download it, it might change the file extension to .temp. Just change it back to .aoi and it will work just fine when you open it in art of illusion
The file just happens to contain a parabolic dish, winston curve dish, and various others too. And all in 11kbytes!
Art of illusion software certainly helped me come up with this design.
http://www.youtube.com/watch?v=qXVfGFQpYD8 shows my first prototype Kyoto trough.
Brian

Step 1: Concentrating Sunlight With 2 Troughs (why It Works)
You can concentrate sunlight to a point of light as shown by a Swedish guy over 30 years ago!
Here is one of his videos of how it works.
http://www.youtube.com/watch?v=FYzgYI9_h6s
I want to solar cook so I do not want a point of light. Instead I want the light to focus on the place where my cooking pot will be for 2 hours. How can I do it? First thing is to make a compound trough. This is easy. You just make a parabolic trough and twist its sides inwards. If you twist both sides inwards by 15 degrees each, you have a 30 degree "acceptance angle" . If you allign it with the suns path, and let the sun shine over it, for 2 hours, all the light from both sides will fall at or below the focus of the dish.
So there is some concentration!
So put your pot here. But the trough is wider than your pot! so the next stage is to concentrate that light a bit more. This is where the wings come in. They are parabolas too and they have a focus on the front of the pot and a focus on the back of the pot.
As long of their angle of rotation is at right angles to the angle of rotation to the first trough, they will not affect that rule "at or below the focal line" when the light arrives under it but it will concentrate the light towards the center of the trough! (I give these parabolas a little twist inwards too to do the at or below thing and spread the light over the pot a bit more).
Step 2: Theory and Practice (not Quite the Same Thing)

My best ever solar cooker was a "compound parabolic solar cooker. It gave pretty good results comparable to commercial parabolics but the process to make it was too involved for most people.
I do not think anyone else has ever tried out the design.
I did tests on the design with free modeling software and it showed that it was not quite as efficient as I had hoped. It also showed that the dish had an elongated "sweet spot" where the dish performed really well.
http://www.youtube.com/watch?v=IIRhNRk_0js is the video that compares different dishes over time.
The aim of this instructable is to take what has been learned in the tests and put the learning to really good use. Designing a simpler better "dish"!
Step 3:
Step 4: Simplification! Why I Went for the Combined Trough Design.
I have made parabolic and compound parabolic dishes in the past.
It is not exactly easy!
But I thought that when I showed my compound parabolic dish design to the world,(with figures for boiling speeds and amounts by the way) others would make it, check it out and compare it to others. NOPE
Perhaps it is just too hard for amateurs to make something like that!
Also,
Alu foil and mylar comes on rolls and chopping it up to cover a dish is a real pain and you will always get lots of wrinkles, especially with kitchen foil. And EVERY wrinkle acts as a flaw in your "mirror".
Perhaps we can learn from the cookit design.
Lets make the "dish" by combining pieces of flat material just curved in one plane.
Use one curve to concentrate in one direction and use the other to concentrate in the other direction.
Result, a simple reflector with great concentration!
AND if you spread your alu foil on a flat surface and just curve it in one direction (like a trough) the wrinkle situation is far far better. And you can just lay down a whole strip at a time. Same with mylar and its competitors. Actually, you might just need to stretch mylar over a frame because it is just plastic covered in alu film!
We have a choice of parabolic, compound parabolic, winston w curves cusps and more!
It might end up that we use one curve type for the long reflector and a different one for the secondary ones.
Results in the field will show which is the best approach. It is quite likely that different curves will suit different situations.
Step 5: Making the Curves for the Solar Cooker.


LOW TECH and why. I use homemade tee square and a piece of string to make my parabolic curves. I try out the curves on a little table (too little but the biggest I have) and when I am close to what I think is right, I cut out the curve. I am unsure how the bottom of the trough should be shaped so I have left it and can change it later.
The parabola is rotated inwards round its focus by 30 degrees. I ended up cutting one side of the parabola as a template, then cutting the other side from that template and then rotating this by 30 degrees on the focus. Then screw the pieces together and you have your main dish.
Originally I was just going to do the "cookit" with a long tail. But without cutting my sign plastic, the tail ends up going 6 ft in the air! So I went with something like the original design instead.
Brian
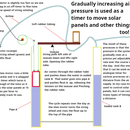
Step 6: What It Means to Panel Cooker Design

Panel cookers are simple small solar cookers that are often made by folding cardboard. The cardboard is covered with reflective material and they are usually used with a cooking pot that is covered with an oven bag for insulation. They are the simplest of all solar cookers and they are effective but generally they do not reflect much light onto the cooking pot.
My software simulation tests suggest that a panel cooker with at least one "tail" in line with path of the sun could be significantly more effective at catching the light.
The key is to keep the tail in line with the path of the sun across the sky.
That might mean some sort of rollers needed under the panel so that it can swivel.
The boost in energy collection may make the extra effort worth it.
I include a picture for clarification.
Brian
Step 7: The Future for the Kyoto Trough?
WELL, I thought It might get a vote or 2 in the US of efficiency contest!
But whatever.
People will realize that the Swedish guy saw a parabolic dish and split it into 2 troughs to do a point focus. Then they are going to see the kyoto trough and think : what type of dish will it become if I reverse engineer it?
So pretty soon the "Kyoto dish" will be born!
They will be spit out in the thousand in factories all over the world and solar cooking will finally catch on,
millions of people are going to eat that little bit better without firewood and millions of trees will be saved.
Thats the deal as I see it anyway.
good night and sweet dreams
Brian
Step 8: Credits
No work is original!
First of all, a big thanks to the people at the art of illusion forums on sourceforge and also a big thanks to the guy from Sweden who dreamed up a parabolic dish made from 2 parabolic troughs.
http://kmr.nada.kth.se/wiki/Main/PointFocus#The_historical_origin_-_San_Francisco
I might not have even considered 2 troughs, let alone a trough with wings if he had not done 2 troughs 30 years ago!
Anyway, I do not know how this will turn out.
Thanks to Tom Sponheim of solar cookers intenational for putting it in the right place on their wiki and to "solarcookingnut" on yahoo groups for support.
Please join in and share your input
Brian White
Step 9: Recent Devellopments With the Experiment
May 16th, I did another test today but too many clouds. So thats it, time is up! US of efficiency competition is over and no votes again. Once templates are done, this will be a super easy design to make. It took an hour or so to set up and cut cardboard for the wings and it took quite a while to find a suitable curve for the long reflector.
Perhaps it will be worth it if others follow.
May 12th. I applied mylar to the trough. There is a little problem.
2 focal lines.! They sure are hot though. (May 16th I now know that 2 focal lines is normal. One is high and the other is low. One rises towards the nominal focus as the sun moves and the other one lowers down away from the focus as the sun moves.)
Participated in the
Earthjustice United States of Efficiency Contest


