

Introduction: Comprehensive Longboard Guide


Hello my name is Jordan from Sydney, Australia. I'm a keen woodworker and love longboarding so it was natural I make one. I spent many weeks researching, learning about designs, board structure, everything that could affect the board's final result. In this guide I will attempt to cover all the details including pre-production, longboard press designs and production, constructing the longboard and finishing the longboard.
This DIY project cost approximately AUD$100 which is cheap as longboards range in price between $120 - 299. Plus the longboard press is reusable and there will be leftover timber to make a second board.
This instructable is a work in progress. I will continue to update it and add any tips and tricks I pick up. Please leave feedback.
I appreciate it. Thanks
Step 1: Longboard Design

For this build I am basing the longboard on a Loaded Dervish longboard. This is because the board has a simple shape and design. I have made several boards with my own designs as well and will make reference to that in this guide.
When basing a longboard on a preexisting board, I have found the best way to make the design is with Photoshop. I have a separate instructable on making a Photoshop longboard cutout. Check out the link below
https://www.instructables.com/id/Making-a-Photoshop-longboard-cutout/
Step 2: Materials - Longboard

The Longboard is constructed from layers of plywood, glued together to form the deck. These layers of ply are 3mm or 4mm and are placed in alternating vertical and horizontal pattern, this forms a strong deck that has neither too much vertical flex or horizontal flex.
Selecting the right plywood is very important as there are various grades and types. The first is the grade: The grade is the quality of the face ply which ranges from D to A (D being the lowest quality and A being marine ply). An A grade ply is good for either the top or bottom face as it looks the best. Plywood comes in non-structural and structural plywood. 4mm Marine AA plywood is structural and 3mm BC plywood is non-structural. BC plywood is good for the middle layer as they are not seen. I used mixed hardwood plywood because it is cheaper and more accessible then birch or cedar plywood.
The other important part of making a longboard is choosing the right glue. The main glues used are PVA woodworking adhesive, Polyurethane adhesive and Epoxy adhesive. PVA is cheap but not waterproof which makes it not ideal and Epoxy is the strongest and the most expensive but make the board very stiff which is not always what longboarders want. I used polyurethane adhesive because it is not super expensive, waterproof and is very strong but it does leave the board with some flex.
The final component of the longboard's structure is a fibreglass layer. Fibreglass is used for reinforcing and works best under stress meaning on the top or bottom of the deck as that is where all the stress on the ply occurs. I chose to put the fibreglass on the top as it will be covered by grip tape. Fibreglass is dangerous and must be handled safely. Always read the instructions carefully. To make the fibreglass layer you need a fibreglass sheet, fibreglass resin and a bottle of fibreglass catalyst. 250ml of resin should be enough for one board and 0.25m2 of fibreglass should also be enough for one board. You can use two strips of fibreglass stripping or a bigger piece of fibreglass sheet.
An optional component is using a clear varnish to seal the board once finished. Its a good idea as it prolongs the board's life and helps prevent damage.
To make the board you will need:
- Plywood Structural Bc 2440x1220x3mm (I paid A$16.50)
- Plywood Marine Aa Grade 1220x810x4mm (A$10.98)
- Adhesive Polyurethane Sikabond 125g (A$7.22)
- Diggers 0.25m² Fibreglass Repair Kit (A$20.95)
- Feast Watson 250ml Gloss Clear Varnish (A$15.60)
I live in Australia and bought all the requirements from Bunnings Warehouse. The links to the material at Bunnings are below.
http://www.bunnings.com.au/plywood-bc-premium-2440x1220x3mm_p0340267
http://www.bunnings.com.au/plywood-marine-aa-grade-1220x810x4mm_p0320033
http://www.bunnings.com.au/adhesive-polyurethane-sikabond-125g-m-purpose-techgrip-418051_p1660985
http://www.bunnings.com.au/diggers-0-25m-fibreglass-repair-kit-no-1_p1565863
http://www.bunnings.com.au/feast-watson-250ml-gloss-clear-varnish_p1520126
Step 3: Materials - Bolt Longboard Press

To make the longboard the plywood must be pressed to achieve the intended shape. There are many forms of presses but I use a Bolt press. The bolt press comprises of a series of horizontal wooden clamps or (ribs) which are screwed into a frame. To make this Longboard the press has these requirements:
- 3m Pine Structural F5 70x35mm A$4.98 (3m standard size)
- 5.4m Pine Dar Fj 42x18mm (2x2.7m) A$8.10 (5.4 standard size)
- Zinc Threaded Rod 36x1/4in x3 A$9.60
- Nuts Hex Half Zp Zenith Snppk 1/4 Pk30 A$3.32
- Leg Furniture Acc Leggz 1/4x5/16in T Nuts Pk4 x2 A$3.96
- Zenith timber screws 6g 30mm pk35 A$3.48
I bought all the requirements from Bunnings Warehouse. The links to the material at Bunnings are below.
http://www.bunnings.com.au/pine-structural-f5-70x35mm-l-m-radiata_p0051348
http://www.bunnings.com.au/pine-dar-fj-42x18mm-2-7m_p0220010
http://www.bunnings.com.au/threaded-rod-zp-macsim-36x1-4in-whitworth-63sz0143_p2410278
http://www.bunnings.com.au/nuts-hex-half-zp-zenith-snppk-1-4-pk30-eba1006_p2420258
http://www.bunnings.com.au/leg-furniture-acc-leggz-1-4x5-16in-t-nuts-pk4_p3940070
Step 4: Bolt Longboard Press - Cutting List


The first step is to cut all the components out. To cut the timber I used a power drop saw and to cut the metal rods I used a metal handsaw.
Cut according to the cutting list below:
- Pine Structural F5 70x35mm - Cut into 9 30cm lengths
- Pine Dar 42x18mm - cut 2 100cm lengths
- Pine Dar 42x18mm - cut 9 30cm lengths
- zinc Threaded Rod 36x1/4in - cut 18 15cm lengths
Step 5: Bolt Longboard Press - Building the Frame


The tools required to build the frame are a drop saw, tape measure, tri square, pencil, power drill and 7.5mm drill bit.
To build the press frame start by finding the centre of both main rails, screw the centre rib to the middle leaving 5cm on either side of the centre rails. Screw 2 timber screws into each main rail (meaning 4 screws per rib).
Leave 71mm between each rib, once all 9 ribs are screwed in, the total length of the press is 95cm which is the length of the longboard's design.
The next step is to drill 7.5mm holes at the ends of the ribs. Find the centre of each end and measure 1.5cm inwards, mark with a pencil. This is where you will drill the hole. Once all the holes are drilled you are ready to make the wooden bolt clamps.
Step 6: Bolt Longboard Press - Building the Rib Clamps


To build the rib clamp you need to draw a profile into the ribs to bend the plywood. This longboard will have a 1/2" concave and a 1/2" camber. The concave of a longboard is when the sides of the longboard bend up allowing your feet to get good grip on the longboard. The camber is the upward bend of the deck between the trucks. On a flexible board this ensures that the rider will always be sitting higher than the trucks and gives more leverage for turning.
You need a pencil and ruler to draw the profile as well as 3 nails and a hammer.
The first thing to do is to draw a centre line through all 9 ribs.
To incorporate the 1/2" camber the end ribs are drawn from the centre line and have the height of 0.0mm while the centre rib is drawn 12.5mm higher than the centre line which gives the board a 1/2" camber. The other ribs from the outside in slow rise to meet the centre rib. Each rib is drawn 3.1mm higher to reach 12.5mm. Refer to the second picture.
To incorporate a 1/2" concave into the board I used three nails. Start by half nailing in 2 nails 30mm from the ends. Then find the centre of the rib and measure 12.5mm down and place another nail. You achieve the symmetrical bend by bending a ruler around the nails, see third picture.
Once the profiles have been drawn on the ribs you cut the profiles, I used a scroll saw but you could possibly use a jig saw. Slowly cut the profiles. Take care to keep the cut smooth.
Once the profile is cut the last thing to do is drill the holes in the ribs to attach to the frame. Find the centre of the rib, measure 15mm from the end and mark it. Drill a 7.5mm hole through the mark.
Number the ribs and assemble them on the frame, the Bolt Press is now finished.
Step 7: Longboard - Cutting List

Longboard decks range between 10-15mm thick. For this deck I'm using 2 sheets of 3ply 4mm marine plywood, 1 sheet of 3mm stuctural ply and a 1mm sheet of fibreglass matting. This makes the board 12mm thick making it very light and giving good flex.
The 2 sheets of 4mm ply need to have vertical orientated grain (meaning the grain runs along the long sides) and the 3mm ply needs to have horizontal orientated grain. This works to balance the flex.
The cutting list:
- 100cm x 25cm 4mm ply (vertical grain) x2
-100cm x 25xm 3mm ply (horizontal grain)
- 1/4m2 fibreglass sheet (normally 100cm x 25cm)
Update:
One thing I didn't consider is weight of the rider, I am only very light but a heavier person will need to further reinforce their board. To make the board stronger add another 3mm ply or fiberglass the top and bottom. I don't want to give specific weights because I'm not sure which weights need what.
Step 8: Longboard - Building the Longboard


Start off by choosing the best face of each 4mm ply. Lightly write 'face' with pencil so you don't forget. Evenly spread the polyurethane glue over the non face sides of the 4mm ply and both sides of the 3mm ply (use a grout spreading tool to get glue over the whole board). Put one of the 4mm ply face side down, place the 3mm ply on top and the other 4mm ply on top with the face side up. Put the board in the press and tighten all the ribs.
Leave for at least 6 hours before you take the board out of the press. Once the deck is dry, mix 250ml of fibreglass resin and the recommended catalyst (see instructions). Pour half the mixture on the top of the board and spread with a brush. Once the top is completely covered place the sheet of fibreglass on top and dab down with the brush. Slowly add the other half of the resin mix to the top of the board, don't use brush strokes to spread the resin (this will ruin the fibreglass). Instead dab the fibreglass. Make sure the fibreglass on the board becomes clear which means it will cure properly (see second photo). Your board is now ready to shape.
Step 9: Longboard - Shaping the Deck


This step is where the Longboard cutout is used. Place the cutout on the top of the board and trace around it. Use a jigsaw to cut around the traced lines.
Also cut out the holes for the drop through and trace around them. I am cutting drop through holes to suit Paris trucks or similar.
Go to your truck manufacturer's website to download a drop through template.
After tracing the drop through from the template, find the centre of the top and bottom of the template tracing. This needs to be perfect or it will throw off the drop through and wreck the deck. Measure 15mm from the bottom and mark with pencil, this is where you will drill the hole. Use a 30mm holesaw drill bit to drill the centred top and bottom (the bottom is the penciled marked dot). See photo four. Now draw centred 25mm wide lines between the two holes. Cut along the lines with a jigsaw (see photo five). Place the truck baseplate in the drop through to check it fits (if it doesn't, keep sanding the drop through until it does). Once you have the baseplate straight in the hole, drill the baseplate holes with a 5mm drill bit. Take the baseplate and enlarge the 4 holes with a 5.5mm drill bit. The drop throughs are now done.
Step 10: Longboard - Finishing


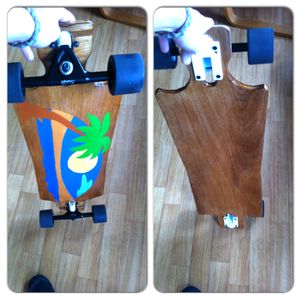


Now the Longboard is shaped it is time to put the finishing touches on it. First sand down the entire board with 120 grit sandpaper or finer. Then wipe down the board with a damp cloth and put 1 or 2 coats of varnish on the top, bottom and sides. You can now put on your graphics whether it is paint or vinyl stickers, it is up to you. For this board I have added a coconut tree vinyl to the top and will cover with clear griptape and on the bottom I have bought an adhesive wall mural of a beach scene. Both will be coated in two more layers of varnish.
The beach scene I bought was divided into 15cm x 15cm squares so I cut each one out and applied each stickers to the board separately. Then I put a few coats of varnish on to seal the edges.

Participated in the
Workshop Contest

Participated in the
Manly Crafts Contest


