

Introduction: Computer Scroll Wheel, Bearings Version


A heavy-weight scroll wheel to do the job of the conventional mouse wheel. Useful for scrolling through long lists, video editing and zooming in programs such as Google Earth.
The larger diameter and weight means that faster scrolling can be achived, with greater accuracy than the conventional mouse wheel affords.
This is based on this Instructable by 'whatsisface'. I just wanted something a little smoother and refined. Plus, I wanted a reason to use my lathe for something other than making candle sticks.
I'd recommend reading at least the first few steps from the earlier instructable, as mine starts off after the soldering is completed.
Anyway, enjoy.
Step 1: Mouse Dissection and Box Construction


As I only decided to document this project after completing this step, I can only offer photos of the project from this point onwards.
I'd recommend reading the first few steps of earlier Instructable for the details of mouse dissection and soldering, as you can see from the picture below I've already (messily) glued everything in place.
The important thing is to find a mouse that uses a solid state rotary encoder for the scroll wheel, rather than an optical encoder. Desolder this from the board and use extension wires so it can be positioned where we want it.
They are rarer than optical encoders, I went through a pile of 10 'faulty' mice before I found mine. If it helps, the model code is: MUSD(B)-B-2, there's no other identifying information on it.
The box will depend on the size of the circuit board you have to enclose, my mouse had a large circuit board, so rather than chopping it up and soldering onto the traces I opted for a mouse sized box.
As I intend to cover my box with leather, the appearance of the box doesn't really matter, so I chose just to use 3mm chipboard and wood glue. Along with liberal amounts of hot glue to secure the circuit board and components in place.
Please excuse the red tape, it was to cover up the sensitive parts of the circuit while it was laying around on my workbench. I didn't see any reason to remove it again once it was in place.
Step 2: Bearing and Shaft


The bearing is one of many salvaged from a scrap photocopier (The aluminuim for the big wheel is from the same machine, it was a former foot.) I forgot to include any indication of scale in the photos, but the internal diameter of the bearing is about 5mm.
Make sure the bearing is fairly secure, as you push the rod through later it could be pushed out of it's holder. Also, now would be a good point to make sure the bearing is spinning freely and well lubricated.
The first two photos are of the box lid, again, this will all be hidden so I'm not bothered about how it looks.
If possible choose a bearing that neatly fits the shaft, or you'll end up wrapping tape around the shaft to widen it. It'll all be hidden, but may throw the whole thing off centre. Use thick tape to get an approximate fit, then thin tape to get it just right.
The shaft needs to be attatched to the wheel in the dead centre, I did all this on a lathe, but it could be done with careful mesurements, drilling and file work.
Cut the shaft to length, test fit it with the assembled box, and then file the tip of the shaft to a square point. This should slot neatly into the hole of the rotary encoder.
Step 3: Wheel


The big wheel is the most obvious feature of this project, so you may want to spend some time getting it just right.
Again, a lathe really helps here, getting everything perfectly central and giving a nice finely grooved surface. I decided to go for a set of concentric grooves, intended to be for aesthetic purposes, but they do feel like natural finger grooves when turning the wheel.
To fit the wheel onto the shaft, drill out a hole a little smaller than the shaft, and gradually narrow down the shaft until it fits tightly. Keep a slight taper on the shaft so it can be hammered in to be secured. Threading would be a more elegant solution to this little problem.
Now is the time to align the rotary encoder with the shaft to ensure the wheel is level. I did this using blue tac to hold the rotary encoder in place, assembling everything and then moving it around by hand to get it in the right place. Then taking it all apart and gluing the encoder securely in place.
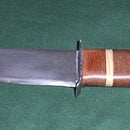
Step 4: Covering the Box With Fabric.


If your case isn't fit to be seen on a respectful desk, then you may want to consider covering it with some fabric, or sanding/painting/sanding/painting it.
I found a piece of imitation leather that was just about the right size, and looked rather good with the aluminium wheel.
Basically cut out the net of a box, with flaps to fold over the corners. It helps to draw around the box onto the fabric. Also, if the fabric isn't a uniform colour, colour any edges that will be showing once the box is all wrapped up.
The bottom of the box can either be covered by the same method, or use a 'furry' fabric like felt for a nice base.
Step 5: Finished, Future Improvements.
All done, try it out, I find it particually useful when navigating in a 3d enviroment such as CAD programs or Google Earth.
It's also pretty good for programming, scrolling through long files quickly and accuratly, or just giving it a spin to get to the top/bottom of the file.
Future improvements:
A shaped case
Though it's not as uncomfortable as it looks, curved edges would improve it.
Buttons
If I encounter a program that requires a mouse click and scoll for a frequantly used function, I may wire one of the buttons to the side of the case
A more complex improvement would be to have a button click when the wheel is pressed down.
Smaller footprint
The reason for the big case is the size of the circuit board, if I did this again I'd choose a mouse with a smaller board, or chop the board up and solder directly to the copper traces by the chip.
Optical encoder
It'd be possible to use an optical rather than a rotary encoder, it'd be smoother (The rotary encoder has clicks, or notches) and give much less friction, so would spin for longer.
The downside would be the additional complexity oh the build. (And trying to attatch that perferoated disc to the wheel shaft, could be awkward..)
Any more suggestions for improvements?


