

Introduction: Connecting an LCD Screen and an Ultrasonic Distance Sensor to an Arduino


When I first started playing with Arduinos, this was the first little set up I created. The video orientation is a little poor. This was my first go at things so I apologize that I was not up to snuff back then. Anyway, very simple set up. What we are doing is using an ultrasonic distance sensor to determine the distance of an object in front of the sensor. The sensor works by sending out a sound wave through one of its nodes, and measuring the reflected sound wave with its other node. Using the time it takes for the sound wave to bounce off the nearest object and return to the senor, we can calculate the distance of the object in front of the sensor.
Secondly, we are also wiring up an LCD display to the Arduino. Using a few commands, we can print messages onto the display. In this case, we are printing the distance of the closest object as determined by the ultrasonic distance sensor and we are printing a warning message in the event an object gets too close. The LCD monitor has a module at the back of it that allows it to communicate with the Arduino via I2C. This also makes the wiring for the display much easier.
The attached video summarizes what our little setup does. Hope you enjoy!
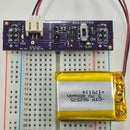
Step 1: Gather Up Your Tools


Step 2: Wire Up the LCD Display to the Arduino

The LCD display that I am using has a module at the back that allows it to communicate with the Arduino via I2C. This makes the wiring much easier. The pins located on the left of the "-" are located on the LCD display module. The pins located on the right of the "-" are located on the Arduino. The pin out is as follows:
GND - GND
VCC - 5 V
SDA - A4
SCL - A5
Step 3: Downloading the LCD Library
The LCD library is an upgrade to the library that comes with the Arduino download. It was written by F Malpartida and can be downloaded here with some descriptions here. The zip folder that I have linked to contains a library for Mac users and Windows users. Only extract the one that works with your machine. Instructions for using this library can be found by following a few instructions listed here and here.
Attachments

Step 4: Find the I2C Address for Your LCD Display
This LCD monitor communicates via I2C. So, we need to find the I2C address associated with the device. It will be different for each device. The documentation for the device is not very good, but luckily, other people have solved this problem for us. Upload the "i2c_scanner" sketch to the Arduino and open up the serial monitor. The address should be printed in the monitor.
Attachments
Step 5: Type Your Address Into the Appropriate Place in the Code
Type the address into the following line of the LCD_display_and_distance_sensor.ino code
#define I2C_ADDR ***type address here and remove stars**** // Define I2C Address where the PCF8574A is
Attachments
Step 6: Wire Up the Ultrasonic Distance Sensor

The ultrasonic distance sensor has 4 pins: VCC, Trig, Echo, GND. Connect Vcc to 5 V on the Arduino, Trig to digital pin 12, Echo to digital pin 8, and GND to GND.
Step 7: Upload the LCD_display_and_distance_sensor.ino Code
Upload the code and watch it work!
The code is written so that if an object comes 15 cm or closer to the distance sensor, the LCD display will print "STEP AWAY!!!" and blink the built in LED on the Arduino on pin 13. If an object is further than 15 cm, the LCD display will print the distance the closest object is from the distance sensor and it will also print "Safe Zone :)."
If you have any trouble with anything, please feel free to ask. If you enjoyed the tutorial, please consider voting for it in the Teach It! Contest. Alright everyone, until next time.
You can find all the codes in the project's GitHub repository or just click the links on each step.

Participated in the
Teach It! Contest Sponsored by Dremel

Participated in the
Microcontroller Contest


