

Introduction: Control Your Arduino From Your PC With the Qt Gui


So if you want to create your own graphic interfaces, you want to control stuff just by clicking buttons from your screen, this instructable is for you.
To do this we will use Qt (say : "cute") from nokia.
Of course Qt is not the only program that can make graphical interface.
But these are the advantages of Qt :
- It is free and open source software (distributed under the terms of the GNU Lesser General Public License)
- It is C/C++, so widely used.
- You can compile your program on a lot of platform (Windows, Linux, ...)
- The possibilities are infinite (you probably have many applications coded on Qt : Skype, Google Earth, VLC, ...
I only provide basic things to start.
Here we just see how to install Qt, the serial port library and write your first program.
The program will control the brightness of a led.
I admit that you already know know C/C++. If it is not the case, there are plenty of course on the web. If your are a french speaker (like me), I suggest the course from www.siteduzero.fr which is very good to start from zero.
Step 1: Intallation of Qt

The first step of this instructable is to get and install Qt.
You can get Qt sdk from this wedsite : http://qt.nokia.com/products/
Once downloaded, follow the instruction to install it.
The first part is over. Fairly easy, isn't it?
The next part is a bit more tricky.
Step 2: Installation of the Library


Even if Qt is very huge and provides a lot of tools, there is one thing which is missing in our case :
the serial port functions.
So we have to install a library to be able to communicate with the port com.
To do this I use the qextserialport library (version 1.2alpha).
First you need to download the library on sourceforge :
http://sourceforge.net/projects/qextserialport/files/
or the last version here
http://code.google.com/p/qextserialport/
Then you extract the files.
Here comes the tricky part. The files you downloaded are not compiled.
So you must compiled them. To do so you must start the Qt prompt console.
You can find it on Windows in :
start menu,
Qt SDK,
Desktop,
Qt 4.7.3 for Desktop (MinGW)
Then send the command that are on picture 2.
Make sure that a new folder "build" was created during the compilation and the files
qextserialportd.dll and libqextserialportd.a are present.
Congratulation, you perfectly compiled the library!
Step 3: Let's Program


Now everything is installed, we can start to program.
Open Qt Creator and create a new project.
I join an example of the program, there are a lot of comments which will help to understand.
The main things to know are :
- you have to include the library in your .pro file (see the example)
- to connect a port, you need to create a variable, to open the port and then to configure it (in this order).
(Don't forget to put the right number of your port)
- to send a message through, use the function write(char*).
- to receive data use the function read :
int numBytes =portcom.bytesAvailable();
char buff[256];
portcom.read(buff, numBytes);
(you can also use the signal readyRead() to launch function when a data arrives)
- if when compiling you have the error n°1073741515 (or maybe another) that mean that you need to put the qextserialportd.dll into your .exe folder.
You can find other examples in the library example folder. That will teach you how to scan the ports or receive data.
Attachments

Step 4: Program Your Arduino
The last part is very easy.
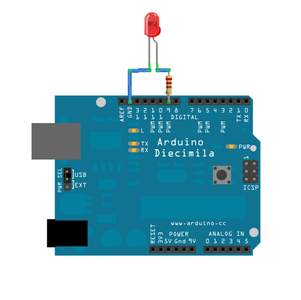
Plug a led with its resistance to the 9 pin.
Then you just have to load the program present in Examples => Communication => Drimmer.
Here is the relevant part of the program :
const int ledPin = 9; // the pin that the LED is attached to
void setup()
{
// initialize the serial communication:
Serial.begin(9600);
// initialize the ledPin as an output:
pinMode(ledPin, OUTPUT);
}
void loop() {
byte brightness;
// check if data has been sent from the computer:
if (Serial.available()) {
// read the most recent byte (which will be from 0 to 255):
brightness = Serial.read();
// set the brightness of the LED:
analogWrite(ledPin, brightness);
}
}
Start your Qt program and control the pin 9 voltage.
Step 5: Conclusion

In this instructable, we have see how to use Qt to control your arduino.
I know that this example is very minimalist, but I'm sure that you will be able to start bigger project.
Next time I will show you how to plot graph on Qt, so you could also monitor temperature, pressure...
PS : As you probably notice it, I am not a native English speaker, I would be please if you can correct me.

Participated in the
Microcontroller Contest


