

Introduction: Converting a Quick Release Vice Into a Regular Vice


Here I show how I converted a quick release vice into a regular vice by removing the quick release mechanism and adding a new plate to keep the half nut engaged all the time.
I tried to repair the quick release mechanism numerous times but I could never get it to work correctly across the whole range of travel. Considering how much time I'd already spent trying to fix it and how long it takes to open and close the vice by just turning the screw I decided it was quicker to just remove it all together.
Using regular tools that most woodworkers will have the conversion took about 2 hours.
Materials
- 10mm Aluminium Plate or something similar
- 6 * M6 cap head screws or bolts
- 4 * washers for M6 bolts
- Thread lock
Tools
- Jigsaw with a metal cutting blade or other metal cutting tool
- Drill, I used a pillar drill but a hand drill would work
- Taps
- Various drill bits
- Counter sink or deburring tool
- Spanners
- Pliers
This project along with loads of others is also available at Wobblycogs Workshop.
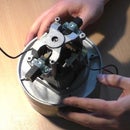
Step 1: Dismantle the Quick Release Mechanism


Remove the quick release mechanism cover with a spanner or socket wrench and then take the bar off. Removing the handle and spring on the front jaw is optional. I was going to leave it in place but I decided to remove it the end.
Before you go any further it’s worth quickly checking that the half nut isn’t the problem. When I first took my vice apart I found the half nut was full of metal shavings and other dirt presumably from manufacturing.
Step 2: Check the Existing Fittings and Gather Materials


The original quick release cover is held on with two short bolts and it would be best if you could reuse those holes so break out the thread gauge and find out what bolts you’ll need. In my case they were 1mm threads and M6.
Now that you know what size and shape the problem is it’s time to get the materials together. You’ll need some short M6 bolts or cap head screws, some washers and a metal plate. In my case I used some 10mm aluminium plate I had hanging around.
Step 3: Cut the Plate to Size


Measure across the base of the vice and then transfer that size to the aluminium plate. Use a jigsaw to cut a section the correct width and then make a second cut to bring it to the right length. The exact length doesn’t matter you just need enough to give you space to insert two new bolt holes on the opposite side of the vice screw.
Step 4: Locate the Existing Bolt Holes


Rather than drill new holes in the vice I’d like to try and use the existing holes. It would seem that these are drilled by hand as they are not at all aligned with each other or the casting. Using a square and ruler I positioned punch marks as accurately as I could on the aluminium plate and drilled the holes a little oversized at 7mm.
Deburr the holes and test fit the plate. So far so good.
Step 5: Add the New Bolt Holes


You now need to add two more bolts on the other side of the vice screw to hold the plate firmly down. To be fair it would probably work without these but it’s only a few minutes effort to add them.
Measure the casting and divide the thickness by two then scribe lines on the aluminium. Make punch marks at suitable locations where the new bolts will go into the casting. The exact location doesn’t matter as the new plate will only go on one way because of the old holes.
Drill the new holes and tap the casting then expand the holes in the new plate so that the bolts will pass through.
Step 6: Locate and Drill for the Half Nut


The plate is now fixed to the vice so it’s time to make a hole for the half nut. Locate the centre and punch it. The catch on the back of the half nut is tapered and so the hole needs to be about 20mm. That is quite a large hole to put in a piece of aluminium plate with only a pillar drill so I drilled it out using successively larger wood bits. An alternative would be to chain drill and then file it to size. I made a sort of improvised bobbin sander from a drill bit, sandpaper and an elastic band to clean up the hole.
Step 7: Add Half Nut Pressure Bolts


I had originally planned on pressing the half nut onto the vice screw using a couple of washers but it turned out that the amount of pressure put on the nut needed much finer control that that method could easily provide. The solution was to drill and tap for a couple more M6 bolts either side of the central hole. The bolts would press on the back of the half nut and the pressure could be adjusted accurately.
Mark a centre line and punch a couple of sensible locations. As with the other holes it doesn’t matter exactly where they go. Drill the plate at 5mm and then tap for M6. Put the plate back on the vice and add the pressure bolts. Adjust them so that the nut is tight on the vice thread and then back them off half a turn, use thread lock to hold them in place.
Step 8: Fit and Test


Finally fit and test the vice. I tested the vice by screwing it in and out over it’s full range of travel a couple of times and then clamping up a mallet. I could happily hit the mallet head with no danger of the vice letting go.

Participated in the
Metal Contest 2016

Participated in the
Trash to Treasure Challenge


