

Introduction: Cool Ways to Repurpose Old Computer Parts


In this instructable I will briefly give you some ideas on how to reuse some parts of old computers that everyone is throwing away.
You will not believe, but these old computers have many interesting parts inside.
This instructable will not give full instructions on all the project,because it will get too long. But it will give you many new ideas on how to use these old components you will find inside. Maybe I will cover some of the projects later in following instructables. Post in the comments what do you want to see in detail.
Here you will see some of my past projects I made with these recycled parts. some of them are "mainstream", others are not so much :)
Step 1: Convert the ATX Power Supply to Benchtop Power Supply


This is the first project I made, many years ago, when I was still in middle school.
The project is very easy to do. Just chop off the connector and identify the wires:
- black wires are ground (negative)
- red wires are +5V
- orange are +3.3V
- yellow are +12V
- blue is -12V (comes handy in rare cases)
Connect the above wires to some connectors or therminals, so it will be easy to connect your project boards to them. I put just ordinary screws on some plastic board, because back then I had no money to buy banana plugs.
- green wire is important. It needs to be connected to ground - black wire in order for the power supply to turn on
- purple wire is +5V standby power. If you connect the LED on it, it will turn on if the power supply is plugged into mains. You don't need to connect it if you do not need it.
- grey wire is +5V POWER-OK. Connect a LED here if you want to see when the power is OK. If you overload the power supply, the LED will turn off and you will know that there is no sufficient power.
Most of these ATX supplies need to have some load present on +5V(red wire) if you want to get the full power out on +12V line (yellow wire). So if you want to extract the full power out, you need to draw an amp or two from +5V, so just put a few power resistors (10 ohm or so) or some 12V car headlight bulbs on the +5V line and you are good to go.
It is good to leave one or two 4 pin HDD power connectors hanging out. You will see later that they come in handy.
Step 2: HDD Mini Grinder
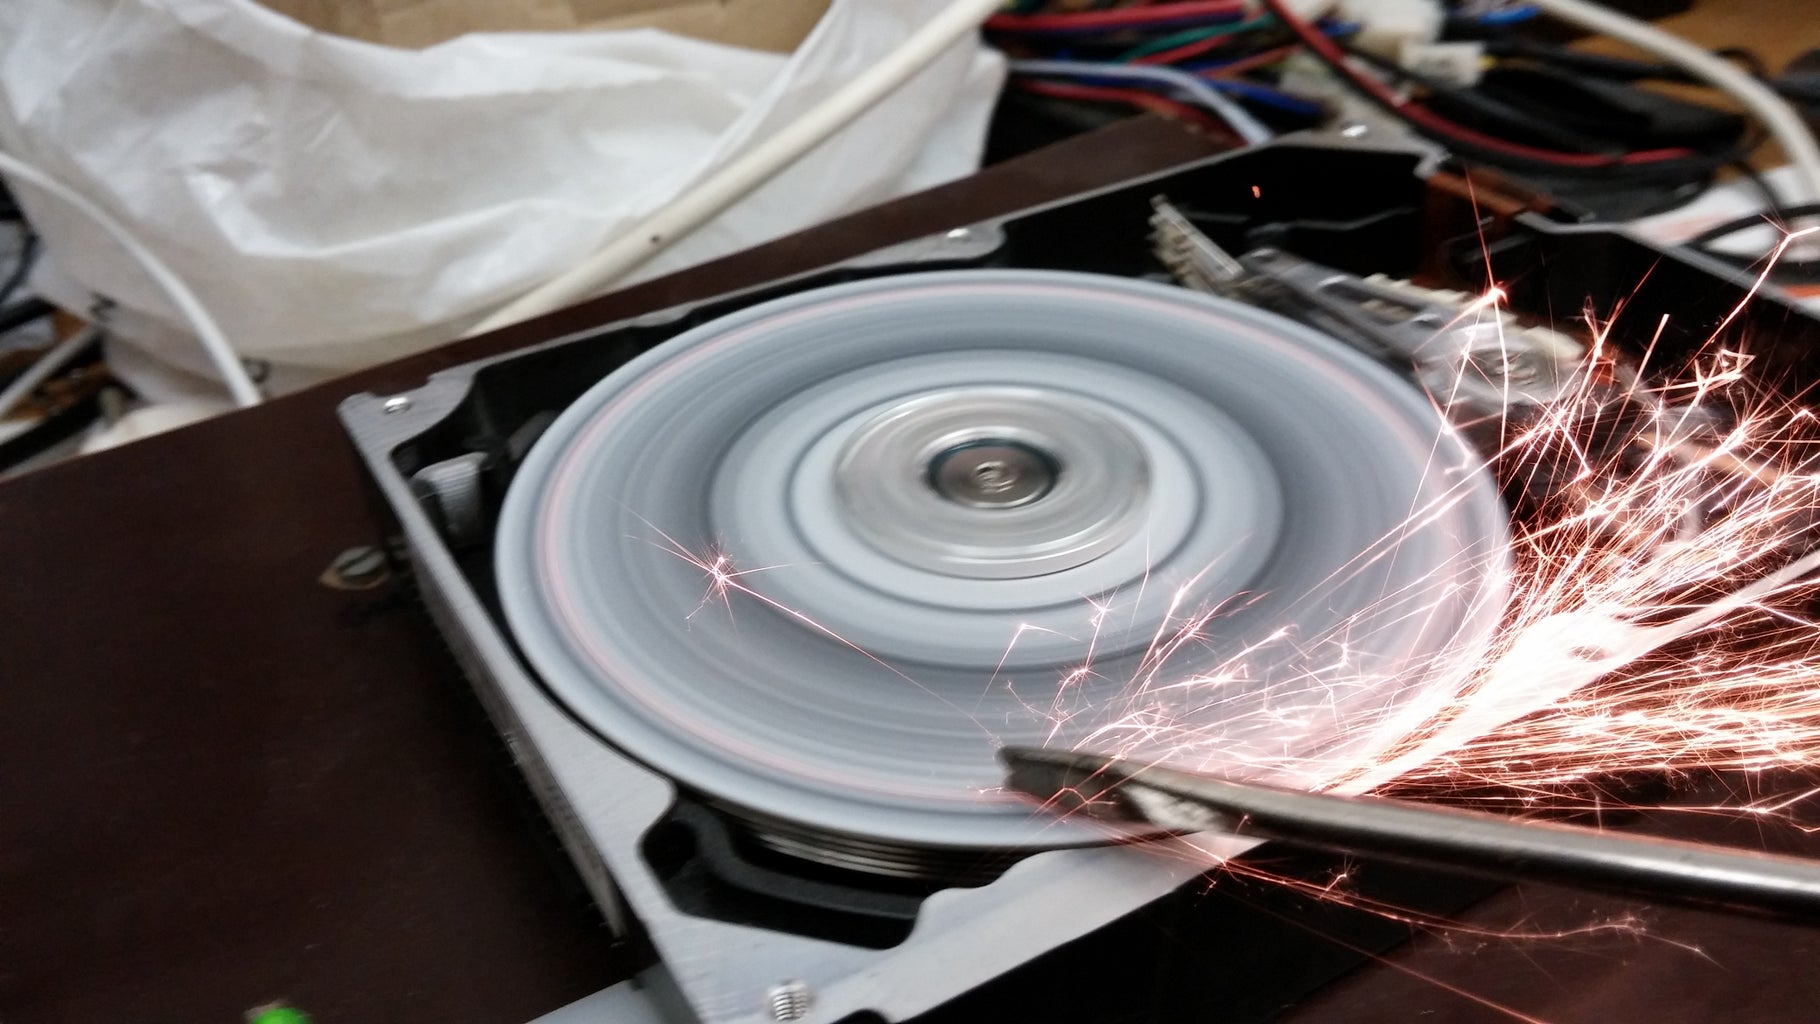


Now that you have a power supply, you can put it to some good use.
Take an old HDD and plug it to the power supply you made earlier directly to the HDD connector you left hanging (I told you it is going to be useful). You want the HDD to start spinning. If it does not start spinning, try to switch a jumper on the rear side in order to spin when the power is applied. Just try all the combinations, one should work.
Then, disassemble the HDD drive.
In the guts you will see the plate, arm and two metal things that are magnets that move the arm. You can rip the arm off because you will not need it, or you can just leave it in.
You can take the magnets out. They are very strong and can be used for many cool things. Watch your fingers!
Then unscrew the plate off the motor and glue some fine sanding paper on it. Cut it to shape and assemble it back on the motor. Now you have a mini grinder. I made a slight modification and added more plates from many drives on the same shaft, so the grinding plate is heavier and has more inertia.
The older the HDD, the better it is, because it usually has stronger motor inside.
Step 3: Convert Old CD-ROM Into Music CD Player


If you have one of that older CD-ROM drives that have headphone jack, then you have some cool old junk :)
These players can play regular audio CDs all by themselves!
Just plug them into your converted ATX power supply, or create separate power supply that supplies 5V and 12V and you are good to go.
Just insert the CD, plug the headphones in the jack (or connect it to an external amplifier via this jack) and press the play button. Voila! Music plays! You can ajdust the volume with built in potentiometer and you can also skip tracks with play button.
Step 4: Convert CD-ROM Drive Into Headphone Amplifier


This was some quick fix project I did in middle school.
I needed to make a headphone amplifier for a TV that had only LINE OUT audio output in the rear. The "line out" output does not have enough power to supply the headphones with enough volume for normal listening, so I needed an headphone amplifier. Fast.
I opened one of this old CD-ROM drives I had laying around. Don't be affraid to void some warranty :)

I assumed, that if it has headphone output, it should have headphone amplifier inside. I was right.
Then you open the thing, you will often see 2 separate circuit boards. One big, and one small, near the front face.
This smaller one is the right one.

Just start googling the IC markings and one of them is bound to be an headphone audio amplifier.
In my case it was MS6308 in one device and BH3540 in the other. They are all pretty simillar.

Open the datasheet and see which pins are inputs and which are outputs and which are power pins and what supply voltage is recommended. Follow the traces on the PCB to see where are they connected. Then you can break those traces and solder your wires to them. Inputs and power often go to the connector that goes to the main board. Unsolder the cable and there is a good place for you to solder your wires. Output is of course on the headphone connector.

You basically need to supply the power(often 5V) and left and right channel signal wires and signal ground.
I also had the option to shorten the PCB since I figured out that it has the part of PCB where none of my connections go. Although this step is not necessary an could be risky.

I also made a small 5V voltage regulator board, so I could power the board with wall adapter which had 9V output. but you can avoid this step by using 5V cellphone charger.

Then I quickly put the boards in some old plastic box I had laying around. I just hot glued everything togheter, since it was just a prototype and needed not to be pretty.
Now, about 10 years later, the amplifier still works :) Still hotglued though.. :)

Step 5: Use Computer Case for Something Else


I re-used my case by installing my CNC router electronics inside the case. Including the inverter for the spindle. Everything fitted nicely inside.
These cases are great for some bigger projects. I have seen people use them as bird houses, post boxes, you name it.
Step 6: Do Something Cool With Old Printer Parts


The printers have all sort of cool parts inside. Guide rails, motors, gears.. you name it.
I converted one of those old inkjet printers into the Most Useless Machine - Advanced Edition :)
I stripped the printer of all of the plastics and left only the base, the guide rail, the print head carrier, the motor that drives the head and the optical encoder for positioning the head.
I figured out how to read the incremental optical encoder and drive the motor with Arduino motor shield, added a servo motor on the print head carrier for moving the arm and in few stormy weekends, and the useless machine emerged!
See it in action in the video above!
This project is too big for just one instructable step. I will probably need to make a separate instructable on this one.
Step 7: Save Some of the Components for Later


Save the fans, heatsinks, LEDs, switches and simillar stuff for later to use on different occasions.
Old CPU heatsinks are ideal for cooling powerful LEDs, power supplies have many smaller heatsinks that you can use for voltage regulators, also the wires come in handy
This is it for this instructable.
You can follow me on Facebook and Instagram
https://www.facebook.com/JTMakesIt
https://www.facebook.com/JTMakesIt
for spoilers on what I am currently working on, behind the scenes and other extras!

Participated in the
Trash to Treasure


