

Introduction: Corner Desk PC


After what seemed like a lifetime of building in this house, I finally got to renovate an old chicken shed into an office for ME !
I’ve worked in IT now for almost 30 years and have built all sorts of mad PC based projects, but I decided that I wanted something different as my day to day PC.
After a few designs I came up with the corner PC unit which solved a few issues I had with the location and access to the front panel which I used a lot at the time.
I’m currently on V2 of the unit, after upgrading the guts last year to something more beefy, I had to add additional forced ventilation, replace the PSU and upgrade the storage to a larger caged solution which is slung under the main box.
I hope you like it, its served me well over the years.
Step 1: Making the Box

Materials
Length of nice wood approx 48"x5"
MDF or similar 25" square cut in half across the diagonal for top
Off cuts of MDF or ply for base and supports
Scrap PC chassis
Donor PC (cables, backplane etc)
3 "L" brackets
Glass 10"x4"
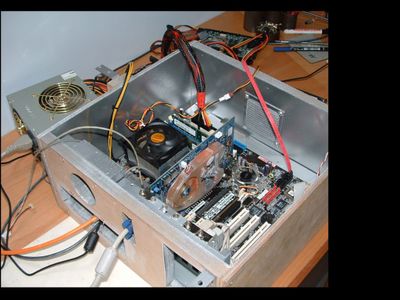
The dimensions were decided by the size of the motherboard and chassis bits robbed from an old case, mine is14” square 6” deep.
I built a basic box frame round it using scrap ply and MDF, mounting the salvaged back plane etc and giving the inside a good decent coat of whatever I had lying about.
I builtit all up and mounted the PSU right behind it in the corner void.
Once the box was made and the rig tested, I measured and cut the opening in the desk.
The internal pictures here are all from V1 but very similar to V2 apart from the the back which changed dramatically when the video moved to PCI-e, I had to rework it to suit the slot change.
Step 2: Finishing the Box & Mounting


The front Fascia was a bit of reclaimed oak floorboard, the slots for the bays and the windows were cut with a router and a straight edge, the window was glazed with a bit of scrap glass cut to size.
The fascia was test fitted to establish the shelf height and the inner supports were set into place and secured using 6" long screwed blocks, the shelf was made using the remainder of the 8x4, originally I had set this in as one piece but as it proved a curse to remove it, i split it up the middle with the cut being hidden by the screen base, there is a 2" hole split across the 2 halves at the back for cable access.
The Box was attached to the underside of the desk using 3 "L" brackets andthe cables were all run through, in V1 all the cables were IDE for CD roms (thick blue cable) but on the later version the cables change to SATA.
Step 3: Cabling

Longer cables were made up for the power and reset switch, and an additional rocker switch was added for the internal lights.In the far right drive bay sits the fan controller, the original silver Aero version had a fan built in which cooled the hard disk behind it, the new vesion is a NZXT controller, which I prefer and as the disks are now underneath the fan was redundant.
The NZXT controls fans in the disk enclosure, case and processor and gives temp readouts for all via independant sensors.
The PSU sling was made from 2 old bits of case, the bends were put in where the lines are marked, the holes correspond to the normal psu mounting holes and the 2 tags at the top slot into a couple of staps mounted on the bottom of the desk for easy removal.
Step 4:

I won’t bore you with the testing phase, it did take a while to balance the airflow in such a tiny box, but I managed it with a single fan sucking air across the motherboard from left to right and it was happy temperature wise even on the warmest days.
Everything got a couple of coats of varnish, and when I updated it last year I added another shelf and an extra monitor since I had a spare video output on my upgraded rig.
The internal light is off most of the time, but provides a nice ambient light when required, I was tempted to slap some disco LED's inside, but common sense prevailed !!
Enjoy


