

Introduction: Cosplay Mask Using Thermoplastic (Darker Than Black)


I was recently commissioned to make a mask for a friend. This mask is from the anime Darker than Black and is worn by the character Hei. I had a lot of fun making it and thought I would share my build with everyone.
Step 1: Supplies

For this build I used a 1/16" thick thermoplastic commonly referred to by the brand name Sintra. It's called a thermoplastic because when heated it becomes soft and moldable. It's not capable of making complex curves or shapes but since this build was basically just one piece with a straight curve in the middle it worked just fine for this project.
Other Supplies Included:
3/4" Nylon Web straps
A 3/4" Plastic side release Buckle and 2 plastic slides
2 Rivets
Black pantyhose
EVA foam
Gorilla Super glue
Rustoleum grey primer, gloss white, and gloss clear coat spray paint
Acrylic paints in red and blue
Tools:
Standard retractable knife
Sandpaper
Heat Gun
Gloves
Form for shaping (I used a large coffee can)
Small Paint brush
Rivet Setter
Step 2: Design


There are a fair amount of these in production so it wasn't hard to find pictures of not only reference material from the anime but also reference material for how others had made this mask as well. Thre are some different variations that people have made so after talking with my friend about his preferences I printed out some pictures, scaled things to my face (our measurements were vary similar), and got to work. The three main things he wanted included in this one were: 1.Glossy white (not matt or flat), 2. "slight" smile, 3. no visible rivets or snaps on the mask.
With most animated films there are going to be shortcuts that the animators take that you can't take in real life. Proportions or perspectives won't be exactly the same and you have to fiddle with it to come up with something that remains faithful to the design while being functional in the real world. I ended up designing one that I thought would work well and cutting it out only to find that it just didn't quite feel faithful to the original design so I retried it and found something I thought worked better.
Step 3: Cut It Out


Does anyone remember that late 90's thing where you made a scissors motion with your fingers, pointed at the person you were talking to and then hooked your thumb over your shoulder while saying "Cut. it. out"? No? Just me? Alright then, moving along...
After transferring my design to the plastic I cut it out with my knife. It's not that hard to do but it can take quite a bit of time because you have to be careful not to swerve off the line and gouge the plastic and it has to be done in multiple passes rather than just cutting through the whole thing at once. The above pictures show both versions of the mask that I cut out. There are, of course, other ways you can cut this out too. If I had a laser cutter I could have just done the design as a file and it could have easily cut everything out itself. It would have been much more precise too!.
After it was all cut out I cleaned up the edges with some sandpaper. I also sanded the surface because it had a smooth finish on it that I didn't want to interfere with the painting process.
I also cut out two small strips of plastic to use when attaching the straps. You'll see them in th enext step. These were so the straps could fasten around something rather than having a visible rivet going through the mask.
Step 4: Heat Forming


Unfortunately I couldn't get pictures of the heat forming process because I couldn't hold the heat gun, the mask, and the camera all at once and I didn't have an extra person around to help out. But the above pictures show the end result of heat forming. (Once again the two different versions I made of the mask)
Essentially the process went like this:
-Lay the plastic down on a smooth surface that can withstand a significant amount of heat.
-Wave your heat gun over the plastic, making sure to cover all areas. Flip it over and do the other side too. (this is where those gloves come in handy)
-Make sure to keep the heat gun moving and gradually bring it up to a moldable heat (this might take a couple tries) because the plastic can burn or warp if you put too much heat in one spot for too long.
-Once it's hot enough that it's kind of "floppy" you'll need to hold it firmly against a form of some kind until it cools. I used a large coffee can because the curve was about right for my face. In hindsight I wish I had used something a little skinnier because the plastic ended up losing a bit of its curve during the painting process and I feel if I had "over curved" it the final shape would have been more to my liking. Either way it still ended up fine.
In the first picture in this step you can see the two strips I cut out for the straps. I also heat formed these. I took a small shim of wood, set the strips across it, heated them until they were floppy, and pressed them down flat so they took the shape of the wood. This gave them a raised area in the middle for the strap to loop around.
Step 5: Painting


I hit it with a few coats of grey primer first. It might have been unnecessary but I've read enough about how the job of the primer is to give the paint a good surface to adhere to that I decided to go with it anyway. After allowing it to cure for over 24 hours I gave it a few coats of gloss white paint. After that dried I used acrylic paint to paint the mouth and the lightning bolt and then hit it with a few coats of gloss clear coat. The lightning bolt was intended to be a sort of purplish blue but unfortunately once it had been clear coated and dried it ended up looking kind of black.
Step 6: Details


Now it's time to add all of the little bits that make this mask wearable.
I held the mask up to my face to figure out where the straps should attach. Then I took the little strap holders I had made and super glued them in place. Once they were dried I looped the straps around and riveted them in place. The rivets I used are actually brass rivets from my leather tool box spray painted black. They're the kind that you have to hammer together so I covered them with a scrap of the black pantyhose to keep from hammering the paint off.
Pro Tip: When you cut the straps make sure to heat they ends with the heat gun or a match or lighter to seal them and keep them from fraying.
Once I had the straps on I glued a piece of black pantyhose over the eyes and cut a piece of padding out of EVA foam (a foam floor mat actually, unused of course) so it would fit snugly on his face.
I put the slides and buckles on the straps and tried it on! It fit! Then I snapped a picture and took it off as quickly as I could because it was still full of super glue fumes and my eyes were tearing up... maybe I was a bit too eager.
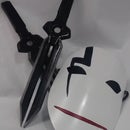
Step 7: Finished


The mask is done! Combined with the knives it was a pretty fun project and I'm pretty happy with the results!
If you'd like to see how I made the knives you can visit that instructable here. If you like either of these instructables don't forget to vote for them in the contests they're entered in. Thanks for checking my projects out! Have fun building!

Participated in the
Halloween Costume Contest 2015

Participated in the
Halloween Props Contest 2015

Participated in the
Epilog Contest VII


