

Introduction: Creating Animation and Games: Chapter 2 Game Controllers


Creating Animation and Games: Chapter 2 Game Controllers
This series will dive into using Propeller microcontroller based systems to create your own graphics, animation, and video games. I'll assume that you only have a very basic knowledge of microcontroller programming and take you step-by-step from beginning with a single dot to the creation of several video games which will provide you great examples for getting started with your own ideas.
- Chapter 1 Getting Started
- Chapter 2 Game Controllers
- Chapter 3 Lightcycles
If you haven't read the previous chapter, go back and review it first with the link above then continue with this Chapter.
In the last chapter we introduced you to a few hardware options, introduced you to the Spin programming language, the Propeller Tool, and got you started working with the basics of the SLUG video driver for the Propeller.
This time we are going to take a look at game controllers and how to implement them into your game creation. Specifically, we'll be using the Wii controller connection (found on Propellerpowered VGAplus, VGAplus256, and Quickplayer Extreme products) and the PS/2 Keyboard. (found on VGAplus, Parallax Demoboard, and Human Interface Board) The game controller driver we are using actually supports several other possible controllers including NES, Parallax C3 NES, and N64 controllers without changing more than a single line of code,
By the end of this chapter, you should have a better understand of several Spin programming concepts as well establish the beginning of a simple game.
Let's jump right in!
First download the source code for this Chapter and extract it to a new empty folder. We'll be working from that folder.
Step 1: Introducing MIGS: Multi Interface Game-control Standard

Writing video games is fun. Sharing them with others increases the fun ten fold!
The problem is how to do you share a game that you wrote to use a NES controller when someone else is using a Wii Classic controller?
Introducing M.I.G.S. Multi Interface Game control Standard.
MIGS is a collection of several common game controller object which have been minimized to work interchangeably in your video game.
If you have only have a keyboard to work with, someone else with only an NES controller can still give your program a whirl by changing only two lines of code in your program.
MIGS supports:
- Nintendo NES Controllers
- Nintendo NES Controllers for the C3
- Nintendo 64 Controllers
- PS/2 Keyboard
- Nintendo Wii Classic/Pro & Nunchuck
Files to include in your game archive:
- migs_nes.spin
- migs_nesc3.spin
- migs_n64.spin
- migs_keyboard.spin
- migs_wiiclassic.spin
- i2cObject.spin
Step 2: Your First Program: CON


Start by typing the following three lines:
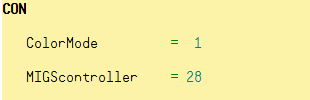
Remember the CON section allows us to establish rules which will be CONstant throughout the operation of our program. Typing CON tells the Propeller Tool which section we are creating, turning the background yellow for this section. In this CON we have established that the words ColorMode is equal to decimal number 1, and MIGScontroller is equal to decimal number 28. These settings will remain this way during the entire operation of the program.
Here's what these two settings do!
ColorMode = 1 sets the SLUG VGA driver to 256 color mode. If you are using a Pocket Computer 256 or VGAplus256 board this is a correct setting. If you are using a Human Interface Board or Parallax Demoboard, set Colormode = 0 for 64 color mode. If you are using a board which incorporates a TV output, this setting won't matter either direction.
MIGScontroller = 28 sets the "base pin" for our controller. You will need to change this depending on what controller you are using.
Here are some very common settings:
- MIGScontroller = 28 Setting for Wii Classic Pro/Nunchuck on VGAplus256
- MIGScontroller = 26 Setting for Keyboard on Human Interface Board, Demoboard, VGAplus, and VGAplus256
- MIGScontroller = 24 Setting for Wii Classic Pro/Nunchuck on Quickplayer Extreme
- MIGScontroller = 3 Setting for El' Jugador
- MIGScontroller = 0 Setting for NES on C3. (Pin ignored)
Step 3: Your First Program: OBJ

Now that we have established the CONstants for our program, it's time to call in a couple OBJects.
OBJects are simply snippets of other code ready to be plugged into our program. In the first chapter we talked about the SLUG object which is handling all of the video for our program. In the second page of this chapter, we talked about the MIGS object which we will be using to handle our game controller.
One of the most powerful aspects of the Propeller is it's large library of ready-to-use Objects which are MIT licensed making your own programs very powerful without having to deal with the complicated programming of devices, sensors, or displays.
Type in the following lines:
There is a couple things to notice as you type these lines. Lines which start with an ' are accepted as remarks or comments in the program. We've included both the TV and VGA versions of the SLUG driver, but the video : "slug_tv_renderer" is remarked, while the darker video : "slug_vga_renderer" appears darker. Using remarks like this make it easy to provide adjustable options for others who might want to use one or the other.
Obviously, you will want to remark/unremark the correct video driver for your configuration now.
Additionally, we have done the exact same thing by adding all of the migs object lines. Only migs : "migs_wiiclassic" is unremarked and active in our program. Again, adjust this to use the one you need for your particular configuration.
We have used ' as a method of adding potential options for the user, but you'll see it most commonly for making notes in the code or actual "remarks". Take the time to add notes to your code now and you'll remember what on earth you were thinking when you look at the same program a year from now.
Step 4: Your First Program: VAR

We've plugged in a few nice objects to handle the complexities of talking to our screen and game controller.
It's time to add a few VARiables.
Type in the following five lines:
Think of a variable as an empty cardboard box with a name written on the side of it. After defining this section as VAR, we have created three "byte sized", empty boxes which are named character_x, character_y, and character_color. Because they are byte-sized these boxes may contain any single decimal number up to 255 (a single byte of information).
The long MIGSstack[40] is a good deal larger box which is being used to store data retrieved from the MIGS Will Classic controller. Simply take my word for this for now.
Step 5: Your First Program: PUB

There is just a little more preparation which needs to be done before we can start writing our video game.
It's time to create the first PUBlic function which will be used as the primary part of our program.
Type the following lines:
Since this is our primary PUB function for our program, I've chosen to call this main. We could have used any name we wanted here and it's common to name PUB functions by their operation to make the code easy to read.
Next we have defined the speed of this program as 80Mhz with the line, system.Clock(80_000_000). Most Propeller board operate at this speed, so expect to see a line like this one in all of your programs.
Once the clock speed has been established, it's time to kickstart the two OBJects which are active in the OBJ section:
migs.init(MIGScontroller) starts the MIGS driver object using the setting we assigned to the MIGScontroller setting in the CON section of our program. We could have used migs.init(28) be it's much nicer to make the setting available in the top of our program instead of forcing users to search the code to locate the init line and change the number.
The line cognew(updateMIGS, @MIGSstack) is only really required for those using migs_wiiclassic.spin in the OBJect section and may be omitted if you are using NES, Keyboard, or N64 controllers.
video.start(ColorMode) starts the SLUG driver object using the ColorMode setting also listed in the CON section of our program. I've altered this version of SLUG for TV users. The TV version will accept either ColorMode setting and work just fine.
Step 6: Your First Program: PUB Defining Variables

It's time to continue further into our PUB main function.
Insert a blank line below what you have already typed and add the following four lines:
Remember those empty byte boxes we created in the VAR section of our program? It's time to store some values in those variables.
character_x contains 64, character_y contains 45, and character_color contains 43.
(Remember: 64,45 is nearly the middle of the screen.)
This will provide our program starting X and Y positions as well as a starting color for the plot function we used in the last chapter.
It's always nice to start any video driver object with a nice blank page to work on, so video.Cls($02) clears the screen with a black color friendly to both VGA and TV users. $02 is hexadecimal for the decimal number 2. As far as the video object is concerned we could have listed the number in either notation without causing an issue.
Step 7: Your First Program: ACTION!


Everything we have done up to this point has been preparation for our program.
Finally, it's time to make our little program actually DO something!
Insert another blank line below what you have typed and add the following lines:
Note! Indentation is very important. Use spaces and the Tab key to duplicate what you see here. I'll explain after you are finished.
Since this is the core of our program, we don't want it to stop, so the first thing we do is setup a repeat loop.
The repeat command causes everything which is indented below it to loop over and over again until we act on the program by either programming a way to break out of the loop, or stop the program by powering off the Propeller.
You'll notice that as you typed each line (indented below repeat) it drew a straight line down the entire left side. This line helps us see what lines are included in the loop. Had we not indented the last line, video.VWait it would not have been included.
Let's take a look at the next three lines of code:
An if statement is a condition check. The statement if MIGS.Player1_Right == 1 checks to see if the right button is pressed on the game controller. When the button isn't being pressed it usually reports a 0. When the button is being pressed a 1 is seen by the if condition check. Notice how the next two lines are indented again beyond the if statement? This means that if the right button is pressed on the controller, the character_x++ and check_boundaries command are executed.
So what happened when the the character_x++ is executed?
The ++ added 1 to it's existing value contained in the character_x variable box we created in the VAR section of the program.
When we started the program we put the number 45 in that box. Pressing the right button once makes it 46.
Guess what character_x-- does in the section if MIGS.Player1_Left == 1?
That's right! When the left button is pressed, -- subtracts 1 from the value contained in the character_x variable box.
I'll bet by now if you can tell exactly what MIGS_Player1_Down & MIGS_Player1_Up do. You probably can even guess what is happening when MIGS.A (button/keyboard A) and MIGS.B (button/keyboard B) are pressed.
How are you doing so far? It might a lot to take in, but we're almost to the ACTION part of our program.
Up to this point we have been reading the game controller and adjusting variables depending on which button is pressed.
I'm going to ask you to ignore the check_boundaries command for a few minutes. We'll come back to it.
It's time to do something with all this information we've collected.
video.plot(character_x,character_y,character_color) probably looks very familiar Issuing number to the plot command we were able to place boxes on the screen in the last chapter. This time we will plot based on our variables each time the loop repeats. (over and over again!) When these numbers change, the plot location plots a new location on the screen.
video.VWait provides the video driver a slight delay in our repeat loop allowing the video driver object to catch up with our program. Don't omit it.
Step 8: Your First Program: Setting Boundaries


Remember from chapter 1 that we have 128 blocks across the screen (or X) and we have 96 blocks we can draw from the top of the screen to the bottom of the screen. (or Y)
By keeping track of the character_x and character_y numbers as they change we can prevent a crash or undesired effect.
Add a few blank lines below your code and let's create another PUB function called check_boundaries.
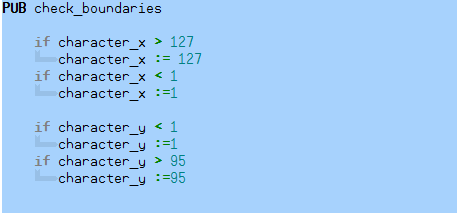
We have four different checks we are running.
Let's break down the four if conditions:
- If character_x is greater than 127 then character_x is set to 127.
- if character_x is less than 0 then character_x is set to 0
- if character_y is less than 0 then character_y is set to 0
- if character_y is greater than 95 then character_y is set to 95
This insures a nice "boundary" which is checked every time a button is pressed in our original if MIGS condition statements.
I can call PUB statement with almost ANY name I can think of:
PUB statements names are flexible!
Last step!
Add the following lines of code:
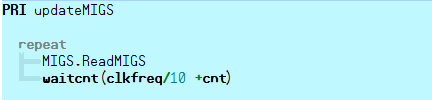
This time we are creating a PRIvate function which facilitates the migs_wiiclassic.spin driver. I'll talk more about multiple cogs in the next chapter, so for now simply add the four lines.
Step 9: Run the Program!

All that typing! Whew!!
It's time to send this program to the Propeller and see what happens. Press F10 in the Propeller Tool to send your program to RAM inside the Propeller chip. The program will run until it's powered down, or you send a new program with F10 again.
Use the game controller to draw on the screen.
Press the A button to toggle the color, and press the B button to clear the screen.
We haven't create a game yet, but we're close! It's an etch a sketch for now. Making a game is next!
See you in the next chapter!
Jeff


