

Introduction: Creating Custom Pencils in LectureNotes on the Samsung Galaxy Note 10.1


Today we're going to create a custom pencil in LectureNotes and show some quick access features for modifying those customizations.
Step 1:

First select 'settings' from the app's drop down menu (three vertical bars, on top right).
Step 2:

Under the Tools menu we are going to check the option for 'Quick Custom Pencil Settings'
This option will allow you to double tap custom pencils in the pencil toolbox, and make changes to each pencil individually.
Step 3:

Now open a new or existing notebook. In the notebook double tap the pencil icon to select 'Custom Pencil Settings'
OR
If you have the Pencil Toolbox enabled, simply double tap one of the custom pencils to modify it's settings.
Step 4:


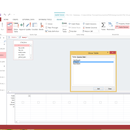
Image 1
In the custom pencil settings dialogue we can choose any of the pencils to modify. I have number 10 chosen here, which I have made into a highlighter.
Line width: sets the pencil width
Alpha: sets the transparency
Softness: sets the intensity
Use the color wheel to modify the color options.
Pencil is pressure sensitive: will choose width and intensity based on stylus pressure
Pencil is velocity sensitive: will alter the intensity based on speed of the stylus
Pencil does not leave round but flat end: when checked you will have flat ends, good for highlighting, when unchecked you will have round ends
Pencil does not draw in front but behind other color: While I don't have this option checked myself, this is very helpful for the highlighter custom pencil. This feature forces this pencil to draw underneath other drawn writing and objects, thereby not obscuring the item it is highlighting.
Pencil is eraser: negates all but the line width, and makes the pencil an eraser
Image 2
If you have the pencil toolbox enabled you can double click a custom pencil and edit only it's settings the same way as the previous menu.


