

Introduction: Critters Poseable Prop Doll


Critters was one of my favorite childhood movies and I rewatched it this halloween with my son. These alien creatures are just fantastic and I absolutely love their design. To build a poseable prop was quite a challenge in the pattern and sewing parts but I'm very happy with the result. He's about 13.5 inches tall.
Step 1: Materials

- Polymer Clay (Oven baked modelling clay) - I used Sculpey Living Doll in light and Premo for the gums, teeth and nails.
- Sculpting tools: paddle shaped tool, needle tool
- Wires- Copper wire gauge 16; Aluminum wire
- Aluminum foil
- Paper tape
- Faux Fur
- Cotton cloth
- Polyester Fiber
- Polyester thread - a thick waxed one and a strong sewing thread
- Embroidery thread
- Black felt
- Drill bit
- Glue - an industrial one like E6000 and white glue
- Wire cutter
- Varnish - Matte and Glossy
- Plastic pellet weights
- Paints - I used Genesis heat set paints but you can use acrylics and soft pastels
- Paint brush
- Scissors
Step 2: Building the Armature


For the face armature, shape the aluminum foil to make a circular flat shape and a smaller dome shape for the muzzle.
To make the skeleton of the doll, twist 2 pieces 32 inches of gauge 16 copper wire then shape a loop to the size of the head midway of this wire and twist the ends. For the limbs, twist 2 pieces 14 inches of the copper wire. Make another one for the other side.
Cut 6 pieces 4 inches aluminum wire for the digits of the hand and 6 pieces 5.5 inches for the digits for the feet. Using a thinner gauge of aluminum wire, wrap 3 digits for each limb. Pose the digits and reinforce it with wire.
Wrap the forearms with aluminum foil then wrap the limbs with paper tape.
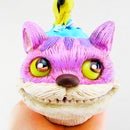
Step 3: Sculpting the Face


Build a layer of clay on the face and muzzle armature. Form the brow area with a log of clay and add more clay to the cheek area. Add 2 spheres for the eyes and with a knife cut out the mouth area as shown. (4th photo) Put a triangular flat piece above the mouth area and indent the upper and lower lids with a needle tool. (5th photo) Define the shapes by adding coils and pieces of clay to areas that needs more building up, blending the seams with a paddle shaped tool as you go. Use a reference photo of the front and sideview of the face to help you sculpt accurately and try to look at your sculpt from different angles.
Once the form is achieved, start detailing the face with crevices and lines characteristic of the critter after which bake the piece for 40 minutes for 120 to 130 degrees celsius.
Using pink colored clay, start sculpting the gums. With the face baked, you need not worry deforming it.
The teeth are white clay shaped individually to a point and pre-baked in the oven. After which each tooth is placed in the mouth. There are 2 rows of teeth. Start adding the inner row first then the outer row..
Bake the whole piece for 40 minutes. When the face is completely cooled, remove the foil armature carefully and carve some of the clay off the back to places where it is quite thick. Doing this will help the face plate from being too heavy.
Sand the edge of the face plate to smoothen the ragged edge.
Step 4: Sculpting the Limbs


Build clay on the armature for the forearms, hands, legs and feet. He has 3 digits on each limb. Add in the details such as the crevices on the wrists, ankles and indent a centimeter boundary to the upper part of the forearms and legs. This is where the fur will be glued on. Bake the parts. Once cooled sculpt in the nails using white clay.
Step 5: Painting


Paint in thin layers to achieve a realistic look. Use heat seta paints or acrylics. Paint the skin first with a very dark green color. The eyes red and the teeth with ochre. For the next layers, dry brush with light brown and ochre to the skin. Paint the pupils black. When the paint is dry glaze several layers of matte varnish except for the eyes and mouth.
After the paint has dried, add the holes to the sides of the face with a drill bit. 3 at the top, 2 to the sides and 2 to the bottom part. Glue black felt to the back of the face. This will help reinforce the clay.
Attach the limb wire armature to the head wire armature by wrapping it with aluminum wire. This is then reinforced with kneaded stick epoxy placed on the chest and pelvic area.
Step 6: Stuffing the Doll


Wrap the wire armature with polyester fibers and use embroidery thread or string to keep it in place.
Make a pouch and fill it with 100 grams plastic pellets to add weight to the doll. Put this on the butt area with fibers on top and tie it up with embroidery thread.
Make a pattern of the doll to cover the fibers with cloth. The cloth will help with the attachment of the face.
Put the face on the head area and using a hook needle and thick waxed polyester thread, string it through the holes and make a square knot.
Step 7: Sewing Fur & Finishing


Make a pattern for the back and front part using tissue paper. Trace the pattern on the fur and cut the wrong side with a blade. Make sure that the direction of the fur on the right side is downwards.
Use strong glue like E6000 to glue the fur to the sides of the face. Glue the edge of the front piece fur to the bottom part of the face.
Sew the sides with polyester thread using the ladder stitch. I added more polyester fibers to the sides of the head before sewing up the sides.
Cut up 4 strips of fur for each limb. One side of this is sewn while the other side is glued to the clay parts.
To hide the edge of the fur cloth. Glue cut fur fibers with white glue.
Paint gloss varnish to the eyes and mouth.
Darken the fur with black permanent ink and trim off some of the fur fibers on the front area and limbs.
Happy making!

First Prize in the
Halloween Decor Contest 2016


