

Introduction: Custom Longboard Pivot Cup


This Instructable shows how to make your own custom and low cost pivot cups. The pivot cups are a crucial part of the longboard truck, and are often over looked or forgotten about. They allow a truck to turn smoothly, whilst holding alot of the riders weight.
It's important to maintain the pivot cups to keep your ride smooth and responsive, whilst keeping the movement of the board reliable and predictable.
This Instructable will show how you can make your own pivot cups that can be purpose made for almost any truck or suitable combination of hanger and baseplate.
Step 1: Why?


There are multiple brands that offer upgrade pivot cups for many models of longboard trucks. They do tend to cost multiple pounds for something so small and simple.
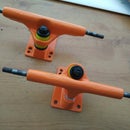
(example. Venom, the bright orange pivot cups pictured cost about £8 per set posted)
It's also often hard to find suitable pivot cups for mix matched truck hanger combos like the one pictured above.
Shown in the picture is a navigator Drone 50° base plate with a rey devil precision 200mm hanger. I ride this combo as my original navigator hangers got pretty bent and I picked the rey devil hangers up for £30 for the pair. They do ride very nicely I must say.
I was riding them with the original navigator pivots (black, pictured) with washers placed underneath to raise them up. The navigator pivots are old and worn, with noticeable slop in the motion of turning.
Therefore I decided to make my own pivot cups, custom fit to this hanger and baseplate combo.
NOTE:
It's not advised to ride random hangers and baseplates together as their is the chance the hanger can pop out of the baseplate when sliding or cornering harshly. This can lead to severe consequences.
Step 2: What Will You Need?

Obviously you are gonna need some trucks. I used RKP (reverse king pin) style trucks but I rekon a similar process could be applied to TKP (traditional king pin) trucks.
Secondly you will need a bag of high quality Polymorph granules. Polymorph is a plastic that melts in hot water. When soft it is clear and can be sculpted. Once it has cooled down again it turns back to a hard white plastic with mechanical properties similar to nylon. It can be bought off the internet for about £20 for a kilo, though this Instructable only requires several grams.
NOTE:
This may not be suitable for use in hot climates due to the low melting point of Polymorph .
Polymorph is fun and useful material to keep around so it might be worth buying a decent amount.
Lastly you will need a kettle, water, mug, teaspoon, serrated knife or junior hacksaw, lighter and some coarse sandpaper.
Step 3: Melting the Polymorph


Put some water in the kettle and let it boil.
Put 2 teaspoons of the granuals in a mug and pour the hot water in the mug. Fill it about half way. Take care not to burn yourself
If there's any hot water left, you may aswell make your self a coffee. :)
leave the plastic a minute or 2 to completely soften up. The granuals will stick to each other and can be scooped out as a blob.
At this point I like to kneed the plastic, making sure it's well mixed with no pockets. Drop it back in to the hot water to re-soften.
Step 4: Shaping


You will need to dismantle your truck.
Remove the kingpin nut, roadside washer and bushing, hanger and old pivot cup.
Leave the board side bushing in place.
Use a tissue to wipe clean the pivot on both the hanger and baseplate.
This next step took me multiple attempts to get right. This is OK as the plastic can be sculpted and remelted many times.
My hanger had an Allen key hole. I filled it in with blue tac to leave a smooth round inside to the new pivot cup.
What you are going to do is take the softened plastic from the hot water and press it in to the pivot hole in the base plate. (the picture shows it on the hanger but from my short experience the baseplate side seemed more effective)
Being quite quick, get the hanger and press it in to place. Make sure it is centred on the board side busing and is centred in the bushing.
Press the soft plastic that was squeezed out around baseplate hole back in to ensure good formation of shape.
Leave the plastic to cool and harden for about 5 min.
You can now remove the plastic casting.
If it's not up to standard, re-melt the plastic and try again.
Step 5: Final Shaping


Now you have your plastic casting. You will need to cut the excess of and sand to achieve a rounder more aesthetic shape.
I used a serrated knife to cut most of the excess off. The excess can be remelted and reused in another project.
I then used 60grit sandpaper, and by hand shaped the pivot cup to a rounder shape.
Lastly to remove the fur left by sanding, you can use a lighter to 'flash' the surface. This leaves a smooth finish. Be careful not to deform, or ignite your plastic part.
Take care to avoid burning yourself.
Step 6: Reassemble Your Trucks


The black trucks pivot didn't have the flash finish. the red truck did and looks alot better.
These pivots cups will leave the truck turning smoothly whilst adding more support the the hanger (as they fit my combo better).
They now have that 'precision feel' again.
Go skate and enjoy yourself !


