

Introduction: Cute Crafted Fireflies


Continuing from the dragonfly I built, I decided my next little gift would be a series of three little fireflies. These turned out to be much easier to manufacture, though admittedly, they are a good deal less intricate. Still, one of these can make a fun two-hour project for someone dexterous.
Step 1: Materials and Tools


Materials - Ideal:
-One Glass Glow Bead - ~8mm
-1/2" Dowel
-Scrap Copper, 1" x 1" is more than enough
-1 1/2" Copper Wire ~30 AWG
-1 Brass Linoleum Nail
Equipment & Tools:
-2 Pair pliers
-Tin Snips or Wire Cutters
-Sandpaper or Table Sander
-Dremmel (w/ wood cutting bit) or Saw
-Drill w/ 1/16" Bit
-Vise or Clamp
Possible Substitutions and Notes:
-Any small piece of wood will do in place of a dowel, though a dowel will be simpler. I used a spare part from a broken down and old piano keyboard.
-The nail does not have to be a linoleum nail, but they are a handy size. Additionally, it is almost invisible on the final product so if you're not a purist, other metals will do just fine.
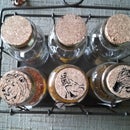
-Unfortunately, the glow bead, in addition to being harder to find, cannot really be substituted or else you will not have a very fiery firefly. I found mine on ebay as a Czech Glass Glow in the Dark Bead. A string of ten ran me about $5 with shipping. I would also mention that the glow is modest, but quite pretty.
-The vise/clamp is really just to serve as a way to hold the wood while you cut it. You could certainly do without if using a dremmel with a wood cutting bit, but doing without and using a handsaw would be difficult.
Step 2: Cutting and Shaping the Wood


This wood will form the head of the firefly. If you are starting with a dowel or long piece of wood, cut it down to around an inch with a saw or dremmel. This will give you an area to grip it as you sand down the end.
If you are using sandpaper: Gripping the end of the wood in a vise, begin to sand down the wood. We are trying to arrive at a rounded end. I found it easiest here to use a flossing motion to get rid of edges with my square piece of wood. After the edges were gone, I would fold the sandpaper and kept rounding edges until it was hemispherical on the end.
Now things get trickier. Saw or cut off the end or the wood you were working with so that you are left with a bullet shaped piece of wood that is ~1/2" long (as long as its diameter). Then, continue to sand edges on the newly cut side until you arrive at a rough sphere. As the wood is very small at this point, it may be easier to grip the wood with pliers in one hand as they give a firmer grip without taking up as much space as fingers.
If you are using a table sander: If you are lucky enough to own one of these lovely machines, I advise you grip the end of your piece of wood in a pair of pliers. This is delicate work, and you do not want to risk your fingers that close to the sanding disk! Using the flat disk of the sander, begin sanding away at edges until you arrive at a roughly hemispherical end.
Next, while holding the wood with the pliers close to the end you were just working on, sand down the wood on the untouched side until you arrive at a bullet shaped piece of wood about 1/2" long (the same length as the diameter). Then, sand edges once more until you arrive at a spherical shape.
Continuing:â Taking your drill and 1/16" drill bit, drill a pilot hole for your nail in the wood that is approximately 3/8" deep. If your nail is a different size than the ones I used (and this is likely) then you need to adjust the diameter of your pilot hole. Pick a bit such that it hold the nail snugly but not tightly. Ideally, you should be able to push it in with your finger with some effort. The nail of course will be too long for the depth of the hole and will stick out. We will resolve this later. This hole will be where the rest of the body attaches.
If you're feeling fancy, now would be a fine time to add stain to the wood, paint or drill little holes as eyes, or add cute little antenna. I must admit that my table sander burned the wood to quite a fine hue and I did not feel a need to stain, nor have I yet added any fancy little extras.
You have finished the most arduous part of the process. If this took you an hour or less, you should be feeling good: you'll be done within 30 minutes most likely.
Step 3: Cutting and Shaping the Copper


The copper will create the wings of the dragonfly. Using your tin snips, cut out the rough shape of the wings (two parallel v cuts). Refer to the picture for the shape. Round the corners of the wings. Next, drill your hole (1/16" for me) in line with the center of the smaller v-cut (as shown). Round off any remaining sharp corners.
(Opt). I did not realize this at the time, but if you wish to add a curvature to the wings, this would be the easiest time do so. To do this, use pliers to grip near the center of the wings and bend the copper inwards with a second set of pliers so that each wing forms a cup like shape. Refer to the finished pictures for a reference on the shape.
At this point you can run your small nail through the hole in the wings and the hole in the wood to hold them together. However, the nail will likely be too long. To fix this, simply use your tin snips or pliers to cut off the end until it is the length you need. Because the hole is already in place, you should be able to push it straight it. The glow bead of the firefly will attach to the head of the nail.
Step 4: The Glow Bead and Final Assembly


The copper wire on the bulb of the firefly attaches the glow bead to the body. My glow bead had a bore going through it. This allowed me to run the wire through, wrapping one side around the nail head and wrapping the other side back down around the glow bead in a spiral.
If your glow bead does not have a hole, you can wrap the wire around the nail and then spiral up the bead with the end terminating at the far side of the glow bead. Feel free to be creative here - as long as it looks good and attaches the bead to the nail, then it is a good solution.
Once the glow bead is attached and you are happy with how the pieces go together, add a little glue to the nail where it goes into the wood and push it in as far as it will go. I used duco cement (a crafts glue) for this step. An epoxy appropriate for attaching metal to wood would work well here too.
Let it dry, and you're done!
Finishing Touches:
-Eyes, if you have not already added them in step 2.
-Legs. This can be done by wrapping about 3/4" of the wire and wrapping it around the attachment point of the wings to head, then bending the sides out and down. Repeated three times, this will give you an appropriate six legs.

Participated in the
Make It Glow


