

Introduction: Cutting Down a Tree in Pieces


The following contains some tips that could be used in the course of removing a tree with the constraints:
a) Removal by one person
b) No chain saw (reciprocating saw)
c) Tree cannot be felled in one swoop (environment too cramped)
While there are many good references for tree removal, most rely upon use of a chain saw and assume that the entire tree can be cut down. In this case the tree had to be removed piece-by-piece due to the lack of space in the yard. So we approached this like any other engineering project.
Following are the steps that I found to make the job a little . . . not easier but more manageable.
Step 1: Considerations (Skippable)

Things to consider when tackling this type of project:
- Do you have the time and energy to do this yourself?
- Do you have the time and energy to deal with landscapers or tree cutters?
(In my case it's hard to get a hold of landscapers especially in the Spring/Summer/Fall months)
- Will a professional need or use some type of vehicle or equipment that will tear up the rest of the yard?
(In my case they would have had to break open a hole in my fence to get equipment in)
- If you are considering doing it yourself, then . . .
- Does the tree have plenty of branches that you will be able to stand on?
(In my tree there were some good branches but also some voids)
- Is there a good place to lean a ladder against it?
(In my tree there were a few good ladder placement points along the trunk)
- Are there main branches that can be removed methodically?
(In my tree there were three major top branches that, when removed, would make the rest of the removal fairly manageable)
- Are there obstacles that falling branches could land on?
(I had a few fence panels that I had to think about, but nothing too terrible)
- Do you own or can you wield a chain saw?
(For me, no way)
Step 2: Basic Approach

In my case, I could not simply cut the tree down in one fell swoop because it would crash into the neighbors' yards. So the approach was to manage it in chunks:
a) Prepare for cutting down main branches which were about 20 feet up and the most difficult part of the job
b) Cut down the main branches
c) Cut down minor branches
d) Cut down trunk
Step 3: Tools and Materials


This is a list of the items I wound up using, your mileage may vary, but these are things I will gather ahead of time next time, and why or how I used them:
OBVIOUS/TRADITIONAL TOOLS
Ladder (I used a telescoping ladder)
Reciprocating saw (to cut branches; a chain saw was a non-starter: too heavy)
Spare batteries for reciprocating saw (my saw is battery operated)
Extension cord (if you have a saw that requires mains electricity)
Pruning blade for reciprocating saw
Hand bow saw (for cutting branches when reciprocating saw won't work)
Goggles (protect eyeballs from flying debris)
NOT-SO-OBVIOUS MATERIALS AND TOOLS
2-3 6-8in scrap 2x4's (to use for steps)
1-2 6-8in scrap 2x4's (to use as foot hold)
1-2 6-8in scrap 2x4's (to use as arm rest)
4-6 L-brackets (to support foot holds and arm rests)
10-20 4in nails (to secure 2x4's; to hold pulley; to use as a hook for tool bag and hook for electrical cord if your saw is corded)
10-20 4in screws (to secure 2x4's)
4-8 8-10in spike nails (to help secure ladder)
Drill (to drill pilot holes for 2x4's)
1/8 in drill bit (to drill pilot holes for 2x4's)
Screwdriver drill bit (to secure screws to 2x4's)
Chisel
Hammer
Tool Belt/w hammer holder and pockets
1 5-6 ft rope (to help hold ladder to tree) (optional)
1 20-50 ft rope (to pull tools up the tree)
1 100-200 ft rope (to help guide branches as they are cut)
Light-weight 5-6 ft pole (to use to help guide rope in tree)
Come-along winch (to tighten guide rope)
Bucket or canvas tote/tool bag (to put tools in)
Carabiner (to snap onto the tool bag and pull rope easily)
Pulley (use to haul tool bag up into the tree)
Lots of Band-Aid's
MATERIALS/TOOLS TRIED BUT DID NOT WORK OUT
(I don't recommend these items, but you may have better luck, who knows?)
DualSaw (supposed to cut through anything, even a car)
50-100 ft string (supposed to help guide rope in tree)
Cinder block (uhm, never mind -- you don't even want to know what I did with that)
Ski pole (uh, never mind that either)
Step 4: Prep Step: Ladder

Putting up the ladder seems like an obvious and trivial step. But I found out the hard way that the flat rungs of a ladder aren't very stable when placed perpendicular to a cylindrical surface such as a tree trunk. The ladder will want to slide to the right or left of the tree, in other words. Yep found that out AFTER I'd climbed up and down a few times. Oops.
I found several ways to help secure the ladder:
1) Hook the top rung of the ladder over a protruding branch (which you may first have to cut in order to yield a "hook"). That will help keep it from sliding a lot.
2) Nail 8-9in spikes through the top and next-to-the-top rungs to act as a make-shift hook. That will help keep the ladder from sliding a little.
3) Tie a 5-6ft rope to one end of the top rung, wrap the rope around the tree, and secure the other end of the rope to the other end of the top rung. That will help keep the ladder from sliding a lot.
Another possibility but not tested out:
Use a chisel to create an indentation across the trunk and rest the top rung in that indentation.
Step 5: Prep Step: Pulley

Any home destruction, er uhm construction, project requires retries and multiple trips. This one is no different. I went up and down the ladder countless times. It finally dawned (duhed) on me to just put up a pulley and a rope to carry things up and down the tree. This step is pretty obvious to most folks, but well, uh, it took me a few trips to streamline the process so here it is:
1. String the pulley rope (20 feet or so depending on the height of your tree) through the pulley while you are on the ground.
2. On one end of the rope, tie a good sized knot to prevent the rope from slipping out of the pulley.
3. On the other end I tied a good-sized carabiner so that I could attach and un-attach the tool bag easily.
4. Attach the tool bag to one end of the pulley rope.
5. Don the tool belt and insert nails and hammer.
7. With the pulley in one hand or in your back pocket, make your ascent up the ladder to the first place you need to work. This will probably be where you will be placing steps or foot holds, as discussed in the next prep steps.
8. Pound a nail into a reachable place to hold the pulley.
9. Hook the pulley on the nail and draw up the tool bag to test it out.
10. Find an appropriate place for the tool bag and pound another nail for a hook for the bag.
11. Let go of the rope and let the tool bag drop down to the ground.
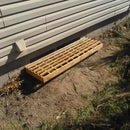
Step 6: Prep Step: 2x4 Steps

Depending on how many good climbing/holding branches are in the tree, this prep step may or may not be needed. In my tree, there was a big gap between the first set of branches that I could stand on and the next set of branches that I could stand on. So I built some steps, similar to steps up to a tree house to make it easier to get up and down. Again, in my case, I had to perform the feat many times so the steps helped the process go smoother (eventually, after I put them up).
1. On the ground, drill four holes about two inches apart in a square pattern through a few of the 2x4's.
2. Put the 2x4's with the pre-drilled holes, drill, drill bit, and driver bit into the tool bag.
3. In tool belt, include hammer, nails, and screws.
4. Climb up to the area where you need to start the steps.
5. Pull up tool bag and hook it up.
6. Position one of the 2x4's at a good spot.
7. Nail the 2x4 to the trunk through one of the holes.
8. Use the drill to drill pilot holes through the remaining pre-drilled holes in the 2x4's and secure with the screws.
9. Repeat for remaining steps.
10. Use the steps to get to the next standing area and repeat the process of attaching nails for the pulley and tool bag at the higher spot, if needed.
11. Lower tools back to the ground if you are ready for a break.
Step 7: Prep Step: 2x4 Foot Holds
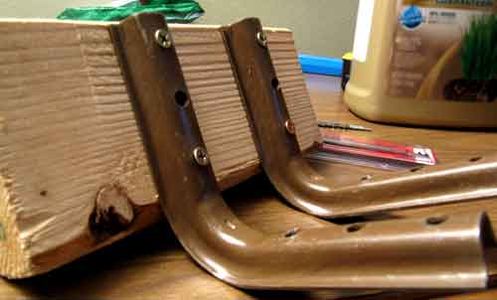
Even though there may be a good nook to stand in the tree, there may be a need for extra support. In my case one foot could stand on a thick branch, but the other foot would have to dangle, so this step is to put up a foot hold. This is a little different than the steps because the foot holds will be placed perpendicular to the trunk to allow for a more steady support when you begin sawing. Yep, found that out the hard way after trying to stand with my ankle turned inward on a distorted branch.
1. On the ground, attach two L-brackets, about 3-4 inches apart, on each of the 2x4's that you intend to use for a foot hold (I only needed one foothold) using the drill and screws.
2. Place the following in the tool bag: 2x4's to be used, drill, drill bit, drill driver.
3. Keep tool belt with nails, screws, and hammer on.
4. Ascend.
5. Pull up the tool bag.
6. Position the first foot hold against the tree and pound a nail through one of the holes in the L-bracket into the trunk.
7. Drill holes through the remainder of the L-bracket holes and secure with screws.
8. Repeat for any other foot holds you may need.
9. Lower tool bag to the ground.
Step 8: Prep Step: 2x4 Arm Rests

I found out the hard way just how rough a reciprocating saw can be when you are 20 feet above the ground and I know how exhausted your arms become from just a few seconds of use. I also found out that the branches are pretty awkward and that running the saw with one hand is even more tiring. And it is almost impossible to find a convenient branch to rest the saw on between breather breaks. So the arm rest prep step is really crucial if you don't have a lot of stamina. Sounds dumb, but this is really the most important preparation piece for me. Climbing up and down the tree is tiring, but most of the time was spent up in the tree with the saw and my arms would give out easily.
1. On the ground, attach two L-brackets to each of the arm rest 2x4's (I only needed one arm rest).
2. Put the following into the tool bag: 2x4's, drill, drill bit, drill driver.
3. Retain nails, screws, hammer in tool belt.
4. Ascend.
5. Repeat the steps that were used in setting up foot holds.
6. Since you are probably at the point where you will begin cutting, if you are using a saw with a cord, pound in a nail or two to help hold up extension cord.
7. Lower tool bag to ground.
Step 9: Prep Step: Guide Rope


A guide rope can help guide the angle of the fall of branches being cut. Or that's the theory. The idea here is to position the rope at the right spot around the right branch in the tree. There is no easy way to do this. Period. One purported way is to first throw a string around the branch, then tie the main guide rope to one end of the string and pull the other through and over the branch. This did not work for me. In the photo you can see the tree with so much failed string attempts it looks like it was TP'ed. Also, as I found out, ropes stretch and so you'll want to get one that doesn't stretch as much as the $10 rope that I bought. So with those warnings, this is my method.
1. Pick a branch.
2. Ascend with one end of the guide rope.
3. Use a ski pole to get the rope over the branch.
4. For steep branches, pound a few nails in and lie the rope in the crack of the nails. This will help keep the rope from sliding down steep branches. (As usual, be sure to wear the tool belt with hammer and nails before ascending.)
5. Guide the rope to the ground and descend yourself.
6. Find another tree or some other semi-permanent object to attach the guide rope to. In my case I had another tree that could be used as the stationary point.
7. Tie one end of the guide rope to the stationary object with a somewhat large loop.
8. Attach the come-along stationary end hook to the large loop of the guide rope that is attached to the stationary tree.
9. Extend the come-along to its longest length.
10. Pull the guide rope as tight as you can and attach the end to the moving end hook of the come-along.
11. Cinch the come-along. The rope will tighten, but my rope stretched so eh, not sure how to accommodate that.
Step 10: Cutting

1. Take a shot of courage.
2. Put the following into the tool bag: reciprocating saw, batteries (if battery-operated saw), bow saw, end of extension cord if your saw is corded.
3. Plug in the other end of the extension cord (if your saw is corded).
4. Put the following into tool belt: hammer, chisel.
5. Put on eye goggles.
6. Make sure your shoes are tied and there is no string wrapped around your legs.
7. Ascend to the cutting point, placing your foot/feet onto the foot holds as needed.
8. As you ascend, keep an eye out for rope, string, cord, and things sticking out from tool belt catching on branches.
9. Pull up tool bag and secure to hook.
10. Start sawing a "bird beak" wedge into the branch
11. Use the arm rest when or if your arm becomes exhausted.
12. Use cross cuts to break open the bird beak wedge cut. It is not always easy to get two perfect cuts, so hack as needed.
13. Use the chisel often to break apart excess chips, this will help save a lot of time since the saw doesn't always cut exactly where you like given the angle that you may find yourself in (and if you have to use one arm). So the chisel is a great time saver.
14. Use the bow saw when the reciprocating saw is just too heavy or awkward. Use one arm to saw with the bow saw until it tires, then switch to the other arm. Remember to use the chisel to chip away excess.
15. Continue cutting, replacing the saw's battery (in your tool bag) as needed.
16. You will probably get to a point where the branch is defying the laws of physics but yet it will still not let go of the main trunk. You might want to take a break, jiggle the guide rope, then go back at it.
17. It took me about three hours apiece to cut a wedge deep enough to fell each of the three major branches of my tree. They were about 8 inches in diameter and sprouted out at unwieldy angles.
Step 11: Finalize


Once the main branches have been removed you can hopefully, finally, cut down the main trunk from the ground using the proper technique with your reciprocating saw or with a chain saw. As for my tree, as it turns out the trunk is fairly straight and instead of cutting it down, I've decided to make it into a totem pole. However, it is at the point where bringing it down is much more manageable.
Stay tuned for my next instructable: How to Clean Up Your Yard After Downing a Tree
Step 12: EpiLOG: What to Do With the Mess

First we gathered the big chunks and then offered them up as firewood on the Internet. Got four responses in less than 5 minutes and got rid of the bulk thanks to the first person that responded to the offer.
As for the rest . . .
Step 13: Bringin' It Down

Re-attach the come-along and rope
Step 14: Makin' the Cut

Cut bird-beak wedge
Step 15: Defyin' Physics

Wash, rinse repeat.
Repeat
repeat
repeat
Step 16: Boom

Finally
Step 17:

Made a fountain/bird bath out of the left-over stump.
Step 18: Stuff to Make With Branches


Here are some of the things made from the left overs . . .
Step 19: More Stuff


Step 20: Corner Shelf #4


This one has a coat hook on the back and I used some sugru to help attach the shelf, hold the lamp in place, and cover up some wiring in the rear.
Step 21:

Table top made from slab of one of the left-over parts of the trunk


