

Introduction: DIY AUX Audio Jack to Car (Honda Civic 2006)


In this Instructable I will show you a way to connect your phone to your car using a custom 3.5mm TRS cable (basic audio cable) to make use of the AUX function on your car.
It is possible to buy a specific part for the Honda Civic that will do this, but nobody wants to spend $50- $100 bucks when you can make it yourself for 10 CENTS.
I will try my best to make it as short as possible
I have made this myself and it is working as expected
THIS WILL NOT WORK IF YOU CANNOT CHANGE YOUR CAR TO "AUX" LABELED ON THE MAIN PANEL
Take note that you will be tampering with your car.
So lets begin :)
What you will need:
1 audio(AUX) male cable (I used an old pair of headphones) price= <$1, buy= anywhere/ spare parts
1 soldering iron along with solder buy= The source/ Radioshack
A few inches of solid core wire buy= The source/ Radioshack
1 ziptie (optional) price= <10 cents ea., buy= Dollerama/ Walmart
1 drill (optional)
1 some time
Step 1: Pry Open Your Car Case

Go to your car and open up the casing where the required cable is. It is different on most cars so you may have to look around. I have a Honda Civic 2006 model and the picture above is how it looks like.
There is a small cap that should be opened revealing a white button that you should pressed using a flat head screw driver.
Instructions: https://www.youtube.com/watch?v=JMq8tKoyxrE
MAKE SURE THAT YOU CAREFULY AND SLOWLY PRY IT OPEN TO PREVENT CRACKS
Step 2: Check What Connection It Is

Once you have opened it up, then you will check what kind of Audio connector is in your car.
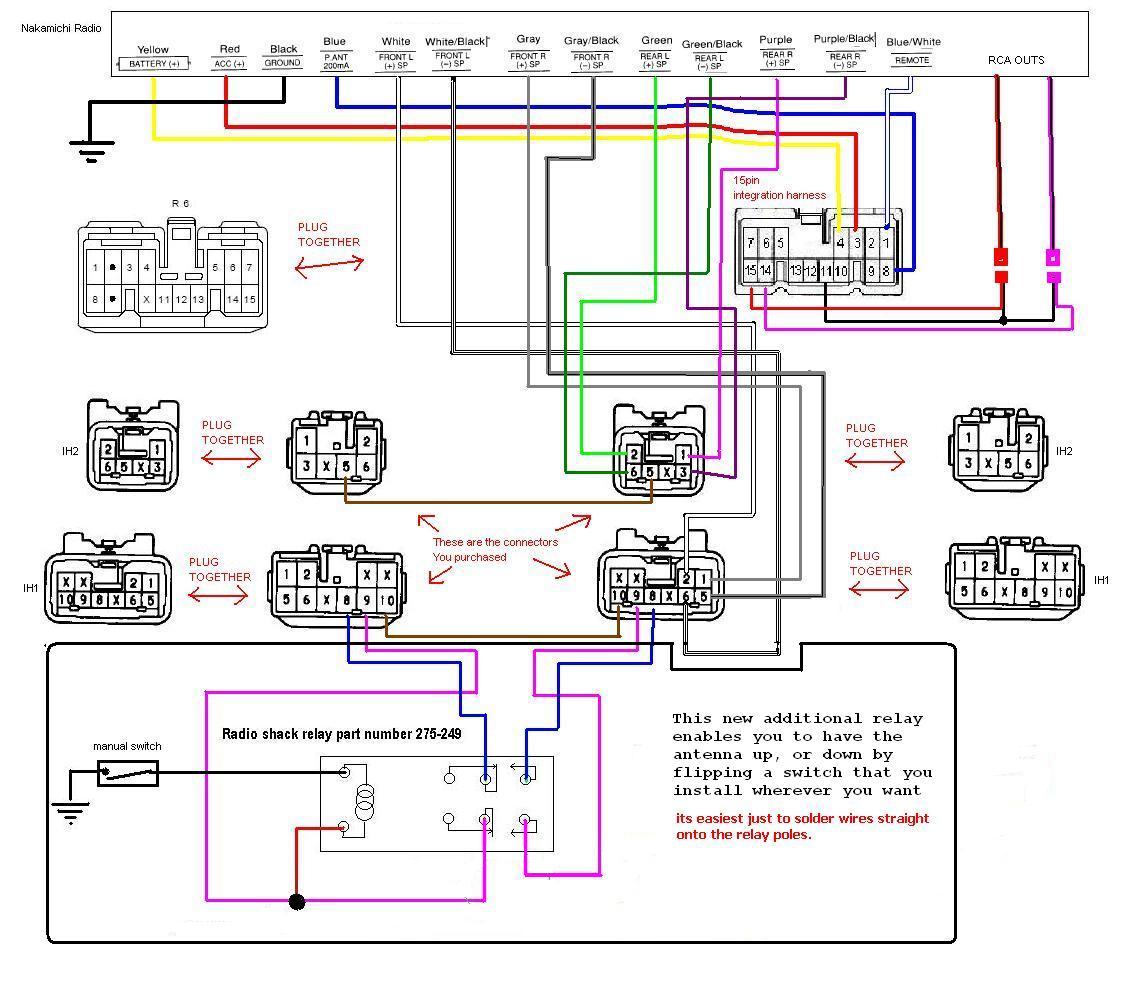
On my Honda Civic I have a 6 pin cable labeled from left to right
By: Ethlar
Pin 1: Right Audio wire : Red OR Green
Pin 2: Left Audio wire : Green OR Yellow
Pin 3: Ground : Black OR Brown
Pin 4: Not used :
Pin 5: Connect to pin 5 : Brown OR White
Pin 6: Connect to pin 6 : Brown OR Black
This page can help if you have the same 6 pin connector as me:
http://www.8thcivic.com/forums/diy-honda-civic-ele...
IF NOT then:
http://doswa.com/images/2010/01/01/ak203mm.jpg
http://s28.photobucket.com/user/moph2000/media/For...
http://www.team-bhp.com/forum/attachments/ask-guru...
http://4x4icon.com/crossfire/pioneer_tuner/becker_...
http://www.msprotege.com/members/MS38449/Bose%20am...
http://www.fordfusion.net/photos/data/500/WIRE_HAR...
http://home.comcast.net/~derek-kelly/element/audio...
http://www.97supraturbo.com/Radio%20Conversion/Ant...
More research my be required
Step 3: Find and Cut an Audio Cable

I used my old headphones where the speaker alone broke but the wire was still functional
You will want to cut a wire that is about 1 meter long
Inside there should be three wires when you cut it.
Red will be = right wire
White/blue/green = left wire
black/un-coated(copper-wire) = ground
Step 4: Strip All Your Wires Seperatly

Wrap the two ground cables, and solder them together.
At the end of each cable solder on a appx. 1.4mm solid core wire (This will act as a plug into the cable)
The wires should come out about 1/3 of an inch
The cable should look like the picture above:
This will be your final chance to clean up your custom wire so make it look pretty and it doesn't short out.
Step 5: Assembly

Now, here is the final step so pay attention
With the Honda civic there were 6 pins
pin 1 = Right wire
pin 2 = Left wire
pin 3 = Ground
pin 4 = not used
pin 5 = connect to pin 6 using a 1.4mm wire
pin 6 = connect to pin 5 using a 1.4mm wire
Put these to the correct spots WHEN THE CAR IS FULLY TURNED OFF and it should all be good to go :)
Step 6: The Moment of Truth

Test if it will work:
Turn on your car
Switch to AUX
Plug in your phone
Play and listen to some sweet tunes
Step 7: Extra Feature

I drilled a relatively small hole in the back of the casing so that the wire is hidden, then fed the cable through it.
Be creative.. idk
Step 8: Adding a Stopper

If in the case of someone tugging on the wire, then it will fall out
So what you can do is make a blockade.
All I did is I gave enough room for the casing to extend and then I tightened a zip tie between the cable and the case, to prevent the cable from being affected after pulled.
Step 9: Finished

Once you have everything up and running all you have to do is put the case back on,
and of course if you have done this yourself then send me some pictures I would love to see them.
In the meantime leave a fav if you liked it.
If you have any questions or concerns then don't be hesitant to leave it in the comments down below. :)


