

Introduction: DIY BioPrinter


Anthony Atala: Growing new organs
Anthony Atala: Printing a human kidney
All this sounds incredible complex, but the fact is that the basic technologies are very accessible - it's all based on inkjet and/or 3D printing! So a bunch of us at BioCurious decided we wanted to play around with this technology ourselves - and the BioPrinter Community Project was born! (Come join us, every Thursday evening at BioCurious!)
We wrote this instructable in part to document our project for our fellow Citizen Scientists in the DIYbio community, so it's getting a little long. For those who want a quick 1-minute intro, you may want to check this little video:
Step 1: Hacking an Old Inkjet Printer to Print Biomaterials


We started out by messing around with an old inkjet printer that we literally saved from a sidewalk somewhere. There's already plenty of interesting things you can do with an low-end off-the-shelf inkjet printer, but they do have some limitations, which we'll get into in the next Step (or skip straight to Step 3 for how we built our own bioprinter from scratch, that you can see in the first picture above).
Undressing the Printer
We disassembled an abandoned HP 5150 inkjet printer for use as a bioprinter. Just rip off all the plastic covers you can find, but make sure you can still operate the reset buttons etc. on the front panel.
There's a little momentary switch that senses whether the cover is open. After you've ripped off the cover, you will need to close that switch to be able to print anything. You can just press it down by hand or with a toothpick, glue a little piece of plastic or a screw onto it to make it easier to depress, solder on an on/off switch, or even just bridge it with a piece of wire (so it thinks the cover is always closed).
There's also a momentary switch inside the paper handling mechanism that senses whether paper has been loaded. You may need to rewire that one as well is you plan to mess with the paper handling.
Once you've got your printer all undressed, and figured out how to activate the cover-closed switch - print something! It'll be a good test to see if you've knocked something loose and whether you can still operate all the buttons. Plus, it's just darn cool to see an inkjet printer do its job up-close. Keep your fingers out of the way though - those cartridges move fast!
Cartridges Prep
Next task is prying open an ink cartridges, so you can fill them with something more interesting. We will be using brand new cartridges for the printer, because old cartridges tend to have residual ink clogging their nozzles. However, you might want to practice opening expired cartridges first. Wouldn't hurt to do a test print, and flush the print head, if your printer software provides that option.
After taking off any labels, you'll see that most cartridges have a lid that's glued into place, usually with some small vent holes to let air in as ink flows out. If you run an Exacto knife or box cutter along the seam long enough, you should be able to cut through some of the glue, and pop the lid off fairly quickly. WARNING – boxcutters are SHARP! If you're a kid, get some responsible adult to help you with this! If you're an adult - consider protecting your hand with a knife-proof glove, and/or clamping down the cartridge in a vise while you're doing this.
Alternatively, you can cut off the lid using your favorite power tool. *Much* easier, but not quite as clean. Keep in mind that you may need to be able to put the cartridge back together again, to get it to fit into the cartridge holder. If anyone knows of an easier way to open inkjet cartridges, post something in the comments! Maybe there's some solvent that will loosen up the glue without dissolving the cartridge itself?
Once the cartridge is open, you'll see that the entire ink reservoir is taken up by a little sponge that holds the ink in place. Color cartridges have separate ink compartments with their own sponges (typically Cyan-Magenta-Yellow, not Red-Green-Blue, since printing colors on white paper is a subtractive color process). You can squeeze out any remaining ink and keep it for later experiments (e.g. for some paper chromatography). Next, rinse, rinse, and rinse some more with distilled or deionized water-we don’t want to clog the print head with mineral residue. We want to get all that ink out of there, so it doesn't interfere with our experiments.
Once the ink reservoir is completely clean, fill it partway with distilled or deionized water, put the lid back on, pop it back into the cartridge holder, and print something. Chances are, no matter how well you rinsed, you'll still see some residual ink coming out. Just keep printing until it's printing clear, and then print some more.
We discovered that our cartridge actually slowly leaks through the print head when you fill it completely with water, but it does not leak when you only put in a small amount. That actually provides a very convenient way to flush out the print head, without having to print.
Filling the Cartridges
At this point, what you want to put in the ink cartridge is entirely up to your imagination! We started out by putting some green food coloring in the formerly black ink cartridge, and printed out a test page to show that it worked. You could also try filling up the color cartridge with fluorescent dyes of your choice, and print out you own blacklight posters. Or, put some invisible ink in the black cartridge, and print invisible messages to your friends.
As our first real "bioprinting" experiment, we wanted to start with something simple, instead of jumping straight into printing with live cells. We decided to print with a solution of arabinose onto filter paper. Then we cut out the filter paper, and put it onto an agarose plate on which we had grown a lawn of E. coli that we had engineered to carry the pGLO plasmid. This plasmid carries the Green Fluorescent Protein (GFP), under control of an arabinose-sensitive promoter. (Stay tuned for an instructable on how to make your own GFP-expressing E. coli).
As a result, wherever we had printed arabinose on the filter paper, we now saw the E. coli light up green under UV light! Note that the beauty of this experiment lies in its simplicity: we only had to print with a simple sugar solution, rather than with bulky live cells; and we were printing on paper, so we didn't even have to change the paper handling machinery. You could also try printing with antibiotics, or even proteins, such as enzymes or growth factors.
The second-to-last image above shows our first test print, where we has printed arabinose over half of the filter paper - and half of the plate lights up under UV light. In the second image, we had printed the BioCurious "eyeball" logo. Success! Unfortunately the sharpness of the image definitely leaves much to be desired. Presumably, the arabinose tends to diffuse through the filter paper, which smears out the printed pattern. We should be able to do much better by printing directly on the agarose.
Step 2: Problem: Current Inkjet Printers Are Too High Resolution!


Problem: current inkjet printers are too high resolution!
We've spent a good amount of time looking at inkjet print heads under the microscope. The silver strip you see at the bottom of an ink cartridge is called the nozzle plate. It's just a sliver of stainless steel that has precision nozzles pierced through it. In this black ink cartridge, the nozzles are arranged in four rows, of which you can see two in the first image above. The nozzles are actually numbered, from 1 to 416. 416 nozzles in a print head that's about 1/3 of an inch comes out to 1200 dots per inch.
Now, 1/1200th of an inch means a spacing of 21 microns. Also, the nozzles themselves are actually around 23 microns in diameter. That's on the order of the size of a eukaryotic cell - uh-oh! We should still be able to print much smaller E. coli cells (~1 µm diameter) with this print head, and possible yeast cells (~10 µm diameter).
But wait - there's more!
When you peel away the metal nozzle plate, you get to the actual print head, a marvel of silicon engineering that incorporates both the liquid handling, the microscopic heaters that vaporize part of the ink in a thermal inkjet printer, and a bunch of integrated electronics. Excellent targets for an amateur microscopist!
The last image above has us a bit worried, though. There seems to be a filter integrated into the silicon, sitting between the ink reservoir and the print head itself! From the microscope picture, we estimate the holes in the filter to be about 3 micron, which may be getting too small even for E. coli cells. Doh!
In addition, if you use a commercial inkjet printer, you'd have to take out the paper path to be able to print on anything else (like an agar plate!). Plus, if you stick with the existing printer drivers you have very little control over exactly what the print head does. You could try adapting Linux drivers to do what you want, but that turns into a project in itself.
So perhaps a clean break is better - let's just build our own printing platform that we will have full control over!
Step 3: Use an InkShield As Print Head


Solution!
So, it looks like we may not be able to use the latest 1200dpi generation of inkjet printers to print anything larger than yeast cells. And we may not even be able to print yeast or even E. coli cells with the inkjet cartridge on this particular printer!
Other groups using inkjet printers typically use ancient HP printers that only do 300dpi, with nozzle sizes presumably around 80 micron or so, which should be plenty large to print human cells. For example, this group is using an HP DeskJet 500, a model that dates all the way back to 1990 - good luck still finding one of those!
Now, Parallax used to have an inkjet printer development kit available to drive a 96dpi HP 51604A cartridge, but both the cartridge and Parallax kit went out of production a few year back.
Luckily for us, Nicholas Lewis recognized the need for a DIYable inkjet platform, and started a kickstarter campaign to build Inkshield: An Open Source Inkjet Shield for Arduino. (Back in stock by March - see the comments below!) InkShield is designed around the HP C6602 inkjet cartridge, a specialty cartridge with only 12 nozzles at 96 dpi, designed to print labels on things like cabling (or... inkjet cartridges!). 96 dpi equals a dot pitch of 265 micron. As you can see in the last image above, the actual nozzles are only about 1/3 of the distance between dots, or about 85 micron - just perfect for our purposes!
The InkShield is designed to be driven from an Arduino, but does need a higher voltage than the 5V the Arduino gets when it is powered from USB. So you'll need to supply a 9-12V input via an optional power connector on the InkShield, or via the power connector on the Arduino.
Step 4: Version 2: Hackteriabot!

The Platform
For our second BioPrinter platform, we built a custom XY platform from a couple of old CD drives, inspired by this beautiful DIY laser cutter / microfluidics platform from our friends at Hackteria:
http://hackteria.org/wiki/index.php/HackteriaLab_2011_Commons#Micro_Manipulator
http://hackteria.org/wiki/index.php/DIY_Micro_Dispensing_and_Bio_Printing
http://hackteria.org/wiki/index.php/DIY_Micro_Laser_Cutter
http://hackteria.org/wiki/index.php/DIY_Microfluidics#Advanced_DIY_Microfluidics
http://hackteria.org/?p=1186
http://diybio.org/2012/06/12/gaudilabalgaepicker/
TL;DR: You pull the mechanisms that move the laser head out of a CD/DVD drive, put two of these at a 90 degrees angle, and voila: XY-platform with a very small build area, but high positional accuracy!
Using the laser head positioning mechanism from a CD drive to build a highly accurate XY platform is not a new idea, of course. Urs at Hackteria credits Peter Jansen on the RepRap Builders list, who got it from his friend Trevyn, who for all whe know may have gotten it from somewhere else:
http://builders.reprap.org/2010/08/selective-laser-sintering-part-8.html
Here's some other versions, via Hackaday:
CNC machine from PC parts
Build a mini cnc machine for $45
Blu-ray CNC looks great for branding and engraving
Laser CNC from Bluray parts
Bluray Laser CNC – version 0.2
Step 5: Build an X-Y Platform From Scavenged CD Drives


Salvaging Parts from CD/DVD Drives
Let's upcycle some crappy old CD/DVD drives that nobody else wants anyway. I was able to find a stack of chunky old drives for only a dollar or two each at Urban Ore in Berkeley. Check your local electronics recycling place.
Disassembling the CD/DVD drives is fairly straightforward. You can use the old paperclip trick to open the tray mechanism.
You may have to disassemble a number of drives to find ones with a stepper motor. At least half of the ones we opened seemed to have a DC motor driving the slide that moves the laser head. If someone knows how to tell the drives with stepper motors from those with DC motors from the outside, let us know! They're easy enough to recognize once you opened up the drive though: DC motor only have two wires, while the stepper motors usually have four, typically on a little flex cable (see pictures above).
As opposed to DC motors, stepper motors can be made to move a discrete number of steps, where each step is a fraction of a full revolution. This makes it very easy to do highly accurate positioning, without needing fancy feedback systems to check what position you're at. 3D printers typically use stepper motors to position the print head, for example.
Using the Stepper Motor
After checking some serial numbers online, we stumbled across one stepper motor labeled PL15S-020, which turns out to be a common and very well documented bipolar stepper motor. Many of the other stepper motors we found look very similar to this one, so we'll just assume they have the same parameters (annotation transfer by homology).
Data sheet: http://robocup.idi.ntnu.no/wiki/images/c/c6/PL15S020.pdf
This particular stepper motor does 20 steps per revolution (not great, but good enough), and the lead screw has a pitch of 3mm per revolution. Therefore, each step of the stepper equals a 150 micron displacement of the laser head - not bad! We could potentially drive up the resolution significantly by doing microstepping. For example, a simple 8x microstepping could theoretically bring the resolution down to less than 20 micron, which seems overkill given the amount of mechanical slack in the system, and the resolution of our print head.
Since we were all teaching ourselves Stepper Motors 101 anyway, we decided to keep it simple and go with full steps. The Arduino.cc website has some Circuits for Bipolar Stepper Motors as well as sample code to drive them. We ordered some SN754410NE H-Bridges to implement the circuit shown in the last picture.
Reduce, Reuse, Upcycle!
Old CD/DVD drives have lots of other cool bits too! There's the tray open/close mechanism containing a DC motor with some low-speed gearing, that can be used for a variety ofother fun tricks. The spindle motor that spins the CD is typically a high performance brushless DC motor, which have been used for very low weight RC planes and helicopters. Plus, a bunch of switches, potentiometers, friggin' LASERS, and the occasional solenoid! Make sure to drop off the leftovers at your local electronics recycling place.
Step 6: Putting It All Together


Materials:
- Two laser head slider mechanism with stepper motors (preferably matching), scavenged from old CD drives. Cost: a few bucks a piece.
- One InkShield kit, with ink cartridge and cartridge holder. Cost: $57
- Optional: additional HP C6602 inkjet cartridges. Cost: as low at $17
- Arduino Uno. Cost: $30
- Two SN754410NE H-Bridge motor drivers. Cost: $5
- Arduino prototyping shield and/or tiny breadboard. Cost: $4-21
- Wires, machine screws, standoffs, enclosure. Cost: Free to $$$, depending on how fancy you want to be.
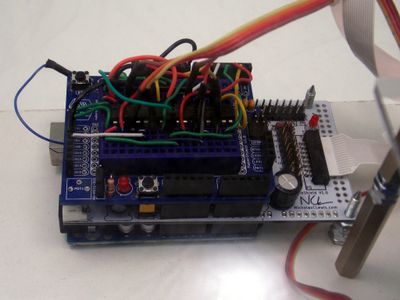
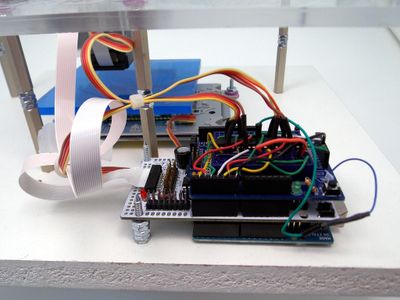
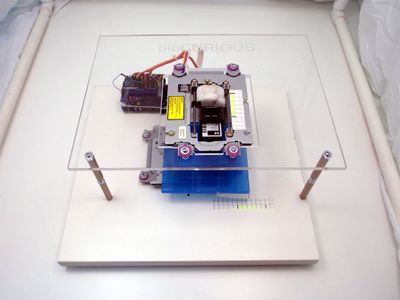
Total cost for our version: about $150, shipping/handling for parts included. The pictures above show two different versions we made. The second one has a nice acrylic top plate, and a lot more space to put things in between.
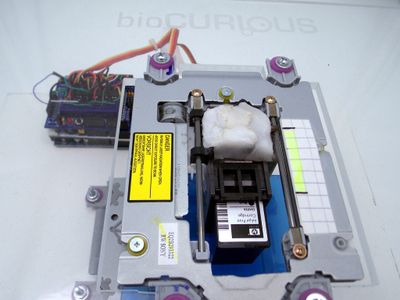
The bottom CD drive mechanism moves the blue plate holding whatever you're printing on (such as an agarose plate). The top CD drive mechanism is set at a 90 degree angle compared to the bottom one, and moves the inkjet print head. We used Shapelock and some screws to attach the bottom platform to the laser head, and to attach the inkjet cartridge holder to the top laser head. The electronics consist of an Arduino Uno at the bottom, then the white InkShield (connected to the inkjet cartridge holder with a nice white ribbon cable), and then a protoshield with the stepper drivers on top.
The gridded paper strips on the bottom and top platforms allow us to track the position of the X and Y stages. Total print area is about 1.5 inch in both directions, with a resolution of 150 micron per step. Note that the resolution of the stepper motors is similar to the resolution of the print head: 96 dpi is a 265 micron pitch, but the dots printed by the print head are clearly separated - more like 150-200 micron.
Step 7: Success!
So here's our first honest-to-god BioPrint... We loaded a liquid culture of E. coli +pGLO into the inkjet cartridge, modified the little "I <3 InkShield" demo Arduino program that came with the InkShield, and printed a couple of lines of "I <3 BioCurious" over and over on an agar plate. (I'll attach some code as soon as I figure out how to do that.) The agar plate was filled almost to the top, to minimize the printing distance.
As you can see, printing with live E. coli cells worked perfectly! We probably let the colonies develop a little too long, so the letters are a bit fuzzy. We get a spray of small colonies from stray cells - probably due to some sputtering from the inkjet head. We may be able to improve on that by adjusting the viscosity or cell density of the culture we load into the cartridge.
But overall, not bad for a first try!
After printing, we disinfected surfaces with bleach, rinsed out the ink reservoir with bleach, and then let some bleach drip-flush through the print head, followed with a lot of deionized water, to make sure no bleach would dry up inside the print head.
It would probably be a good idea to invest in a second hand ultrasonic jewelry cleaner, so you can sonicate the heck out of any dead cells or other deposits that may form inside the print head.
Step 8: Lessons Learned and Future Work
We dug into this project with essentially zero hands-on expertise with bioprinting, driving stepper motors, driving inkjet cartridges, or even programming Arduino! So naturally, not everything we did was as optimal as it might be. Here's some things we might do different next time:
- Learning how stepper motors work and how to drive them was a really valuable learning experience, but we could have saved ourselves a lot of time and effort by adapting some of the RAMPS (RepRap Arduino MEGA Pololu Shield) technology that has already been well developed for precisely this purpose by the 3D printing community. In particular, the Pololu stepper drivers already have microstepping capability built-in.
- Building your own XY stage for essentially free is great! But we are using these stepper motors for something they were never designed for, and it's starting to show. We are already getting some trouble with the bottom stage skipping occasionally, presumably because we've been resetting the sage by hand too often, which puts a lot of wear on the plastic bits that track the worm gear. It would be easy enough to buy some stepper motors brand-new, lasercut a frame to hold them, add some micro switches for end stops, and code a position reset function in software.
- Once you start sourcing brand new stepper motors, laser cutting a frame, and wiring up RAMPS electronics, why not just start with a 3D printer instead? If we get tired with our current BioPrinter version, that's probably the direction we'll go. Cost would likely go up by an order of magnitude or so though...
- Having a single print head has its own limitations. If we really wanted to do some sort of tissue engineering, we'd love to be able to print multiple cell types, and put some scaffolding material in between. We could potentially put two inkjet cartridges back-to-back. The solution the Big Boys in this field use is syringe pumps. Imagine having several syringe pumps sitting next to the printer, each feeding a different printing material via a thin tube to a needle mounted on the print head. Stay tuned...
Now the elephant in the room... What the heck do you do with your own BioPrinter? I don't think a place like BioCurious will ever compete head-to-head with companies like Organovo in terms of printing human tissues or organs. For one, animal cells take a lot of effort to maintain. Plant cells are much easier to work with though! Don't want to give everything away, but stay tuned for some of our next Instructables!
Meanwhile, here are some ideas:
- Print gradients of nutrients and/or antibiotics on a layer of cells to study combinatorial interactions - or even to select different isolates from an environmental sample.
- Print patterns of growth factors on a layer of eukaryotic cells to study cell differentiation.
- Print two or more microbial species at different distances from each other, to study metabolic interactions.
- Set up a computational problem as a 2D pattern of engineered microbes on an agar plate.
- Study Reaction-Diffusion systems
- Print 3D structures by over-printing layers using the inkjet head. Now you can consider doing all the above in 3D!
- Print cell in a sodium alginate solution, onto a surface soaked in calcium chloride, to build up 3D gel structures (similar to spherification process in Molecular Gastronomy)
- More ideas? Post them in the comments!
Step 9: Addendum: So You Want to Do Real Science?
The BioPrinter shown here is obviously just a prototype. But since we've had a very serious inquiries about using this in academic labs, here are some guidelines:
- Delphine Dean's group at Clemson University has been working on bioprinting using a modified HP DeskJet 500. Definitely check out their video on JoVE on Creating Transient Cell Membrane Pores Using a Standard Inkjet Printer! Tons of great information how to deal with an inkjet printer as a piece of lab equipment, how to clean ink cartridges, make suitable cell suspensions, and some intriguing non 3D printing applications.
- We have not yet proven to our own satisfaction that the HP C6602 cartridges can print eukaryotic cells. We likely just have a clogged print head because we weren't sonicating to clean out cellular debris after printing. We'll keep you informed...
- The printing may take a couple of minutes, so keep the printer in the hood to avoid contamination (duh).
- Wrap the electronics in plastic wrap or build an enclosure to keep it dry and clean. Everything else can be wiped down with bleach after using.
- It may even be possible to autoclave the CD drive mechanisms and the print head - only one way to find out! The plastic of the cartridge should survive autoclave temperatures, but might warp. No idea bout any glues used to attach the silicon print head to the plastic cartridge though.
- Any suggestions for how to best reference an Instructable? I'd recommend something like this (in APA Style):
D'haeseleer, P. (2013, January 22). DIY BioPrinter. In Instructables. Retrieved [your time] from https://www.instructables.com/id/DIY-BioPrinter/

First Prize in the
Instructables Design Competition

Grand Prize in the
UP! Contest

Participated in the
SciStarter Citizen Science Contest


