

Introduction: DIY Polymer Clay Snow Globes!


Everyone loves homemade gifts for the holidays- why not make a snow globe? I made 6 of these for my friends this year-- "snow" cool! (Eh, bad pun)
Step 1: Materials

- Mason jar. Baby food jars or other canning containers also work.
- Figurines. The stuff you'd like to display in your snow feature!
- Water-proof glue. I'm using an outdoor adhesive called Amazing QuickHold Contact Adhesive for this project. My second choice would have been Loctite Stick & Seal, they're both impressive glues. Plumber's glue is also handy!
- Mod Podge if you're sealing anything other than clay
- Glitter!
- Glycerine: available at drugstores (optional). It makes the snow move slower, if that's of interest to you--I ended up returning it since I liked it without it!
- eventually, water
I made 6 of these for Christmas/holiday presents for my non-Christmas celebrating friends, totaling less than $25 for 6 people!
I'm going to use polymer clay and make my own snowman for this project, as well as a tree for some extra scenery. This little scene was baked at 275 degrees for 30 minutes on a piece of crumpled aluminum foil. Make sure when you form the foil, it needs to be as flat as possible on the bottom so it can lie flat on your jar lid. Make sure the entire base isn't too big (it doesn't stick out from the bordered part of the jar).
If you include anything other than clay (I used toothpicks), use Mod Podge to seal them. Worth it in the long run!
Step 2: Putting the Figure on the Lid

First, dry fit your figurine, lid, and jar to make sure everything will fit!
Then take the flat part of your lid, and glue your figurine on it! You can definitely do more than one if you'd like, just make sure you stay within the bordered area of the lid, or else it won't fit onto the jar. Some of mine didn't do this--some of my bases were a tad too big.
(Fig. 1: seeing that this figurine didn't have the foil completely flat at the bottom when I baked it, you can see how I couldn't have glued the entire bottom down. It's still glued down, but it could have been better.)
Step 3: Making the Snow Globe


Put in a teaspoon of glitter into the jar, or about enough to cover the bottom of the jar lightly. Too little and it doesn't snow; too much and it'll begin to clump up or worse, it'll stick to your figurines and turn them into living snowman abominations!
Fill the jars about 3/4 of the way full with water. Use a spoon to try to break up some of the glitter clumps. If you put too much in, they'll make huge clumps! Make sure those are taken out. (Optional: add a splash of the glycerin if you have it)
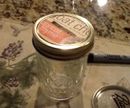
Add your figurine-lid combination, and make sure it's oriented the right way if need be. (I wanted the "Ball" logo to be in back). Then glue around the rim of the lid with the screw on part, and screw on the lid. (Fig. 1: the lid on the bottom when screwed on. I wiped off the extra glue around where it came out from putting too much in.)
Flip over, done! I bought a 6 pack of these jars and made a few more!


