

Introduction: DIY Pool Cover Remover and Putter Onner, V2.0


The movie here just shows the cover in action.
Step 1: Architecture

This contraption consists of TWO basic pieces:
1) The roller.
2) The holders or stands.
Normally, the stands will go at the far side (or "back") of the pool.
Step 2: Materials and Tools


Main Materials
(2) 10-foot drain pipes (approx $8 each)
(1) 8 foot 2x10 board (approx $10 each)
(2) 8 foot 4x4 fence posts (approx $10 each)
(1) 4 foot 2x4 board (approx $2 each)
Supporting Materials
(1) box o' 2.5 inch deck screws
(4) Long L or 90 degree shelf brackets
(1) Roll duct tape
(1) Roll tread tape
(1-4) Glasses Chardonnay (just checking if anyone is reading this)
(optional) 4-8 pieces of 12-16 inch rebar
Tools
Drill
Level
1/8 inch drill bit
7/8 inch drill bit
Box cutter/sharp knife
Clamp
Measuring device
Step 3: The Roller

The roller is basically an 18-20 foot pipe that will roll across the top of the pool, so it has to be at least a few inches longer than the width of the pool. I used two 10-foot drain pipes sold at the local Home Depot.
Note that the pipes here have a built-in "coupler" that allows you to sort of put them together in series.
Step 4: The Roller: Couple Pipes (if Needed)

If your roller pipe is shorter than the widest part of your pool, you'll have to couple a couple of them together to make a longer one.
Attach the pipes so that the result will reach across the widest part of the pool. My pool is 16 foot so I cobbled up the two pipes which resulted in a total of 20 foot. I may cut it down to a shorter size, but for now I left it as a 20 footer.
As mentioned, the pipes I purchased had built-in couplers that allowed them to be connected easily (though not strongly).
If you had to couple multiple pipes to create one long one, wrap the joints where the pipes meet with duct tape.
Step 5: The Roller: Drill Holes on Both Ends of Pipes

Create a 7/8 inch hole through each end of the pipe, approximately 3-7 inches from each end.
After creating the hole, use a sharp knife or box cutter to create cuts round each of the holes.
Why?
The holes will eventually be used to hold a broom stick for leverage when rolling the roller, and these extra cuts will allow a standard 1 inch broom handle to slip in through the holes a little easier. (Or you could just drill the holes larger; I prefer a smaller hole and the cuts so that the stick doesn't slip.)
Step 6: The Roller: Put Cover on Pool

Put the cover onto the pool.
Why?
It's much easier to do this with the cover on. (That's why this is version 2.0)
Step 7: The Roller: Put the Pipe at the Front of the Pool

Place the pipe across the front end of the pool. It will lie over the top of the cover.
Step 8: The Roller: Tape Cover to Pipe

Roll up the edge of the cover and tape the cover to the pipe using tread tape.
Hint: pre-cut a dozen or so 6 inch strips.
This cover is round, so I taped up about the first foot for about 5 feet
Step 9: The Roller: Tape Over Tread Tape With Duct Tape

Cover up the tread tape with duct tape.
Step 10: The Roller: Result So Far

The roller is finished.
Step 11: The Roller: Insert Broom Handle. . .

Insert a broom handle or something similar into the holes at the ends of the pipe, this will give you better leverage when rolling the roller . . .
Step 12: The Roller: in Action . . .

Here is the grandkid rolling back the cover, like a opening a can of sardines...
Step 13: The Roller: the Gist

You can actually use the roller right now to unroll and roll the cover as shown here during a test roll.
Step 14: The Stands: Cut Lumber

Your lengths may vary based on how high you want the stand to be and how wide you need the feet to be for stability. Here are the basic dimensions that I used for the Intex 16 foot pool.
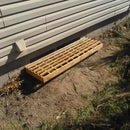
Step 15: The Stands: Attach Posts to the Feet


Using the L brackets, attach one of the 4.5 foot posts to one of the footers.
e-enforce the post to the footer by drilling from the bottom of the footer into the bottom of the post. Alternatively, you can toe- nail screws into the joint between the post and footer from the top of the footer.
Step 16: The Stands: Add Toe and Heel Reinforcement

Cut the remainder of the 4x4 post in two and use each as a "toe" and "heel" for the stand's footer.
You can also drill a few holes through the footer in the intent to add stability using rebar at a later stage.
Step 17: The Stands: Position at Rear of Pool, Fit for an Arm

Place the stand at the rear of the pool and clamp one of the short 2x4's at an angle that will allow you to easily roll the roller into the crotch created between the arm and the post. Use a clamp so you can move it around to get a good feel of where it should be.
Here, the arm is positioned a little above the pool edge and at an able of about 30 degrees.
When it's in a good position, permanently attach the arm using screws and remove the clamp.
Step 18: The Stands: the Gist


One stand is complete. Repeat the process for the other stand.
Here is one stand, with some paint slapped on and a solar LED lamp on the top.
For more de-uglification, you could round off the corners or even attach a few training wheels to the stand so that it could be rolled out of site.
Also, as mentioned earlier, at this point you could drill holes through the feet and pound some rebar through the holes into the ground to help its stability.
Step 19: Complete

Tada.
As mentioned, not perfect, but it is easy.
Other DIY pool cover links:
http://www.diychatroom.com/f2/diy-pool-cover-reel-system-tips-44558/


