

Introduction: Dancing Meerkat


Preface
Dancing meerkat is happy mp3 player that turns on a laser pointer at a distance of about three meters. It plays songs and fairy tales stored on the SD card.
Description
The entry point is a photo diode that reacts to light a laser pointer. Positive signals from the photo diode evaluate Arduino controller that turns on servomotor, lights up LEDs and asks the mp3 module to play the song.
I thought about using your own speakers, but it would be necessary to use an amplifier. (The audio output from the mp3 module is only sufficient for headphones.) Using external speakers we get more quality sound.
Step 1: Components


- LM393 Light Sensor Module
- Arduino Nano
- Catalex serial MP3 Music Player
- Mini SD card
- Servo Motor
- 9V Power Adapter for Arduino
- DC Power Jack
- 2x LEDs + resistors
- Wires
- Box
- Laser Pointer
All components are readily available for instance on www.aliexpress.com.
I chose an Arduino Nano, because it is small and has FTDI on the board. This is ideal for easy reprogramming. I used MG90S Micro Servo. This servo has metal gears and is noisy. I suggest you use another. I chose Piranha LEDs because they have high luminance and low power consumption. To communicate with the mp3 module exists a good library. I was surprised by the sound quality and seamless reading from the SD card. The wooden box has a size of 12x12x12 cm.
Step 2: Preparations


It can be useful:
- Soldering iron
- Fusing tape
- Melting gun
- Pliers
- Shrink tubing
Drilling
Drill a hole for the servomotor, for the DC power jack and for the photo diode. Before drilling plan the installation of components in the box.
It is important to remember three important things:
- You need to have easy access to the potentiometer on the light sensor.
- You need to have easy access to the SD card.
- You need to have easy access to the USB port on the Arduino controller.
Step 3: Wiring Components


LM393 Light Sensor Module
Module has analog and digital output. The digital output is connected to the potenciometer which change the borders of light. This is handy because when you want to change the boundary of light it is not necessary to modify the software. I used a digital output.
Catalex serial MP3 Music Player
I used a 2GB SD card Kingston formatted to FAT16. Specification of module says that it is possible to use Micro SDHC card up to 32 GB.
On the card I recorded a song named 001.mp3, 002.mp3, 003.mp3 .... Specification of module says that files can be also named as 001xxx.mp3. This is useful if you intend to upload multiple files.
I used Audacity for edit and trim some MP3 files. In Audacity you can also change the sampling frequency, but it was not needed.
Remember that the RX connection from the controller has to go to the TX pin on the MP3 module. And the TX connection from the controller has to go to RX pin to the MP3 module. Cross.
Arduino TX -> MP3 RX
Arduino RX -> MP3 TX
On the controller creates a software serial interface. So do not use the standard RX, TX hardware pins (0 (RX) and 1 (TX)).
LEDs
LEDs require resistors. I used 470 Ohm, but your diodes can be different. For easy calculation of resistor size I used useful ElectroDroid.
Step 4: Meerkat


I opened the photo of meerkat in editor Gimp. I mirrored the photo and put it under another name.
Image -> Transform -> Flip horizontally.
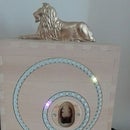
Both photos - the original and the mirrored - I printed, cut them and pasted them on hard paper. The picture of meerkat is two-sided.
For fixing of picture I used a piece of wooden slat in which I cut out the groove and drilled two holes. The slat I fixed on the shoulder of servomotor.
Photos can be easily replaced .
Step 5: Programing
Songs play in random order, but it is easy to change.
The complete code and the ArduinoSerialMP3Player library is attached.
Code
/***********************************************************/
#define mp3 Serial3
#define LED1_PIN 2
#define LED2_PIN 3
#define ARDUINO_RX 5  //connect to TX of the module
#define ARDUINO_TX 6  //connect to RX of the module
#define SERVO_PIN 7
#define LIGHT_SENZOR_PIN 8
#include "mp3serial.h"
#include "Servo.h"
const int SERVO_START_POSITION = 90;
const int COUNT_OF_SONGS = 9;
Servo servoMotor;
boolean isDancing = false;
void setup() {

  mp3.begin(9600);
  delay(500);
  sendCommand(CMD_SEL_DEV, DEV_TF);
  delay(200);
servoMotor.attach( SERVO_PIN ); servoMotor.write( SERVO_START_POSITION );
  pinMode(LED1_PIN, OUTPUT);
  pinMode(LED2_PIN, OUTPUT);

  randomSeed(analogRead(6));  // unused unalog pin
}
void loop() {
if( !digitalRead( LIGHT_SENZOR_PIN )){
playSong();
lightUp();
isDancing = true;
} if( isDancing ){
letDance();
} // Check for the answer.
if (mp3.available()){ // Song just ended
if( findText( "Completed play", decodeMP3Answer()) != -1 ){
isDancing = false;
lightDown();
servoMotor.write( SERVO_START_POSITION );
}
}
}void playSong(){
sendCommand(CMD_PLAY_W_VOL, 0X0F00 + getRandomSongNumber() );
}void letDance(){
servoMotor.write( random(0, 180) );
delay(500);
}void lightUp(){
digitalWrite(LED1_PIN, HIGH);
digitalWrite(LED2_PIN, HIGH);
}void lightDown(){
digitalWrite(LED1_PIN, LOW);
digitalWrite(LED2_PIN, LOW);
}//-- UTILS -----------------
long getRandomSongNumber(){
return random(1, COUNT_OF_SONGS + 1);
}int findText(String needle, String haystack) {
int foundpos = -1;
for (int i = 0; i <= haystack.length() - needle.length(); i++) {
if (haystack.substring(i,needle.length()+i) == needle) {
foundpos = i;
}
}
return foundpos;
}Have a good time.


