

Introduction: Darth Raver- the Glitter Manace


Darth Raver is one of those projects that's been gestating for a long time. I bought this mask at a thrift store a few years ago. I destroyed the voice changer during an ill-advised attempt at circuit bending, so the mask sat on a shelf in my work shop. I bough a few large stuffed Easter bunnies to harvest their pink fur and I decided to use the scraps to make a Darth Bunny. I primed the helmet and quickly lost interest in the project, returning it to the shelf.
The library that I volunteer at is having an Anime convention this weekend with a dance on Saturday night. I'm not really a cosplayer, but I remembered the Darth Vader mask in the shop and started playing around with ideas. When I saw the glitter paint and fluorescents, Darth Raver was born.
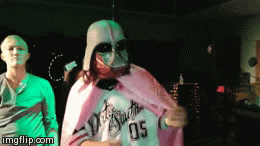
Grumpy Jedi is not impressed.
Step 1: Preparing the Helmet


I prepared the mask by disassembling it and cleaning all the parts. I set the lens assembly aside for later. I rinsed and dried everything completely and wiped it all down with an alcohol rag to remove any grease or schmutz.
Step 2: Painting the Helmet


I primed the helmet with primer. All the paints I used were from Rustoleum products. I gave it several coats of silver glitter paint and sealed it with triple thick glaze. I masked off the center ridge of the helmet and sprayed it with pink glitter and then gave the whole thing a final coat of triple thick glaze to seal the glitter.
I gave the mask an undercoat of lilac in a satin finish. The fluorescent paint is translucent so a light colored base coat brightens it up a lot. Next I gave the whole thing a couple of coats of fluorescent pink. I coated the top surfaces of the mask with fluorescent green and then highlighted it with silver glitter. I highlighted the underside with pink glitter and filled in the nose and mouth grille with silver glitter. When everything was dried I sealed the whole mask with triple thick glaze and let it dry again. Since I was done with the spray paint, I reinstalled the lens and added black detail to the edge of the grille and the two protrusions. I also added adhesive gem stones to accent the grille, eye line and neck.
Step 3: Adding Color-Changing LEDs


To take Darth Raver to the next level I decided to add some color changing LEDs around the inside of the helmet to illuminate the mask. I used to work at a theme park that had concerts, haunted houses and night time events. They sold over-priced beer in fancy mugs with LEDs that flashed different colors when you picked them up. The LED units fell out of the bottom a lot, so I'd walk around collecting them. They're a great way to add light to a project with very little effort. These LED assemblies have a switch on the bottom that stops the flow of electricity when they are on a flat surface. Since I want to mount the lights flat inside the helmet, I had to remove the switch. I simple used a pair of side cutters and snipped off the protruding button. I mounted the LED units on the lower flare on either side of the helmet.
Ta Da! Darth Raver is ready to dance! I'll add some action pics after this weekend.
And here it is- Darth Raver in action. I love the disdain from the grumpy Jedi at the end-
Darth Raver- The Glittery Menace from chuck stephens on Vimeo.
It's not all long-distance throat crushing and kidnapping princesses- sometimes you just have to glitter up and cut loose.
Step 4: Follow Up

And here it is- Darth Raver in action. I love the disdain from the grumpy Jedi at the end-
Darth Raver- The Glittery Menace from chuck stephens on Vimeo.
I was expecting some of the hard-core SW fanboys to see this costume as a 'fandom menace', but responses to the mask were very positive, including a couple of offers to buy it. I wore it off and on throughout the day while working a booth at LameCon with my robotics team and it was a lot of fun, albeit kinda hot. I think I may need to add a small fan behind the grille in the muzzle area.
It's not all long-distance throat crushing and kidnapping princesses- sometimes you just have to glitter up and cut loose.

Participated in the
Fandom Contest


