

Introduction: Bamboo Cargo Bike (Tiki Bike) - Updated 12/8/2017


Design and Inspiration
This is my first Instructable, so please forgive me if it does not read the way you would like it to. This is a build diary of sorts. There is a lot of information written as tags on the pictures, so make sure to examine those if you choose to use this instructable.
I had been pining for a Harry vs Larry Bullitt cargo bike ever since I saw one. Unfortunately, I cannot afford to buy one. One day, a friend of mine challenged me to build my own cargo bike. I have experience putting together bikes from spare parts, and I will admit that I think about bikes perhaps more than is healthy, but I have NEVER made a bicycle frame. I do not know how to weld. I am not even a skilled woodworker. For some reason, though, I could not say no to the challenge.
When I first considered this project, I knew immediately that it would be made out of bamboo. My lack of welding equipment and skill forced this decision. I began to read as much about bamboo bike construction as I could - bamboo preparation, epoxy use, natural fibers, etc. At the same time, I read anything about longjohn cargo bikes (aka bakfietsen) that I could find. In addition, I ran out an found a Harry vs. Larry Bullitt to rent so that I could be sure that I liked and understood the benchmark machine. There are so many excellent resources available online. I will mention only a couple here:
Building a Bamboo Bike - This was truly an excellent resource.
Amy Qian's project - Drove the Keep It Simple Stupid (KISS) philosophy home.
Instructables had numerous build resources that were very helpful as well.
As I read and read, I also began to think about and sketch my design ideas. I took my time (because I had no choice) and drew many ideas out in scale. This was very helpful for me, but in the end, the availability of materials governed the final design. It was nice to have a well thought out blueprint to guide the process, though. The Larry vs Harry website kindly makes available a wealth of information about their cargo bike's dimensions, so the Bullitt was a convenient model. I had trouble finding hard numbers for steering geometry for longjohn cargo bikes, however. I knew that the bikes benefitted from "low trail" steering, so it was clear that I would have to have the fork for the project in hand before I could make detailed predictions about head tube angles, steering clearance, head tube height, etc. Eventually I aimed for ~45mm of trail and used this handy Bicycle Trail Calculator to determine my head angle.
My design has one feature that deserves separate mention here because it had a huge impact on jigging. Most metal bakfiets designs have a central large tube joining the cranks to the front of the bike - a boom, if you will. The steering tube typically crosses or pierces this boom tube so that the steering linkage can operate below the cargo area. I knew that piercing bamboo would weaken the material, so I went with a twin boom tube arrangement that tapered at the bottom bracket in order to clear the cranks. The boom tubes essentially "hugged" the metal steering tube. Great! But also not great. Because of this arrangement, I could not assemble the frame flat on its side. Most of the bamboo bike projects I saw assembled the front triangle of the frame horizontally on a flat surface in order to ensure that the heat tube and seat tube were in good planar alignement, and to ensure that the bottom bracket was perpendicular and centrally aligned as well. Because my boom tubes tapered, this would not be possible for me. As you look at the build photos you will see what I am talking about. I was forced to build with vertical jigging, and this cost me many weeks of hand-wringing about how to suspend the metal parts in space while maintaining good alignment. It worked out beautifully in the end, but it was a headache.
My last bit of preamble is that this project was very time consuming at almost every phase: design, frame assembly, joint wrapping, finish work, accessorizing. If you plan to do something like this, know that there were at least 4x the number of joints and poles to manage on this frame as compared to a typical bike frame. This dawned on me shortly after I started shaping and joining the first poles. That 4x multiplier has to be applied to every step of the process, so budget time and resources appropriately. Take your time, and you will be rewarded.
Step 1: Materials


I tried to source materials locally if possible (and by "locally" I mean I scoured my basement first). I did not have donor bikes lying around for this project, but I did have a reasonable work bench that could be levelled and used as a build headquarters.
Metal parts: I purchased most of my metal frame bits from Nova , but Paragon Machine Works makes even nicer stuff. I stuck with Nova in order to minimize shipping costs. I mistakenly assumed that since the head tubes were bike specific tubes, they would not need milling to fit a headset - WRONG. I bought the following for about $100:
- Headtube - a 44mm ID steel headtube (enough for two projects) for zero-stack headsets. Finding a bike shop with the proper 44mm ID facing and milling tool was an unexpected challenge. In retrospect I would go with a more traditional external cup unit. I had specifically chosen the 44mm arrangement so that I could run an adjustable headset if needed ($150 for an Angleset, but in case I screwed up the steering geometry I wanted a 2nd chance option). Also, it is worth mentioning that Harry vs. Larry forks are being made with tapered steer tubes, so 44mm is the minimum headtube diameter that will work with those newer forks.
- Steering tube - the longest headtube I could find was an aluminum one measuring about 24" and designed for a 1 1/8" external cup threadless headset. A longer tube would have been nicer, but I did not have a way to machine the inner surface, so I stuck with a bike specific product - this turned out to be foolish since the bike specific tube needed milling regardless. If I had the cash, a carbon fiber tube would have been badass. I should have had both tubes milled and faced to accept headsets BEFORE building the frame - don't make the same error.
- Seat tube - to be inserted into a suitable bamboo tube and act a sleeve for a 27.2" seatpost. Many builders recommended against simply sliding a seatpost into a bamboo tube without a metal sleeve. Know that seat tubes are tapered on one end to closely fit your seat post. Make sure you trim the correct (non-tapered) end.
- These dropouts to allow the use of an internal geared hub and disc brakes. Also, these dropouts looked like they would work well in an epoxy plug after some scoring. Lastly, these dropouts have integrated disc tabs, so a disc brake bridge between seatstay and chainstay would not be necessary.
Fork: I managed to get an actual Harry vs Larry bike fork from a local dealer...actually a local saint. I had trouble finding a ready made 20" steel fork with a 1 1/8" steer tube and provisions for a disc brake. My other option was to have someone weld a disc brake tab to a BMX fork.
Bamboo: I was all set to buy bamboo poles from Frank's Supply at a cost of almost $200. I got very lucky and a neighbor introduced me to someone with an unwanted bamboo forest smack in the middle of the city. I was able to harvest a good selection of poles up to 40mm in diameter for FREE! I did this in February, which was nice because there is a theoretical advantage to harvesting bamboo in the colder months. I harvested more than I needed because I had no way to predict how many I would loose to cracking during the curing process. It turns out I lost very few. Allow at least 2-3 months for curing, otherwise your poles will continue to shrink after you have built your frame - no bueno. The poles that cracked in my case were the ones with sexy bends in them - kind of a shame. I cured my poles by stacking them horizontally in my basement with attention to maximizing airflow. I turned them once after about 3 weeks. I did not bother breaking nodes and I did not bother with blow torching the poles because I found conflicting advice on the topic...besides, I had too many poles to deal with.
Epoxy: There are several products available that would work fine in the epoxy realm. I went with West Systems because many of the sources I found had positive experiences with their products, and I could order quickly through Amazon. Super Sap CLR from Entropy Resins is allegedly what Craig Calfee uses on his bikes. Their prices are reasonably competitive with West Systems. Since I used 2 qts of epoxy and 2 pts of hardener on my build (I would have liked to have 3qts available as a cushion), the price differential between the two products is neglible. West Systems can be purchased in smaller quantities, however. I had originally planned to do my tacking with Gorilla Glue, but when I saw how its volume expanded as it cured, I immediately abandoned that idea since the expansion would likely push poles out of alignment. I ended up using epoxy thickened with ordinary wheat flour to bond joints, and epoxy colored with ground coffee for wetting fibers (more on this later). UPDATE 12/1/2015: I used Raka's low viscosity epoxy system on the repairs discussed at the end of this instructable. Raka's product is a good deal cheaper than West Systems, but the odors are stronger, the epoxy more viscous and messy. In general, I prefer the West Systems product due to ease of use. The Raka product certainly gets the job done, though, and the price is right.
Wrapping fibers: Bamboo bike frames are held together by joints made from epoxy-soaked fiber joint wrappings. You can use any fiber with reasonable tensile strength to make the joint wrap matrix. Many folks opt to use carbon fiber tow. Calfee and others use natural materials, such as hemp bast fibers. I researched my options exhaustively before finally just picking up a 50' roll of 3/8" Manilla rope (actually abaca fiber) from my local Home Depot. The thought of sanding away at carbon fiber in my house was very unappealing. I opted to skip hemp bast fibers because it seemed silly to hunt for a faraway source of a rare fiber when extremely strong abaca fiber rope could be purchased at any hardware store and cut to custom lengths. In retrospect, using a flat weave carbon fiber tow, maybe 3/8" wide or so, would have yielded more uniform joints that would have required far less sanding than my rope joints...which I didn't sand anyway. UPDATE 12/1/2015: I used 12K CF tow and 1" wide CF twill tape on repairs discussed later. The CF requires a lot more careful handling than the manila rope fibers. Using CF with the thicker Raka epoxy was a pain. If you decide to go with CF tow and tape, I would use the widest tow you can find (higher "K") and tape that is as wide as you manage. The strands of the weave and tow will try to come apart as soon as you start handling the material.
Tools: There are many tools that were helpful for this project. I will mention the standouts.
- Thin kerf pull saw: this saw was my right hand. Far better than any power tool for cutting down raw poles, sizing cured poles, trimming length during assembly, etc. I used the one shown in the hotlink.
- Dremel tool: I used a simple variable speed model and a number of attachments (see image in this section). The 115 cutter and the EZ-lock cutting disc were by far the most useful attachments. Very handy to have, but the rasps were much faster for removing large amounts of material when fashioning miter joints. The Dremel had the edge in shaping epoxied joints and quickly removing the outer skin of the bamboo, however.
- Rasps/files: I used a couple of rasps to do a lot of mitering. Invaluable. I also found files to be very useful for sculpting a clean edge between the joint wrap and the bamboo poles during the finishing steps.
- Mixing sticks (popsicle sticks).
- Rubber gloves: Invest in decent dishwashing/cleaning gloves that cover your forearms. Wash the uncured epoxy off of them with rubbing alcohol or Gojo hand cleaner between uses. This works far better than nitrile gloves, which break easily during the joint wrapping process, even when doubled/tripled up. You will get epoxy everywhere, guaranteed. Prepare for this.
- N95 dust mask and safety glasses. More for the grinding/sanding involved in shaping poles than anything else. The epoxy odor was minimal in my case.
- 1-2-3 blocks: I bought 2 pairs especially for this project, and they were super helpful. Not at all a necessity, but they were well worth the money for me.
- Handheld power sander: Very helpful. Invest in a stacks of 50, 120, and 220 grit sandpaper if you plan to sculpt Calfee-like joints.
- SOLO cups for mixing epoxy (I used the smaller variety rather than the college kegger variety)
- Electrical tape: for wrapping joints and squeezing out excess epoxy. I experimented with expensive contractor grade, middle of the road grade, and el-cheapo rolls. The expensive stuff resisted snapping a little bit better, but honestly, if you rely on successive layers to provide compression, you can use a lighter touch and cheaper tape. In the end, I could not justify spending $4/roll of tape at the rate I using the stuff. For a project like this, you can easily use 8 or more rolls of tape. Easily. I perforated the tape with a drill and my smallest bit. A push pin can also be used (see Amy Qian's blog).
Step 2: Getting Started: Assembling the BB/Seat Tube Cluster


Before starting assembly, remember to prep all metal surfaces that will need to bond tightly with epoxy. There are various opinions on the web on how to do this. What I found suggested that steel required little prep beyond a thorough degreasing (I used isopropyl alcohol) and some roughing up (with sandpaper or a file). Aluminum apparently requires a more careful surface prep for a good joint since it oxidizes quickly after sanding. What I did was to 1) sand the tube surface with 50-80 grit sandpaper, 2) immediately wipe clean with isopropyl alcohol, 3) let dry for a minute, 4) apply a thin coat of epoxy to the prepared tube surface a soon as possible before significant oxidation occured. I did not use stainless steel or titanium parts, so I cannot comment on how to prepare those materials.
In this step, I first selected the straightest pole I could find whose inner diameter was a close fit for the metal seat tube insert I was using. The pole I used had a ridge on one side that required gentle filing down. I made sure I could sink several inches of steel insert into the pole before trimming the insert. Remember, you can only trim one end of the seat tube insert! So mark which end is OK to cut and which is NOT OK to cut. Meaure twice and cut once. The insert was bonded to the pole using slightly thickened epoxy. Try to clear excess epoxy out from bottom end of the insert to ensure that your seat post can be lowered beyond the bottom of the insert. I chose to drill a hole and cut a slot into the top of the insert (to allow the seat post clamp to work) before bonding, but I suppose it could have been done after the gluing as well.
Knowing how much filler to put into your epoxy mix in order to achieve the right consistency will require some minimal trial and error. It's easy. And finely ground wheat flour seemed to work fine for me. I did not see the need to buy fumed silica or microballon fillers.
A word about mitering: many other folks have had good success with mitering software/apps that allow them to predict the shape of tube miters. I played around with a popular web based program, but the results were inaccurate and the process was time consuming. I am 99% sure that operator error was to blame, here. However, shaping the miters freehand with a rasp and frequent checking was very effective. It was also fast. Since I had countless non-reproducible miters to shape, I abandoned the software and never looked back.
Step 3: Boom, Rear Triangle, Front Triangle Assembly


Once the BB/ST was ready, the next step was to get the boom poles and rear triangle started. This is when the production moved to the large flat work table. I used scrap wood, PVC tubes, as well as drawn straight lines to arrange the positions of critical parts. Namely, the dropouts, BB, and steer tube all had to be lined up properly in the horizontal and vertical planes. This is where the scale drawings came in very handy. It is important to know the relative heights of the rear axle, front axle, bottom bracket, head tube, and steer tube from the ground before you set up the table and jig.
In essence, the "jig" for this frame was more of a scaffolding, with individual pieces that could be glued up, taken down, and moved. This portability was essential because my table was not long enough to accomodate the entire length of my project. The plan was to glue up the rear triangle, move the scaffold backwards, and then glue up the front end. The important pieces of the scaffolding are labelled in the pictures. Specifically they were: a) the steer tube mast, b) the BB/ST bridge, c) the dropout mast and bridge, d) the PVC head tube mast. There were additional little bits used to prop up and support the tubes here and there.
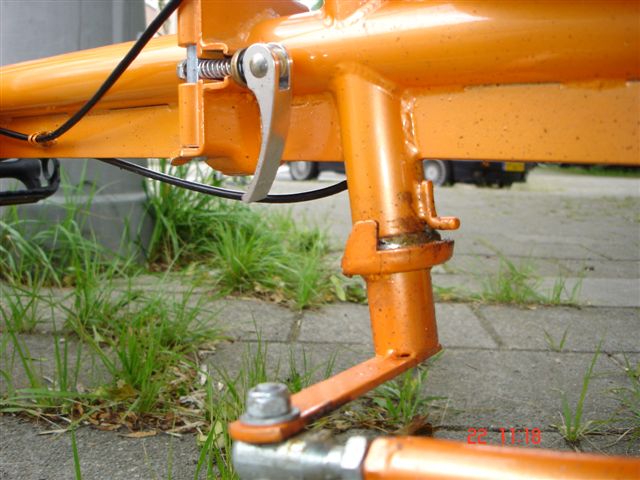
I started by suspending the steer tube as straight and vertically as I could manage with the help of a mast constructed out of a large dowel and a piece of plywood. The dowel outer diameter should be close to the steer tube inner diameter to minimize movement. Any gap should be taken up with layers of tape on the dowel (at the base and the top of span that is covered by the steer tube) in order to allow the tube to move freely up and down the mast, but not side to side. The bottom of the steer tube is where the tabbed steering rod will eventually protrude from. This tabbed rod (example) has to clear the boom tube, so it defines the lowest point of the frame.
The heights of subsequent scaffolds for the bottom bracket, the rear dropouts, and later on the head tube, were determined in relation to the height of the bottom of the steer tube from the table (I also factored in the bottom stack height of the headset I planned to use because I am anal like that). This is why you need a detailed scale drawing. My drawing also took into account crank arm length so I could predict pedal strike. In all honesty, you can simply copy the Bullitt numbers and be assured that Harry vs Larry did their homework.
Once the steer tube mast was erected, I got to work on a BB scaffold. This was a bit of an evolution, and so I am glad I used wood - easier to modify. I had the ST/BB threaded onto a long rod. This was accomplished by taking the BB to a hardware store and checking all the PVC end caps one by one until I found a pair that fit snugly. I then drilled a 3/8" hole throught the middle of each - Amy Qian's website (see Intro) describes a nice way to do this. I could now mount the BB/ST arrangement on a threaded rod, which I subsequently suspended off the work table at the proper height to achieve the BB height I was hoping for in the finalized bike. I eventually notched one of the BB/ST bridge members so that I could remove and replace the BB/ST as needed while I metered and tapered the boom tubes.
The next scaffold was the dropout mast. Nothing exotic here. In fact I abandoned exotic aluminum jigging and simply went with a wooden mast and threaded rod. Glue and cable staples kept the rod from moving atop the mast. The dropouts were arranged to fit a 135mm hub. Remember to put your disc dropout and your derailleur hangered dropout on the correct sides! By now your table should be labelled "drive side" and "disc side" as my table was so that you can continually double check the correct placement of drive side components.
Straight lines drawn in right angles on a flat table are essential to making a ghetto, homemade frame jig like this work. Always ask yourself where the sources of error might be. Get OCD about the planar alignments of your BB, head tube, and dropouts, as this will ensure that your pedals and wheels are in good alignment. Having an upright seatpost is also pretty important. Once that is all dialed in, the rest of the poles can be more crooked than Wall Street without affecting the way the bike rides.
The pictures above are annotated with additional advice and explanations of the process. The actual business of gluing together tubes and dropouts, etc is covered in depth in the Building a Bamboo Bike tutorial I linked to in the Intro.
Step 4: Move the Scaffold to Allow Assembly of Head Tube Section and Cargo Bay


After the boom tube, rear triangle, and front "triangle" were glued up, the structure was secure enough to be removed from the scaffold. The scaffold was taken down and moved backwards far enough to allow space to attach the head tube mast at the front end of the table. The steer tube mast/scaffold cracked at this point, but it was no big deal. The steer tube was already firmly attached to the boom. I still needed the steer tube mast to realign the frame to the midline, however. Once the scaffold was repositioned and glued up, I fine tuned and double checked the position of the head tube and it's mast before gluing that to the table as well.
The head tube mast is described in the pictures. It was constructed out of PVC pipe bits. It is nothing special but it solved a huge problem for me - I employed the "sleep on it" strategy of problem solving again and again for this project to great effect. Once the boom tubes were attached to the headtube, I could get to work assembling the cargo area. There was a lot of mitering and fitting going on, which was quite enjoyable.
Step 5: Tubes Tacked, Freed From the Jig, Joint Wrapping Time


When all the tubes were tacked together with thickened epoxy, the scaffold was permanently retired. I used a round file and a Dremel tool to cove and shape the cured epoxy. You don't need to go overboard since the joint wrap will cover these parts. How much coving the the epoxied joints contributed to strength of the final frame, I cannot even guess...but deep down inside I think this is an optional step.
Wrapping the joints was the next step. This phase of the project was very messy. I tried masking some of the frame as an experiment. I realized that masking didn't really save me any time, and I cannot recommend it. It is in this phase that a project like this becomes different from an ordinary bamboo bike project. There were so many joints to manage. I started with non-essential joints to work out any kinks in my wrapping procedure. After much trial and error I settled on a system:
- First separate a 3.5 foot length of 3/8" Manila rope into its 9 strand bundles (see pics).
- In a SOLO cup use one pump of both the epoxy and the slow hardener, mix well.
- Add about 1/3 tablespoon of ground coffee to the mixed epoxy and mix again.
- Coil 2 bundles of Manila strands around two fingers and shove into the epoxy cup.
- Massage until the rope is evenly coated in epoxy. Flip the coils over in the cup and massage some more.
- Wrap a joint, taking care to pull the wrap tight. There is a really anal retentive treatise on how to wrap these joints in the Building a Bamboo Bike primer I linked to in the intro.
- After 2-3 wraps, bind with perforated electrical tape (sticky side out) using successive layers to achieve proper compression.
- Secure the end of the tape with a spring clamp and allow to cure.
In my case, it was easiest to take down the tape wrap after the epoxy had cured for about 4-8 hours. Often times I would wrap joints at night an take down the tape 10 hrs later in the morning. My progress was very slow, but if you had freedom from work and family, you could bust this wrapping business out in less than a week. The only rate limiting issue for me, by the time I got familiar with the procedure, was the availability of clamps (which are cheap).
Step 6: Finishing the Frame


Finish work takes forever, so plan accordingly. By this point, the thought wrapping every joint more than necessary in order to sand them smooth was deeply offensive. So I left wrapped joints unsanded. But sanding the poles, cleaning the junction between he wrappings and the poles with a file, polishing metal, and finally applying varnish took a long time anyway. The results are worth it, though. Despite unsanded joints, the frame looked dynamite after it was cleaned up. Sanded Calfee joints look even better, but there was no way...no way.
If you have made it this far, then you have probably developed opinions about and familiarity with all your hand and power tools. I will not tell you how best to do your finish work. In my case, I used the Dremel with a 115 cutter to remove the bamboo outer skin layer. Then I finished the job with an orbital hand sander loaded with 50 or 80 grit paper. I then used a file to clean the transitions between joints and poles. And finally I used the sander again with 220 grit paper to smooth up the poles and transitions before wiping clean and varnishing.
I used spar varnish to protect the frame, but there are many other options including epoxy, boiled linseed oil, paint, and so on.
I ran into a few minor issues at this point. I needed the help of a knowledgeable guy with a torch and a machine shop to make a tabbed steering tube (example...mine was nicer) and linkage rod. I did not feel like going the cheap route here, because I wanted the steering to be done right the first time. It was the most expensive single part of the project at ~$200 thus far, and it was money well spent. In addition, I needed to have my head tubes machined for headsets, and in the case of the steering head tube, this required modifying a reamer for the job. Luckily I had skilled bike mechanics in my corner who helped me solve the problem. This is why you must prep all your metal parts ahead of time! I got lucky. You may want to discuss your choice for a steering tube (be it a bike specific tube or a piece of pipe) ahead of time with the person eventually doing the reaming.
Step 7: It Works!


The project is not finished yet. The bike still needs a bench and floor. It still needs proper wheels and a multi speed drivetrain. But what I have so far works beautifully. It carries 200lbs of cargo without flinching (not including the 175lb rider). It flexes a bit with that kind of a load. The long seat mast also sways a bit, and frankly makes me nervous. In retrospect I should have added triangulation to support the seat mast. If you are considering such a project, know that it was worth every ounce of blood, sweat, and tears that went into it. I will update this instructable when I get around to adding the floor and bench. The kickstand is a long way off, but not a pressing matter right now. Please feel free to ask me questions here. I will try my best to support other builders out there. I would love to see more homemade cargo bikes out in the wild.
For those of you who are made of money, how cool would it be to make one of these out of carbon fiber poles?!?
As for total cost, to my best recollection the itemized bill is as follows:
- metal parts ~$100
- fork $90
- bike shop work $270
- epoxy and rope $140
- tools and jigging material...dunno, but PVC pipe is cheap, whereas aluminum angle is not.
- Cost of wheelset and brake housings ~$300
In total I estimate this project cost just South of $1,000. I could easily have spent more, and potentially less. A word of warning: even with "compressionless" (Jagwire Ripcord) brake cable housing, the front brake is pretty mushy. Powerful, but mushy. This kind of bike would benefit from hydraulic disc brakes. Also, I used every millimeter of housing in the Jagwire kit to make the run from the lever to the front caliper. I would have been very pissed if I had bought hydraulic brakes that came up short on housing length. Beware.
Update: I finally made a dedicated wheel set and bench for this bike. The bike rides very nicely, I must say. I have been able to use this bike as a primary means of transport, riding up to 30 miles a day, without a problem. It is reasonably light weight, well behaved, sturdy, and a rolling reminder that we can all make cool stuff. I am pretty sure I made an error by not reinforcing the seat tube, though, and I will correct that soon...because you can do that with bamboo. Still no kickstand, but we will what the winter brings. For now, this project is just about done.
Step 8: It Broke! But I Fixed It


After a few months of trouble free riding, I finally managed to break something. I grabbed a handful of rear brake during a low speed panic stop, the cargo bay essentially unloaded, and I heard a "crack." I hoped it was just my rear wheel slipping back under hard braking, which has happened before (this is the downside of using track-style dropouts...since I opted to go with a derailleur set up and not an internally geared hub, I would have been better served with ordinary vertical dropouts). After I readjusted the rear wheel, I discovered that the rear wheel would no longer turn freely because it was no longer in alignment with the disc brake caliper. The "crack" sound was a separation of the disc side dropout from the chainstay (pictured above). My guess is that forceful braking tries to rotate the disc dropout counterclockwise. The dropout is probably better braced at the seatstay insertion due to the shape of the dropout and the angle of construction, so the resulting force tries to pull the dropout straight out of the chainstay. Alternatively, the repetitive micro-movemement of the disc dropout caused flex in the rear triangle (thanks to the resilient and forgiving properties of the bamboo poles) which eventually caused the rigid epoxy dropout plug into the bamboo pole to separate and fail. I am no engineer, so I can only guess.
After some thought I decided I would address both possibilities and use the opportunity to fix my unsupported seat mast as well. The fixes were as follows:
1. Drive a stout steel pin through the disc side chainstay and dropout to counteract any force that tried to pull the dropout straight out of the pole (pictured). I used a section of stainless steel rod cannibalized from an SKS fender. I used the rear wheel in the dropout to leverage the cracked dropout into alignment, drilled though the chainstay and dropout (hole size should allow you to slide the pin in by hand), then I used epoxy to fix the pin in place.
2. Use CF tow and tape to a) hold the dropout against chainstay, and b) wrap the chainstay circumferentially to keep the pin/hole from splitting the end of the bamboo pole.
3. Insert a brace near the disc side caliper to minimize rear triangle flex at the dropout.
4. Add a second set of seat stays to support the seat mast and (maybe) additionally reinforce the disc dropout at the seat stay insertion. When I first built the frame, common sense pleaded with me to support the seat mast in this way, but I preferred the look of the frame without the supports. Stupid. Mixte frames have a dual seat stay arrangement for a reason.
Time will tell if these fixes will keep the disc side dropout from failing again. Time will tell if anything else will break. The seat mast support certainly made a huge difference. In any case, this episode proved that the Tiki Bike is repairable and absolutely worth repairing should something go wrong.
Step 9: Check In...Dec 2017
Hello all,
I just wanted to state for the record that the Tiki Bike is still very much alive and well. In May of 2016 I took my eyes off the road while travelling at cruising speed and rammed into a parked with the front of the bike. I did some damage, of all places, to the rear top cross bar of the cargo bucket. I did a lot more damage to my body and the car, though. So now this bike has been rigorously crash tested, and it passed. The space-frame construction and flexibility of the bamboo prevented the front of the bike from shattering or deforming, I guess. A metal bike would have been destroyed (ask me how I know this). I am impressed with this building material. I keep meaning to reinforce the damaged bamboo, but the bike works well enough despite the splintered tube. So I keep postponing the repair. The weight of the full bike minus the wooden seat for the kids in just shy of 50lbs. I am not a weight weenie, but in this case we have it all: light, strong, and cheap...take that, Keith Bontrager! Because I live in a bike friendly (term used loosely) city, I typically use the cargo bike 1-2x/week. As a result, it is fair to say that this bike has changed my life. Any cargo bike would. I can run most of my shopping errands in one large loop, even if I need to pick up 40lbs of kitty litter as well as groceries and some large pizzas. The record weight hauled in the bucket is ~220lbs (don't forget to add ~175lb of rider). The pain and time of construction is a vague memory, now. I hope to keep using this bike for many more years. Go build one, people.

Participated in the
Outside Contest

Participated in the
First Time Author Contest


