

Introduction: Designer Cardboard Photo Frames, a Mega Tutorial


I love collage in any form, be it photos or photo frames. When I was a in school I spent my two months pocket money buying all those magazine which featured the Miss World of that time Aishwarya Rai (now a famous international actress) because I wanted to make a collage of her pictures. Oh... the sweet teen age, driven by pure madness :). Since then collages have been my favorite thing to do with pictures (I did one of Arnold Schwarzenegger (I'll be back:D) too).
I have been observing a trend of photo frame collages in interior design these days and I always wanted to have photo frame collage wall in my home. I had tons of Ideas for collage photo frame walls, but what could be more better than DIYing all those frames.
I was sure of one thing that I want to give a theme to those photo frames. I had lots of cardboard in my home (I started keeping cardboard even since I created my first cardboard project, a lamp), and I realized that I can use this to create photo frames, frames that demonstrate the beauty of corrugated board. Father's day was also near by so I thought I would use these frames for my childhood photos featuring my parents, My father loved his gift :).
There are cardboard artists who beautifully create corrugated portraits, they are my inspiration for this design. This ible is a work of almost 4 weeks, I am going to show you various methods & tricks on designing with corrugated board with every possible detail I figured out while I learned and created these designer frames.
In short this ible is my research, learning & outcome about corrugated design.
I have divided this instructable into following sections to explain better. If you think this is a long ible but if you choose to read it, I promise you won't regret. However feel free to jump to any step you wish.
- Cardboard or corrugated board
- Preparing for corrugated design
- Your corrugated design apparatus
- First Frame
- Designing your first frame
- Black Beauty
- Playing with rings
- Some geometry
- Best of waste
- Randomness at design
- What's more...
This instructable is dedicated to my loving Father, my Hero.
Step 1: Cardboard or Corrugated Board. Some Fundamentals.


During my research I came across many facts about cardboard. Though cardboard is easily available and you can experiment a lot with them, however everyone may not have enormous quantity of cardboard (all collected, no purchase made, see image above) as I did. I did lot of practice to actually conclude if my research makes sense or not, which at times was very frustrating (I hope to avoid yours, with my findings :))
For cardboard design experts this information may be trivial but for the rest I hope it is useful.
Is cardboard or corrugated board the same thing?
Yes or No (notice bold font :)). According to wikipedia "Cardboard is a generic term for a heavy-duty paper of various strengths, ranging from a simple arrangement of a single thick sheet of paper to complex configurations featuring multiple corrugated and uncorrugated layers". This includes boxes for cereals, medicines, toys etc.
Whearas Corrugated board is a paper-based material consisting of a fluted corrugated sheet and one or two flat linerboards. It is widely used in the manufacture of corrugated boxes and shipping containers"
But in reality both terms are used interchangeably :)
How to identify corrugated board?
Corrugated board have layers of corrugated paper flutes. Arrangement of flutes determines the type and variety of cardboard. The image above has following explanation (Image Source:http://www.boxesunl.com/thickness-strength.html)
A) Coroplast
B) Chip Board
C) e-Flute
D) b-Flute
E) c-Flute (Standard, Commonly used)
F) Double Wall (c&b Flute) (Commonly used)
G) Triple Wall (Strongest )
How do I know if my cardboard is acid-free or not?
For some of us it means a lot if the cardboard is acid free or not, especially if its is going to be touched quite frequently or when you make something for your kids. You can use a Ph-Test pen sort of thing or check internet to find other ways to test.
How to peel off the top paper layer to reveal the corrugated layer, after all thats the whole beauty...right?
Great question.. next step is dedicated for this question only :)
Step 2: Preparing for Corrugated Design


Preparing corrugated sheets of cardboard, which at its simplest is nothing but peeling off the top layer of paper and revealing the flutes. The problem is it is not as simple as it sounds because of the following reasons:
- Different boards have different amount of glue used between layers.
- The thickness of flutes also determines the strength of glued layers.
- The quality of paper used is different in different types of boards.
- Number of walls, single, double or triple is also an important factor.
- Simple stretch and pull apart method.
- Wet & pull method.
- A sharp scissor.
- A heavy duty cutter
- A flat nose tweezer.
- A water spray bottle.
- A painting brush.
- Some fine sand paper.
Simple stretch and pull method: Try this method on a small piece of board, I usually take the flaps of the boxes. Do as follows:
- Cut a small flap of corrugated board box using scissor (works well on single and double walls).
- Notice the sides of the piece, you will notice the papers in the layers (Image 3).
- Hold the paper using your fingers and stretch gently. Start peeling a little by little in direction of flutes or parallel to flutes or diagonally, you will soon figure out that in one of the direction peeling is going smooth (Image 4,5, & 6)
- If you are able to peel it off you may get a very clean corrugated layer or with tiny paper pieces still stuck (Image 7), which can be removed later.
- If you succeed this way, then use a tweezer to remove the tiny pieces of paper (Image 8).
- Gently sand the flutes (Image 9)
- The Finished product will look like (Image 10)
- If this method does not work, you will end up something like this (Image 11), in this case you would want to try the other method.
- Also at times, you will get partial success (Image 12), bigger patches of paper will get stuck, you pull them seperately (Image 13 & 14), if you are not able to peel them, then switch to second method.
Wet and Pull method: The idea here is to get the glue between the layer moist, so that it can leave the flutes easily. I had great success with this method on stubborn boards :), all you need to do is:
- Gently mist the cardboard top layer using the water spray (Image 15).
- Run strokes using the paint brush with little pressure so that the paper becomes moist but not soggy (Image 16)
- Leave it for about a minute or so.
- Start pulling the top layer (just the way we did in method 1), notice the glue lines, how prominent they have become (Image 17)
- You should be able to pull out the whole layer, but like I said earlier sometimes the distribution of glue is not even or the paper may not be fully moist (in my case), you may have to try a few times (Image 18 & 19)
- In the end the whole layer is gone with very little paper left (Image 20).
- Use tweezer to pick the tiny pieces, wait a few minute for the flutes to dry and then you can sand.
Acid Note: If you are able to find that the board is acidic, wear rubber gloves while you peel off the wet paper. Just in case, honestly I had not tried this.
This is the only tedious part in corrugated design, but trust me it's totally worth it :)
Lets see what additional stuff we would need to put our design thoughts into corrugated art.
Step 3: Your Corrugated Design Apparatus


I am going to list all those things (Image 1 ) which I had used in creating my designs, you may not need all of them. So here are the essential ones :D
- Corrugated sheets (You know them...right? :D)
- Single or double or triple wall cardboard
- Cutting knives like Xacto Basic Knife Set (Thanks Instructables :)
- Cutting mat (Thank again Instructables :))
- Heavy duty cutter
- A sharp heavy duty paper scissor (look for specifications, it should say suitable for cutting cardboards)
- A small pointed scissor (will come in handy to cut in tiny places)
- A metal ruler
- A plastic or acrylic ruler
- White Glue like Elmer's or Fevicol.
- A pencil & pencil sharpener
- Masking tape. (a.k.a Sticky Tape)
- PATIENCE MY FRIEND :)
- Lots of drinking water to keep your brain hydrated:)
- Tea or Coffee (you need it right? :))
- Spray paint (different colors)
- Plastic Set Squares (remember school :)), will come in handy for creating parallel lines and rectangles.
- Geometrical Compass.
Besides all these tools, I had learend that it is a good idea to cut a lots of different type of stripes of corrugated sheets in advance, this definitely helps a lot while you design. Most of the designs I created required me to cut following types of strips (See Images on How to):
- Vertical Flute Stripes (Image 2)
- Horizontal Flute Stripes (Image 3)
- Diagonal Stripes (Image 4)
- Thin Stripes (Image 5)
- Thick Stripes (Usually cut on double or triple wall board) (Image 6), you would need a sharp blade and blades will loose their sharpness quickly, if you cut a whole lot of them over a period of time.
I also spray painted a few sheets to add some color to my designs (Image 7).
I had a plan in my mind to create a photo frame collage, so it made a lot of sense to prepare all these things well in advance. I can't tell you how much it helped me and how fast I created all these frames. If you choose to create just one or occasionally, you can do all this on ad-hoc basis.
By the way this is how my collection of strips looks like (Image 8)
NOTE ON CUTTING
- XActo knives are excellent for cutting straight boards when you don't need the corrugated layers, for examples, cutting the base of frame. Cutting with knives needs lots of pressure which can damage the flutes, thats why they are not suitable for cutting corrugated sheets.
- Heavy duty Scissor is good for cutting corrugated sheets into stripes, also for cutting to adjust the sizes while you decorate the frame. Scissor does not require much pressure to cut and this keeps the flutes safe.
- Heavy duty cutter is useful for cutting triple wall boards and to create thick corrugated strips. These boards can manage the pressure of cutting but you have to cut like a saw not like a knife (See image 6)
All right I think we have all gathered and prepared all the apparatus required, lets make our first designer frame.
Step 4: First Frame

In this design, I will also show you how to create a skeleton of the frame, subsequent design will follow the same approach. I created these frames keeping in mind 4x6 size photographs but its just a matter of increasing the measurements to fit other sizes.
IMPORTANT: Do not waste a single piece of board or corrugated sheets, unless damaged, you may be able to use them in other designs. corrugated design has the best use of the waste.
Double wall or triple wall boards are ideal for creating frame skeleton but some single wall e-flute type boards (like the boxes used to ship laptop) are also sturdy.
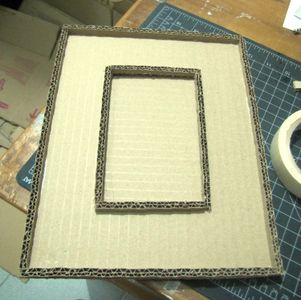
Lets create the frame skeleton:
- Take a rectangular piece of cardboard, mine was about 9x11". (Image 1). It is totally up to you how big the rectangle you want, it can be smaller or larger too, you will see this in subsequent designs.
- Smooth its edges by cutting off damaged edge (Image 2) (Use Xacto like knife)
- Cut a rectangle in the center (not necessarily) of size slightly smaller than the photo size you are planning to use the frame for. I used the size 3.75x5.75". (Image 3)
- Take a smaller piece of similar board and cut a rectangle of size 4x6 to cover the back of the photo (Image 4)
- Cut 4 thin strips of board and glue them at the back of the frame such that they form case for the photo (Image 5) and the rectangular piece created in previous step fits inside (Image 6)
- Tape the top strip with the rectangular cover such that it forms a flap (Image 7).
- Cut 4 triangular pieces of board. I used 2x2 square pieces to create them. Glue them at the back of frame as shown in Image 8, this will stabilize the frame when hung on the wall.
- Pick thick stripes (Have you cut them in advance?) and glue them to form a border around the frame and the inner rectangle. (Image 9). If they are not long enough, don't worry, you can just glue them in line and they will look just fine. Notice I also covered the edges with masking tape. before I glued the supports.
- Notice the gap between the outer and inner border, for this frame it was about 2.5"
Lets decorate this frame :)
Step 5: Designing the First Frame


- Draw 1" wide lines on a corrugated sheet (Image 2) to cut horizontal flutes stripes (Image 3).
- I decided to create squares of the stripes by cutting them after every 3rd flute (Image 4).
- Create several such squares(Image 5).
- Glue a thick strip parallel to the border such that the tiny square can fit between the two (Image 6).
- Glue one square and then glue a small piece of thick strip. Alternate the squares to glue in horizontal and vertical flutes (Image 7)
- Repeat 4 & 5 for remaining 3 sides, the frame should look like Image 7. Adjust the width of squares for the last square in row if it does not fit in securely.
- Now measure the width of the gap between the inner border & the thick strip border for squares.
- As per your measurements, cut 2 horizontal stripes (Image 8) for side gaps and 2 vertical stripes for the gap near top and bottom. Glue them
- The final product should look like Image 9.
Don't forget to use your imagination to give that special touch of yours in every design.
Lets add some color in our design in the next step :)
Step 6: Black Beauty


I am moving on with one design after another in exactly the same order as I made them, you will notice that each design gets better and have more fine looks :). This design looks complex but its very simple. Lets make it (Please refer image notes too for finer details)
- Get your frame ready like the first one.
- Spray paint a few sheets, lets say you spray painted a sheet close to size A4 with black spray paint.
- Cut 4 corrugated triangles (about 2" each side), cut the two joints of the triangle to match 1/2" width and glue them on four corners of the frame (Image 1)
- Cut 2 horizontal stripes of about 1/2" (Image 2, I already have many) and glue them on top and bottom of frame (Image 3)
- Similarly cut two vertical stripes and glue them on the side border to complete the black border (Image 4).
- Glue the border of inner rectangle with 1/4" wide thin stripes (Image 4).
- Cut several horizontal stripes of plain corrugated sheets of about 1/2" wide .
- Cut several horizontal thin stripes of black corrugated sheets of about 1/4" wide.
- Start from one corner of the frame, glue a horizontal strip diagonally (Note: We are not using diagonal stripes, just regular horizontal stripes). (Image 4). Cut off access strip diagonally from inner border using a scissor.
- Next to plain stripe, glue the thin black strip (Image 5). Cut off access strip diagonally from inner border.
- Continue gluing the strips in this fashion till you cover the entire frame.
- The final product should look like Image 6
Let us also take a break from squares & rectangles :).
Step 7: Playing With Rings


This design is only using thin stripes so cut several in advance. Also, notice that instead of a rectangular space in the center, I cut a oval to give it a vintage look. All right Lets begin
- Create a frame (in this design I used board from a shipment box of laptop).
- To create an oval cut in the center, I create an oval shape in Microsoft Powerpoint, printed it on a paper, cut the paper oval and glued it in the center of the frame (Image 2).
- Then cut it using one of the Xacto knives for fine cutting(Image 3).
- I glued thin stripes to the inner edges of the oval (Image 4).
- I also glued the thin strips to form a border of the frame (Image 5)
- I randomly cut small pieces of the thin stripes of various length and glued their ends to form several rings (Image 6)
- And then i just glued them in the pattern shown in (Image 7), off course I had to make few additional rings to fill in the gaps.
Can you imagine the possibilities :)?
Step 8: Some Geometry


Also I wanted to add some glow to this design so I used gold spray painted corrugated sheets :).
Lets put some geometry into this design, learn how to create a hexagon and a consequently a cool frame. Time to test your geometry skills :D
- Spray paint a corrugated sheet using gold color.
- Create a square frame (mine was 8x8") this time and draw a hexagon (with side 2.5") in the center of the frame (Image 1 & 2).
- For detailed instructions on how to draw a hexagon, use this link (this is a very good site for refreshing school geometry stuff ;-))
- Cut the hexagon (Image 3)
- Cut several thin stripes of gold corrugated sheet (Image 4).
- Cut several diagonal strips of plain corrugated sheet (Image 5)
- Create the border of the frame and the hexagon using thin gold strips (Image 6)
- Glue the first line of stripes as shown in Image 7.
- Keep gluing the alternating plain and gold strips parallel to the side of the hexagon until no space is left (Image 8).
- The Final Product should look like Image 9.
Let's move on to the next design.
Step 9: Best of Waste


This design is set of rectangles of random sizes arranged to form a tiled mosaic. There are no special instructions for this design, use your imagination to create this mosaic. I did it as follows
- Create a bordered frame like the first frame design.
- You would needs lots of thin strips which will act as outline of rectangles.
- Start gluing a small rectangle from one corner.
- Glue thin strips to form a border around rectangle.
- Keep gluing rectangles next to another, attach thin stripes border and cut them to fit in the space.
Step 10: Randomness at Design


You know, all these designs looks so complex once they are complete, but they are really easy to make. Lets see how you can make this design.
- Create a rectangular frame.
- Create lots of thing stripes.
- I wanted to give frame border a more prominent yet elegant look this time, so I cut 1/2" wide stripes of thin but sturdy board (the one from the laptop shipment) (Image 1).
- I glued these strips to form a border of the frame and the rectangle inside. (Image 2).
- Then I cut few diagonal strips 1/2" wide (Image 3 )and glued them on top of the border (Image 4).
- Then I cut one triangle of random size and glued it in one corner, I also glued the thin strip to form an outline of the triangle. Then I just measure one side of the triangle not by a ruler but by placing a small piece of corrugated sheet next to it and cutting it then and there (Image 5).
- I also used several triangular pieces from the scrap collection.
- I just kept on cutting and gluing the triangle by only making sure that next triangle has a side parallel to the one that is already glued. and this resulted the final product (Image 6)
- Just keep cutting the triangles, trust me they will fine their place :).
What next?? Lets see..
Step 11: What's More
Phewww.. my longest ible I had written so far. I congratulate and thank you if you have it read this far :).
For me corrugated design is an amazing beginning, I still have a loads of design in my mind which I wanted to include in this ible, but sadly I ran out of time. After making these many frames I can confidently conclude that I have covered all the basic design aspects of corrugated design. Yet I feel that there are more discoveries to be made and many more things to learn.
I will continue to research & experiment more efficient ways of peeling off the top layer. If you come across any better method, please do share in the comments below, I would really appreciate that.
I wish you put your imagination to work and create even more awesome corrugated design. I hope this ible should be able to help you.
A note on those colored photos:
If you are thinking that I might have photoshoped or did some editing to those photos of my parents, it is not like that. All those pictures were black & white and I just printed them on bright colored paper. I wanted to give some color to those uni-colored frames and I think it worked out pretty well.
A note on those quotes:
Since I dedicated this ible to my father, I designed those quotes in powerpoint and printed them on plain white paper. I want to showcase my frames using quotes about father.
A note on hanging mechanism:
These frames are so light weighted that I was not very specific about making hanging mechanism, I just used double sides tapes and a thread to make a loop which is used to hang them on a nail.
You can also use double-sided tape, just make sure you don't stick the tape directly on the frame, instead put a layer of cello tape first. Also use tiny pieces of double sided tape to stick to walls. When you want to change the photo, you don't want to tear the board off while un-mounting it.
You can also glue two triple walled board strips in as inverted V shape at the back of the frame to create a hook, but in this case you have to make sure that the corner triangles are also made using triple walled board.
Beyond Photos:
You have seen how I have used quotes, give your imagination a ride and you will have tons of ideas for example a mirror :) or may be a clock :)
------------------------------------------------------------------------------------------------------------------------------------------------------------------------
Thank you for your time & patience to visit & read this ible. Please do share your feedback, comments, suggestions in the comments section below. If you have questions, I would love to answer them. If you need help, send me a message.
Lastly If you think this ible deserves a vote, please vote I would really appreciate it.

Runner Up in the
Craft Contest

First Prize in the
Father's Day Contest

Participated in the
Instructables Green Design Contest

Participated in the
Epilog Challenge V


