

Introduction: Developing Your Electronics/Science WorkSpace


So, I'm really into science and technology. As of late, my focus has mostly been hobby electronics, but I am interested in biology, chemistry, etc. With hobby electronics, I, of course, need a space for building, some storage compartments for all my components, some essential equipment, etc. Over the last year or so, as my hobby has become more and more consuming, I have amassed a good amount of components and tools of the like. I'm really proud of my DIY space so I wanted to share my little workstation and also give some tips on creating your own. My station happens to be located in my bedroom (which is very convenient actually), but this can be anywhere for you.
Interesting fact, I also built a lot of stuff for work in my room. Just goes to show that you can get a lot done even in the most modest workshop. All you need is a little ingenuity. The second prototype for my senior design project, was built in my little workshop. It was an impedance analyzer for a brain-on-a-chip device which is an in vitro model of the blood-brain barrier that my lab is working on. It's really cool, so check it out on the VIIBRE website. The DIY Arduino Pulse Sensor which I built for the undergraduate class that I am TA-ing for was built in my little workshop as well.
Anyways. Enjoy!
Step 1: You Need a Good Bench

1. Bench area
2. Laptop
3. External monitor
4. Desk lamp
If you want to get into hobby electronics, you need a good spot where you can pour out all your components and get to work. I bought this sleek black desk from Walmart as a part of a set. I think the set in total cost $70, so the desk itself is about $40 or so. Notice we have some room for a laptop, a little space to do some tinkering, an external monitor for the laptop (because two screens is much better than one), and a desk lamp to give us some illumination.
Step 2: Basic Components


1. Jumper wire
2. LEDs
You will also notice a storage compartment on the desk as well. This storage compartment houses some jumper wires. Jumper wires are useful for making connections between different parts of your circuit without having to cut wire. Also included are some LEDs of various colors (visible light, IR). LEDs end up finding themselves into most electronics projects typically as some sort of indicator of an event occurring in your circuit.
Step 3: Passive Electrical Components: Resistors, Capacitors, Etc.

1. Resistors
2. Capacitors
3. Inductors, etc.
No circuit exists without these guys. These are fundamental building blocks of every circuit. They control some sort of current flow to various parts of your circuit. You want to get yourself a ton of these and in a variety of values at that. I got all my resistors form an electronics lab at school. They were just going to throw them away--seriously. At the end of the semester, they toss all the little components and buy new ones because it would take too long to reorganize everything; they are super cheap to buy anyway. So, I volunteered to take them off their hands. You will notice that I exemplify the quote, "One man's trash is another man's treasure." If you don't get luck as I did, again these things are super cheap. I found a nice kit on Amazon. There are tons of options like this one around.There are ones for capacitors (this is the one I have) and inductors too.
Notice the organization of these guys. You want to have some sort of container that keeps these guys organized for you. As you can see, they are small so they can get lost easily. Plus, you don't want to have to keep reading the code every time to determine what the values are.
Step 4: More Components...the Active Guys


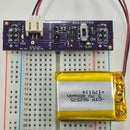
1. Microcontrollers
2. Op amps
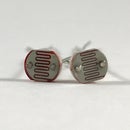
3. Sensors
4. Motors
I have tried to divide my drawers up into categories, but I eventually ran out of space so everything is a little munched together. In one drawer, you can see a few Arduino stuff and a Raspberry Pi. You want to have a microcontroller of some sort, maybe a specific one of choice. For me, it's the Arduino. They are easy to use and there is a ton of online help if I ever get stuck on something. As you can see, I have some Arduino shields, a programming head for the Arduino Pro Mini, some mini breadboards, and a ton of other stuff. You will find yourself purchasing a few Arduino add-ons for your projects.
In the next drawer comes the mother of all electronic circuits, the op amp. Notice they are either in anti-static foam or in anti-static tubes. Op amps and other active components can be damaged by static so keeping them in some sort of protective layer is a smart move. You may want to line all your drawers in some anti-static foam like this one. I plan on doing this at some point, but at the moment I'm a little low on cash. You can see why...
In addition to the op amps and Arduinos there are a ton of sensors and motors. I have a few accelerometers and piezos in stock along with other things. Sensors allow you to interact with your environment. Sensors are the connection between your microcontroller and the real world. The technical term is "transducer." You are going to need a few different types of tranducers so that your projects can come to life. Motors allow you to create some sort of mechanical action. Pretty handy when you want to do work on your environment as opposed to sensing what your environment is doing.
Step 5: Basic Instruments and Tools


1. Oscilloscope
2. Bench Top Power Supply
3. Function Generator
4. Multimeter
5. Probes: Oscilloscope Probes, Alligator Clips, Banana Clips, BNC cables, etc.
There are a few essential instruments you will find yourself using an any electronics project. An oscilloscope is one of these. An oscilloscope allows you to view the electrical signal being conducted through your circuit. This is crucial for developing and debugging, so you want to get yourself a workable scope. The one I have was purchased from one of my TA's in college. Lol. I was in the market for one and he didn't use his anymore. The scope is pretty old, but very functional. Has the basic operations and can take 4 inputs. I usually use two at a time: one for visualizing the input signal and one for visualizing the output. The other two inputs for the scope come in handy when looking at intermediate signals. Oscilloscopes can run for a pretty price, but you can certainly find some for cheap on eBay. Mine was about $120 and I received it and a function generator. You can also turn your Arduino into an oscilloscope. There are some tutorials for that online. I don't recommend that personally because of speed issues. Alternatively, you can get some nice handheld scopes on the cheap on Amazon or Sparkfun if you don't want one of these clunkers that I have.
Above the scope, you can see a DC power supply. All your projects will need to get power from somewhere and you want a good regulated power supply. I recommend a dual power supply. A lot of op amps need a bipolar supply so getting a dual regulated supply is crucial. The one I have was fairly pricey, but I am very satisfied with it. You can decide for yourself. Here is the link.
Also, a function generator can be handy. A function generator is used to produce signals. Mine can produce a few different waveforms (sine, triangle, square). Your electronics project is going to need some sort of signal input and sometimes it's handy to create a specific signal so you can test your circuit.
Lastly, we have the digital multimeter. these guys are ubiquitous to any electronics workstation. They allow you to read voltages, resistance, etc. Some can get even fancier and operate pretty much like oscilloscopes. But it depends on your need. You will probably just need to spend $20 and get a decent one from Lowe's or something. Mine was actually $6. It is definitely at the low end in terms of functionality (and obviously cost), but it gets the job done for me.
Oh you are going to need probes of some sort for these guys. Some alligators clips, oscilloscope probes, etc. You can find these anywhere online. I got my stuff from Amazon.com and Newark.com.
Step 6: Location
Oh by the way, all my major components are located withing arm's length of my work bench. My jumper wire is right on my desk. My components drawer with op amps, Arduinos, etc. is right behind me, my oscilloscope, etc. are right below me. Location is everything. You don't want to have to get up and walk over to somewhere else when you need to get something.
Step 7: A Second Work Bench


1. Laptop computer, external monitor, lamp
2. Soldering Iron
3. Hot glue gun
Okay, this may not be critical, but I really like it. I have a second work bench, that is equipped with another laptop and another external monitor. Trust me, this is not overkill. On this bench I keep my soldering iron and my hot glue gun. You're going to need a soldering iron whenever you decide to put together a complete project instead of putting it on a breadboard and then ripping it apart when you are done to start a new project. Hot glue is great for sticking things together--of course. But actually, glue can come in handy when you need to keep stuff together or from falling apart. Glue is an insulator so you can use it to seal up your projects without worrying about shorting anything. Electrical tape is used for this too. Along with the soldering iron, you will need some solder, flux, solder remover, solder sucker and sponge. And for the hot glue gun, you will need some glue sticks of course. I keep all my stuff a some small drawer unit right next to the work bench.
The extra work bench will also come in handy if you someone working on a project with you, or if you just need a change of scenery (which in this case is my room and tv from a different angle :) --- yea, not overkill at all).
Step 8: Decoration


1. Drawings, paintings, etc.
You need a little decoration in your work space to brighten the place up a bit. I have a few drawings that my little sister made for me and some that I drew myself. I even bought a piece of artwork from a homeless man I met a few months ago---no joke. It's the one with the old car and barn. It's pretty nice.
Or Maybe you want to display a few of your most proud accomplishments. For me, I have one of my research posters above my bed. I also have my college and high school diplomas on display as well. I have to do something with them right?
Step 9: Entertainment

1. Tv
2. PlayStation 3
3. Netflix, Amazon Instant Video, YouTube
4. Nintendo DS
As you are working hard on your projects, you may find that you need to take a break every so often. Or maybe you like watching a good tv show while you are working. This is where the entertainment section comes in. Tv hooked up to the PS3 for a little gaming or some Netflix. Whatever works for you, or that you have a subscription for already. My personal favorites are crime and police dramas: Criminal Minds, Law and Order, etc.
Step 10: Calling It a Night
After a long day's work. You need to rest. This is the benefit of having your workstation right in your room. You can slip into and out of work whenever you want. Trust me, all this thinking can make you tired. And if you are like me and tend to get up really earlier (3 a.m.) you can quickly go right back to work---and then take a break again because it's actually way too early for you to be up, but you can't help it because you are an extreme early bird. (Sigh) The struggles...
Step 11: Keep Building Your Work Area
After all these additions to the work area, you will find that you need to add some more tools to your shed or parts to your inventory. This will happen. So, find your favorite electronics distributors, mine are: DigiKey.com, Mouser.com, Newark.com, Sparkfun.com, Adafruit.com, and Amazon.com and start searching for some more cool stuff.
In addition to electronics stuff, I am looking into buying a microscope soon because I want to do some biology projects. Check out this guy.
Step 12: Display Your Work


If you are viewing this Instructable, you are probably aware of websites like this one. There are other sites like Hackday.io that allow you to showcase your work, take advantage of those. I think the booming DIY community will continue to bring us some cool, inventive, and creative projects and maybe shape how big businesses commercialize their projects.

Participated in the
Formlabs Contest


