

Introduction: Doorbell to Arduino 'Interface'


Hi Everybody
In my first Instructable I want to show you how to build an cheap and easy Doorbell to Arduino 'Interface' so you can let your Arduinoproject get triggered through it or simply use your Arduino as a bell.
Almost endless possibilities :D
Step 1: What You Need...

Here's what you'll need, its not that much...^^
First of all you need the 'heart' of the interface, the relay.
-My Doorbell has 12V DC so I used a FTR F1CA012V which is a 'Double Pole Single Throw'-relay but you can use 'Normally-open' or 'Change-over'-relays as well.
You also need:
1x 100k Ohm Resistor
1x small 3 port luster terminal
some bell wire
about 20cm control wire cable
shrink tubes to isolate the contacts and protect the 'Interface'
soldering tools
Thats it!
Step 2: Lets Build...


Ok, lets Build the Interface.
- solder the bell wire to the relay coil connections and isolate the contacts with shrink tube
- solder one single control wire (red) to the relay common terminal and isolate the contact with shrink tube
- prepare an other control wire (black), take the resistor and solder it to one end
- solder a third control wire (yellow) and the black wire with the pull up resistor to the relay 'normally-open' terminal, take some shrink tube and isolate the contact all over the resistor
- cut off a ~10-14cm long piece from the control wire cable isolation, pull your 3 control wires through it and insert them into the luster terminal
- at last do a big piece shrink tube and shrink in the whole relay with the cables to protect them from getting broken.
Here it is! Your very own Doorbell to Arduino 'interface'
... go on to see how to install and use it...
Step 3: How to Install and Use It...

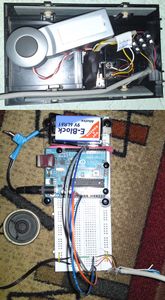
To install your Interface you have to connect it with the bell wire to your Doorbell power supply and through the luster terminal with your Arduino.
As you can see, I used my old bell case to store the interface in it.
How to use:
In fact, the Interface isn't much different than a pushbutton.
If someone pushs the Doorbell, the relay switchs and the Interface sends an (HIGH)-signal to your Arduino I/O pin.
There are 3 wires to connect to your Arduino, one from the relay common terminal to the Arduino 5V supply and two from the relay 'N-o' terminal, one with the pull up resistor to the Arduino GND and one to an I/O port of your choise.
No more, no less :)
---next---> Test it!
Step 4: Teh Final Test! (~.*) C[|
To test the whole setup I used this outstanding piece from of code Nyan Cat on Arduino from geo bruce with just some little changes.
(edited the code to use the interface at pin 8 as starting trigger)
And?!..........
........nyan nyan nyan nyan nyan nyan nyan nyan nyan nyan nyan nyan nyan nyan nyan nyan nyan nyan nyan nyan nyan nyan nyan nyan nyan nyan nyan nyan nyan nyan nyan nyan nyan nyan nyan nyan nyan nyan nyan nyan nyan nyan nyan nyan nyan nyan nyan nyan nyan nyan nyan nyan nyan nyan nyan nyan nyan nyan nyan nyan nyan nyan nyan nyan nyan nyan nyan nyan nyan nyan nyan nyan nyan nyan nyan nyan nyan nyan nyan nyan nyan nyan nyan nyan nyan nyan nyan nyan nyan nyan nyan nyan nyan nyan nyan nyan nyan nyan nyan nyan nyan nyan nyan nyan nyan nyan nyan nyan nyan nyan nyan nyan..... :D :3
Attachments

Step 5: ...what Next?!

...here is a little sneaky preview :3


