

Introduction: Easter Egg Box


I was asked to make an eternity ring a little while ago for a friend who is pregnant.
Easter has been on my mind and I thought a wooden egg box would be a fantastic thing to present the ring in.
I have been saving some spalted alder for the perfect project and I think this one might be the one.
Step 1: Putting Between Centres


I found the center point to the wood by drawing a line from each side to form an X. the center of the X was the middle part of the wood. I indented this point with a metal spike which allowed me to locate the egg more easily on the lathe. The divot located with the steb and live centers.
Step 2: 2 Spigots Are Better Than One


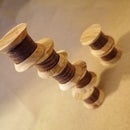
I turned the wood to round and created a chucking point on each end. (This is a point where the chuck can grab onto the wood)
I parted the wood leaving room for the bottom of the egg on one side.
Step 3: An Internal Shelf


I started to shape the bottom of the egg and created a place for the top part of the box to locate when closed.. like an internal shelf.
Step 4: An Egg Shape Is Born


I chucked up the longer peace of wood for the pointy end of the egg and created the mail part of the box or the pointy internal ring which will help the box to stay closed. This required a few tries to make sure I got the best possible fit.
Once my box fir together I brought the tail stock to support the two halves and started to shape the outside of the egg box.
I left enough wood to support each side for hollowing.
Step 5: The Sound of Hollow


Using a bowl gouge and a small skew I hollowed each half of the egg box.
Its interesting to note the tone difference of the wood when the walls become thin. I know some turners who create incredibly delicate work who use the sound of the wood as much as any other method.
Step 6: Parting Is Sweet Sorrow


Part off the two halves..
Step 7: Carve Sand and Finnish


I used a chisel sympathetically with the curve I had turned to take off the remaining wood from parting.
I then worked through grits of sand paper from low numbers to 1000 grit and finished with CA glue before burnishing it with burnishing cream to get a really awesome shine.
I hope you enjoyed this instructable.
Stay tuned for more interesting makes.. I have a few fun things coming up and I plan to share the fun.
Also you might not have realized... theirs a video on the 1st step which shows you how i made it. Hope you like it.

First Prize in the
Egg Contest 2016

Second Prize in the
Make a Box Contest

Participated in the
Full Spectrum Laser Contest 2016


