

Introduction: Easy Bow-tie


Follow these instructions for a quick and easy bow tie. The finished product can then be attached to just about anything you can think of!
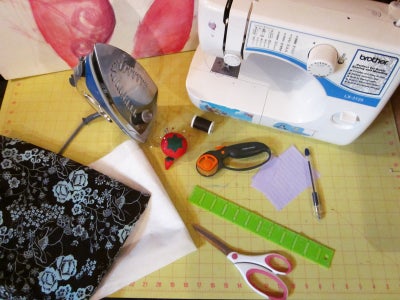
To get started you will need:
- Fabric, 1 yard will be way more than enough.
- *Fusible interfacing, again 1 yard is way more than enough.
- Color-coordinated thread
- Sewing machine
- Cutting tool, such as a circle cutter or scissors
- Pins
- Paper and pen to draw your pattern
*Interfacing is usually available at any store in which you can purchase fabric. It varies in type and thickness, the type used in this tutorial is a fusible (it can be ironed on) type and relatively thin. The interfacing is used to provide extra support and keeps the bow from being floppy or saggy.
Step 1: Make Your Pattern.

1. Grab your paper and pend to sketch out a quick pattern. You will want to make them with approximately the same dimensions as in the picture (the large piece is 5 x 3.5 inches and the small piece is 3.5 x 1.5 inches) in order to get the same bow shape. After making your first bow you can modify the pattern to make variation in the size and shape of your bows!
2. Use your scissors to cut your pattern pieces out.
Step 2: Cut Out Your Fabric Pieces.


3. Pin your large pattern to your fabric and cut your pieces with a circle cutter or pair of scissors, cut two pieces out.
4. Pin small pattern to fabric and cut one piece.
5. Pin large pattern to interfacing and cut one piece; once you have cut this out trim a little off the edges to make it slightly smaller than the large fabric pieces.
You will end up with four pieces total!
Step 3: Iron

6. Take one of the large fabric pieces and place it so the wrong side is facing up towards you. Place the piece of fusible interfacing in the center and iron. The interfacing should stick to the fabric.
7. Iron all pieces flat.
Step 4: Sew Main Bow Piece


8. Take the two large pieces and place them with the right sides of the fabric together. I don't normally have to pin them together, but if you prefer to do so then pin away!
9. Starting off center on one of the two longer sides begin sewing all the way around the outer edge with a small seam allowance. When you come back around to the starting side stop sewing before you reach your beginning point. The goal is to leave a small open area for turning your bow inside out. The finished example of this can be seen in the last two pictures, make sure you check them out to see clearly what I mean.
Step 5: Finishing Main Bow Piece


10. Carefully snip the corners of your finished main piece. Don't cut too close to the threading or you'll end up with a hole, just close enough so when the bow is flipped inside out you will have nice, crisp corners.
11. Turn that rectangle inside out. I used a pen to run along the edges and poke into the corners to make sure everything fully turned out.
12. Iron the rectangle to make sure everything is nice and smooth. Make sure you carefully fold the unsewn opening inwards and iron it crisp. You can choose to do a few quick stitches by hand to close this gap although I usually leave it open because the bow centerpiece covers it nicely.
(Optional Step): You can choose to leave this rectangle as is, or you can do a finishing stitch around the outer edge. It's simply an extra little detail and isn't necessary for the overall structure of the bowtie. If you choose to do the finishing edge simply start in one corner and carefully stitch all the way around until you reach your starting point again.
Step 6: Sewing and Finishing Small Bow Piece


13. Next, take the small rectangle of fabric. Fold this in half and carefully stitch down the edge. Make sure you don't stitch too far in otherwise it will become impossible to turn out. The wider this piece is the easier it will be to turn right side out!
14. Turn the newly formed tube inside out.
15. At this point I wrap this little piece of fabric around the larger rectangle (scrunched in the center to simulate the finished bow shape) to see just how long I need to make the center piece. Once you have determined the appropriate length, fold the fabric over at the determined appropriate point (length-wise). Make sure you fold so the first seam that was sewn on this piece is facing out! Sew the edges together.
16. Trim off the excess fabric and flip the small tube inside out.
Step 7: Putting the Pieces Together


17. Now scrunch or fold one end of the main bow body and slip the center piece on.
18. Move the center to the appropriate place and play around a bit to get the bow shaped to your liking. Congratulations, you've completed your bow!
Step 8: Enjoy!

You can now use your bows for just about anything you can think of: hair bows, brooch, decoration on anything, necklace, dog-wear. :)
All photos taken by me. If you have any questions or suggestions please leave me a comment!


